
Calibration
For the first time, you need to map out the calibration points according to the plan that you get with TestMesh.It is very important to map out correctly. We set up landmarks on the map at what distance the first point is located, there may be one or two depending on the location.
The second point is always placed at the discretion of the consumer, but it must correspond to the direction on the plan, so that the content is aligned, the distance between the points should not be less than a meter, the more you can afford, the better.
As an example, in our location, we put them at a distance of 3 meters from each other. A large distance is used to avoid out of sync for players at large distances from the calibration center, especially in the corners of your location.
So how does our content calibrate across locations?
There are three calibration options available:
1. Single-point calibration (we don't recommend using it at locations over 100 square meters. meters, large discrepancy error):
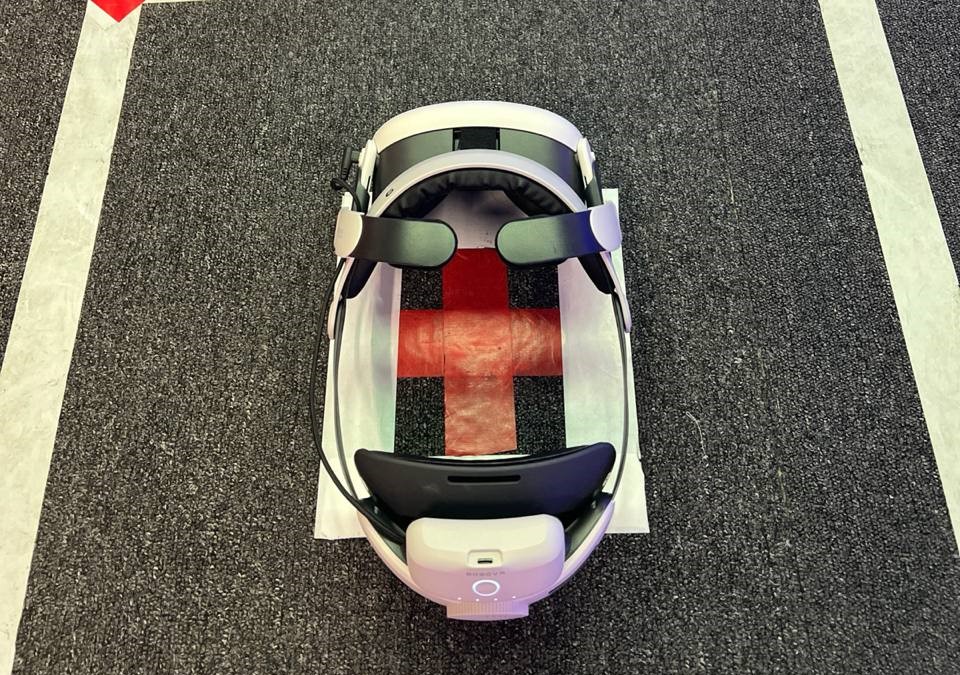
After connecting to the game, you place the helmet on the floor so that the cameras match the calibration direction. After that, you need to simultaneously press the keys on the right controller A + B, you will feel a slight vibration and your character will not become transparent.
2. Two-point calibration:
The calibration mechanics are very similar, but now you don't need to put your helmet on the floor to calibrate. you keep the helmet on your head. Your task is to touch the floor at the first calibration point with the controller and simultaneously press the A + B keys on the right controller, you will feel a vibration response - the first calibration point has been triggered.
The second step is to walk the nth distance in the calibration direction and repeat the first step again (touch the floor at the second calibration point with the controller and simultaneously press the A + B keys on the right controller, you will feel a vibration response - the first calibration point has been triggered).
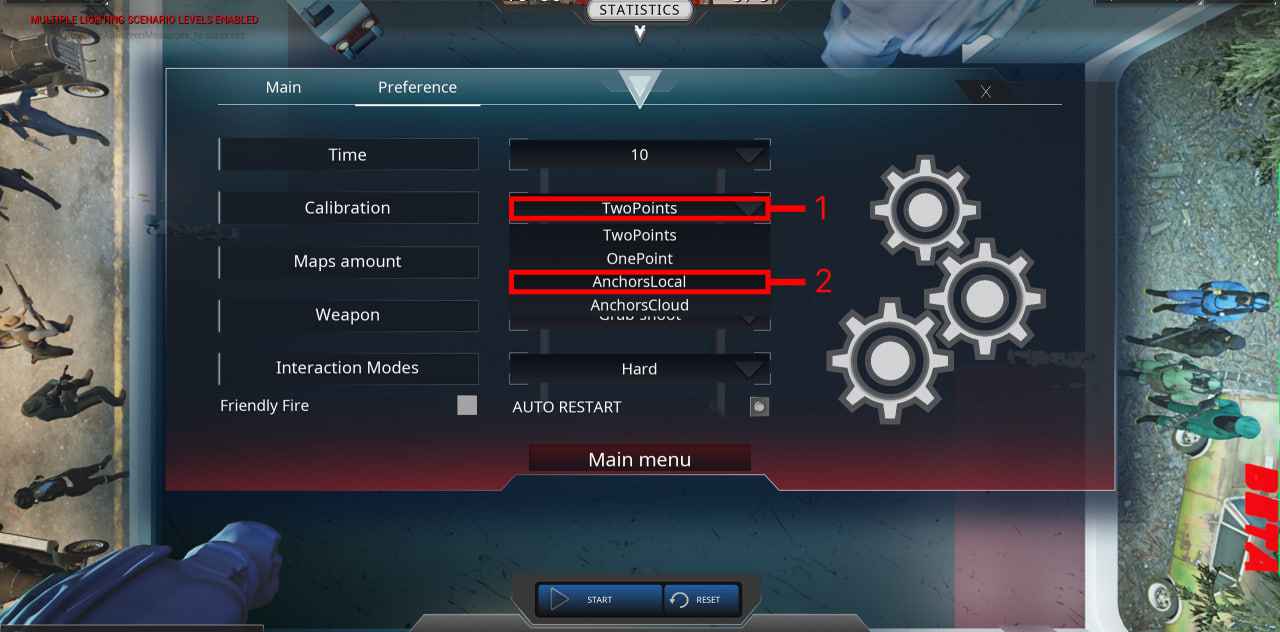
With the release of version 1.2.6, we've added a new two-point calibration tool that allows you to return the calibration without removing the helmet from the player. (Currently only works on Meta helmets) This tool consists of calibration using two anchors that are placed at the calibration points and fix the physical space for the helmet. To enable this feature in the settings, select the AnchorLocal calibration method. You will learn more in the game management section
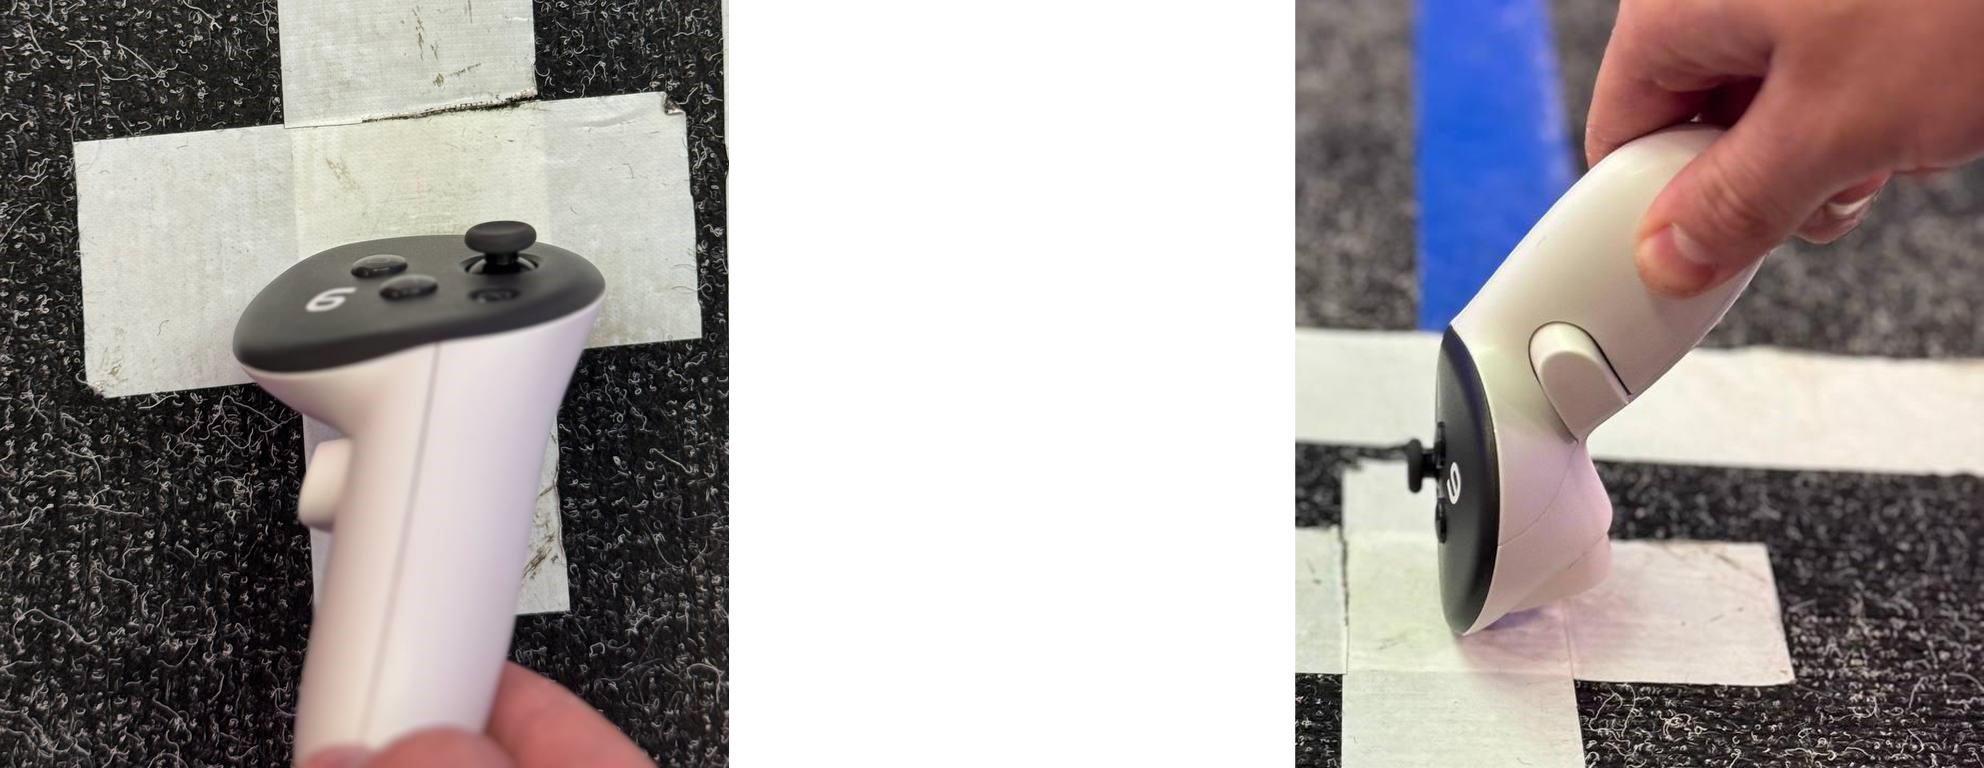
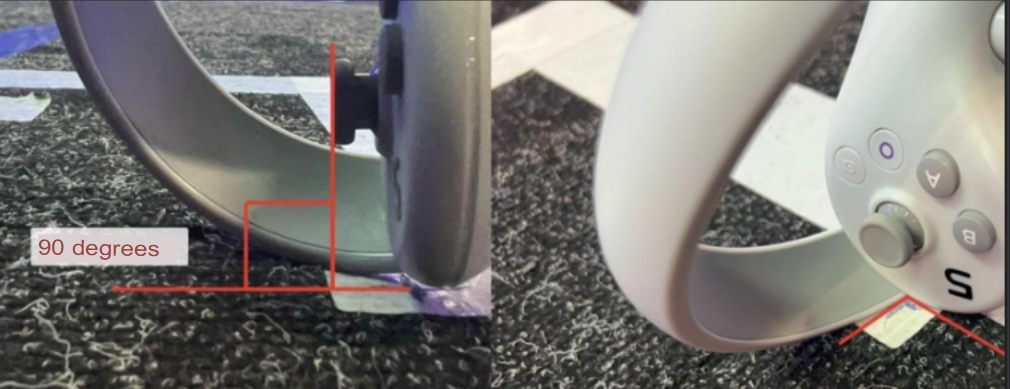
Recommended controller positions for calibration are shown below:
Meta Quest 3/3s
Pico 4/4pro
If you notice discrepancies in the virtual and physical space during testing, you need to send them in the format: In what area is the discrepancy, by how much and in which direction. It is important to do all this relatively for a fee, so that it is easier to navigate.
3. Anchor calibration
Meta recommendation
Important information
Limitations. If it doesn't work, first check all these items.
-
This instruction applies only to calibration via Anchors Local.
-
Anchors will only be installed if the helmet is logged in to the Meta account!
- Availability of a VPN on the Aren router.
-
This type of calibration requires two calibration points.
-
This type of calibration only works if Anchors Local is selected in the admin menu.

Recommendations for use
- The anchors should be reinstalled as needed, as minor errors may accumulate over a long period of operation, and the anchors may disappear (approximately once every 1-2 days). You don't need to calibrate before each game.
- This method does not require leaving the helmet on: anchors remain saved when both helmets and the server are restarted.
- We recommend updating your helmet to the latest firmware version 72.
- The better the lighting on the location, the more accurate the anchors will become.
Pico recommendation
Important information
Limitations. If it doesn't work, first check all these items.
- This instruction applies only to calibration via Anchors Local.
- This type of calibration requires two calibration points.
- This type of calibration only works if Anchors Local is selected in the admin menu.

Recommendations for use
- Unlike Meta, anchors on Pico are held much less
- You should reset anchors as needed.
- Anchors on Pico are PRACTICALLY NOT SAVED when devices are turned off and in poor light conditions
- On older Pico and Pico 4 Business models, data about the surrounding area may be lost from time to time (especially in large areas). In such cases,:
-
If you put on a helmet and find yourself in transparency mode, you need to walk around the area to allow the helmet to restore space.
-
If you were walking around, but you were prompted to outline the game zone and there is no "back" button, follow the instructions in the helmet to outline the zone.
-
When delineating the game area, the old anchors are lost
If you have selected a build with the ability to calibrate by anchors, this will happen at the start of the app, regardless of the chosen calibration method, which may slow down the preparation for the game. There is no way around this.
-
Installing local anchors
For correct operation, local anchors must be placed on each helmet.
Installation process:
-
Setting Anchors Local in the admin panel
-
We enter the game from the helmet on which we want to put anchors.
-
Anchoring your two calibration points. To create an anchor, press the same buttons as for normal calibration: A + B.
really important:
- The first point is strictly the controller on the floor, strictly at your calibration point.
- The second point is strictly in your second point, strictly on the floor.
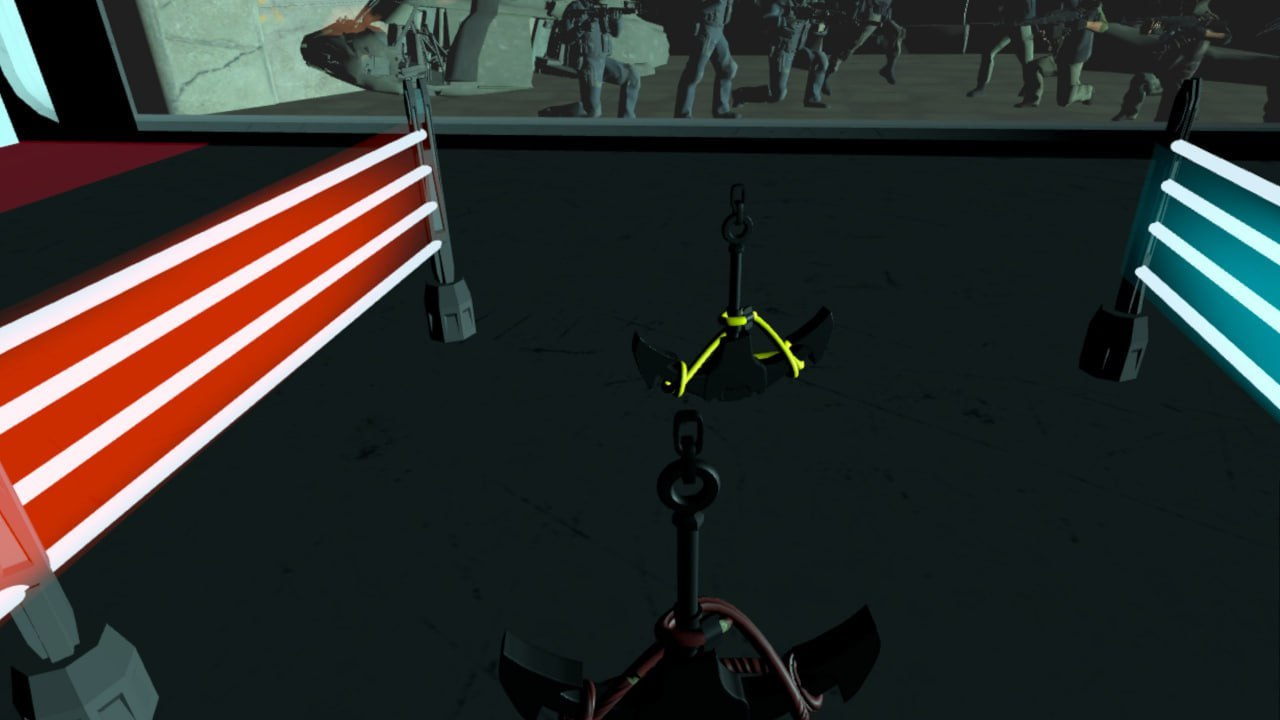
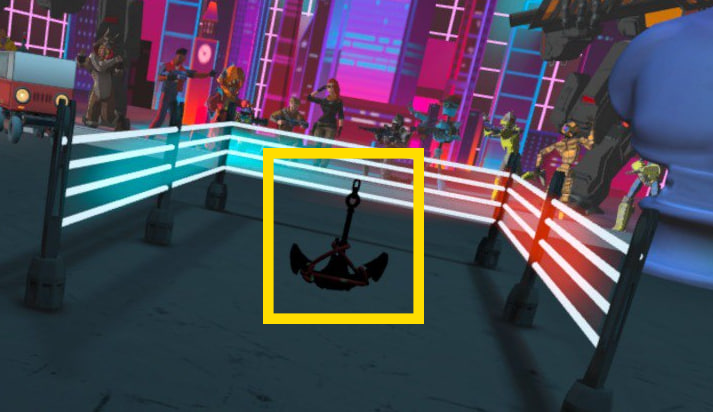
3. When the anchor is successfully installed, it becomes visible.
After the second successfully created anchor, you will be calibrated, and the anchors will become invisible.


Resetting an incorrect anchor
If the anchor is set incorrectly:
- Complete the installation of the remaining anchors (if it was the first anchor) to exit the calibration mode (stop being semi-transparent)
- Reset your state in the admin panel
3. Reinstalling both anchors again
When you reinstall anchors, the old ones will only be deleted when the reinstallation is complete. Don't pay any attention to them.
How do I see anchors?
- Reset helmet status in the admin panel
- Put on a helmet, make sure that the player is in calibration mode (semi-transparent)
- The anchors should become visible while you are in calibration mode.
Launching the game
Once the local anchors on all helmets are created, the process of launching each game will proceed as follows::
- Connecting as an administrator
- We set Anchors Local as the calibration type in the admin panel
- Entering the game from the players ' helmets
- If it doesn't calibrate the player within 6 seconds of entering, it means that there are no local anchors on the helmet. You need to install them (see "Installing local anchors")
- If there are local anchors on the helmet, the player is calibrated automatically
Player Calibration
Calibration when entering the game
On helmets that have local anchors, players will be automatically calibrated when entering the game (5 seconds after entering the game)
Login calibration failed
If players log in to the game and don'T calibrate after 5 seconds, it means that there are NO ANCHORS INSTALLED on their helmets.
In this case, they must be re-installed.
Calibration failed during the game
If one player's calibration fails:
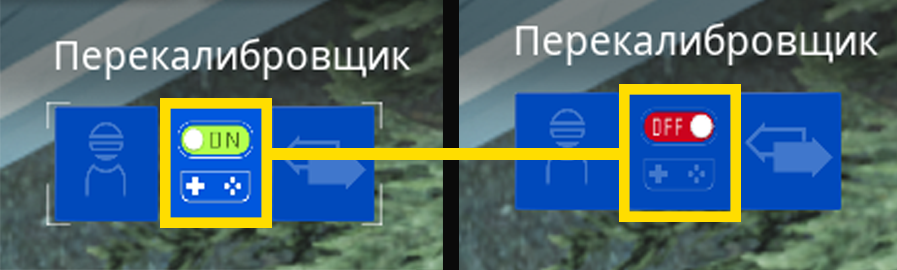
- We remove the state for this player

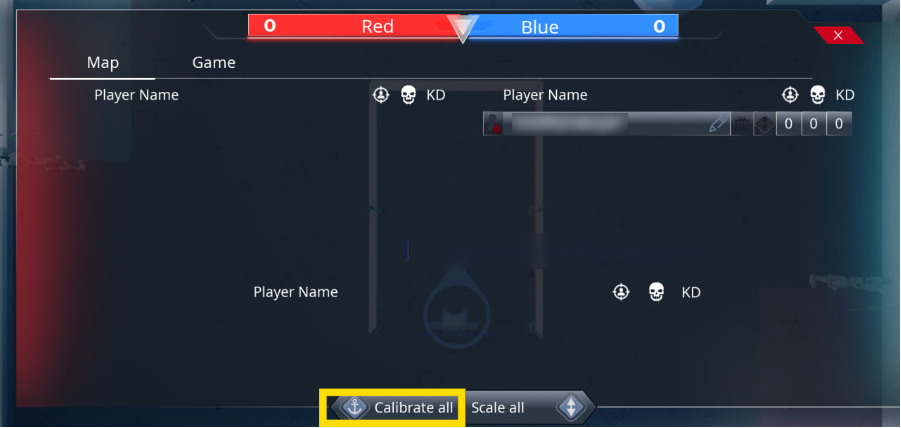
2. Recalibrate using the "calibrate all" button in statistics
!The calibrate all button does NOT work FOR ALL PLAYERS, but only for those who have the state disabled.
If players don't calibrate themselves when they click Calibrate all, it means that there are NO ANCHORS INSTALLED on their helmets.
In this case, they must be re-installed.
To recalibrate all of them:
- We ask the players to stop and stand up straight
- Disabling the state for all players
- Click the "calibrate all" button in statistics
Common problems: why might it not work?
- Reason: Failed to log in to your Meta account
What to do: log in to your Meta account - Reason: When you open a Meta profile in the main menu, it does not load and it is not connected to the Internet
What to do: unlink your account in the Meta Horizon app, re-upload it, and sync it - Reason: firmware below version 72
What to do: Flash the device.