Setting up a PC for stationary areas + Software
Technical specifications (minimum)
Here are the minimum specs for the server computer for the arena, if you have the opportunity to take the characteristics of a higher level.
Build on Intel:
- Processor -- intel core i5 12400F;
- Graphics card -- NVIDIA Geforce RTX 3060;
- RAM -- 16 GB;
- Storage - 1000 GB (read and write speeds of at least 3000 rpm);
- Motherboard -- B-chipset and 1 Gbit/s network port bandwidth;
- Power supply - at least 500 watts.
Build on AMD:
- Processor -- AMD Ryzen 5 5600X;
- Graphics Card --AMD Radeon RX 6700 XT;
- RAM -- 16 GB;
- Storage - 1000 GB (read and write speeds of at least 3000 rpm);
- Motherboard -- B-chipset and 1 Gbit/s network port bandwidth;
- Power supply - at least 500 watts.
Pre-setup
- Format the hard drives on the gaming PC and on the administrator PC while preparing to install Windows, this can be done at the selection stage Where do you want to install Windows? by deleting all partitions and creating new ones
- Install a clean Windows 10 Pro operating system
- We do not use various ready-made builds of Windows in computer clubs.
- We recommend using a Windows image downloaded from the official website or made using Microsoft's Media Creation Tool or using auxiliary resources such as https://uup.rg-adguard.net/. Instructions for creating an image are below.
- Perform the initial setup of Windows, create a local account, and set a password for it before accessing the desktop.
- Also, we recommend adding a password to the BIOS in order to protect the PC from being bypassed by changing the bootable media.
- Install games and applications on your PC that should be accessible to guests and administrators. It is forbidden to use antivirus programs because they can negatively affect the operation of the software.
- You can also perform this step after installing the software in technical mode
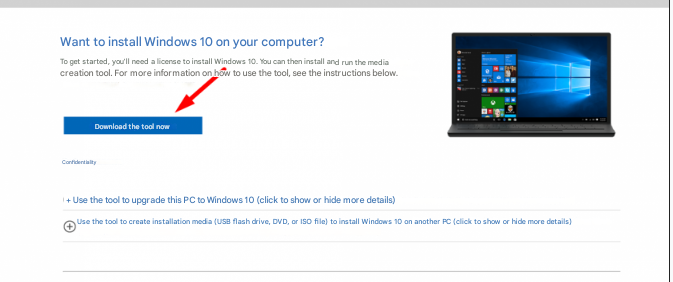
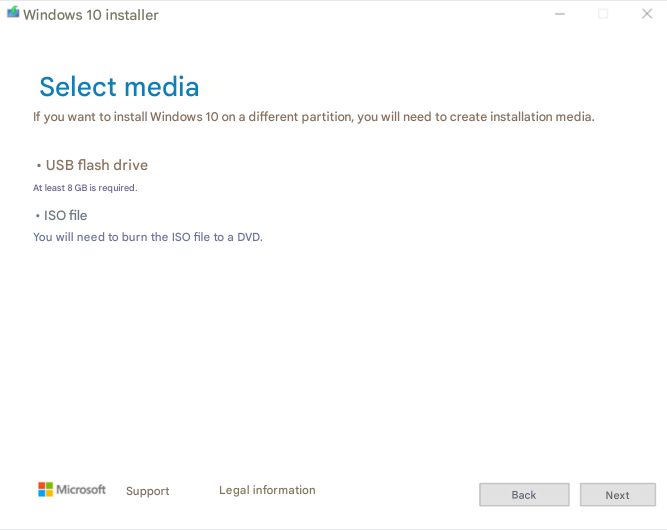
How to create an image using the Media Creation Tool
- Opening the site https://www.microsoft.com/ru-ru/software-download/windows10 and download MediaCreationa from there
-
Inserting the flash drive
-
After downloading, launch MediaCretionTool and wait for the preparation to complete
-
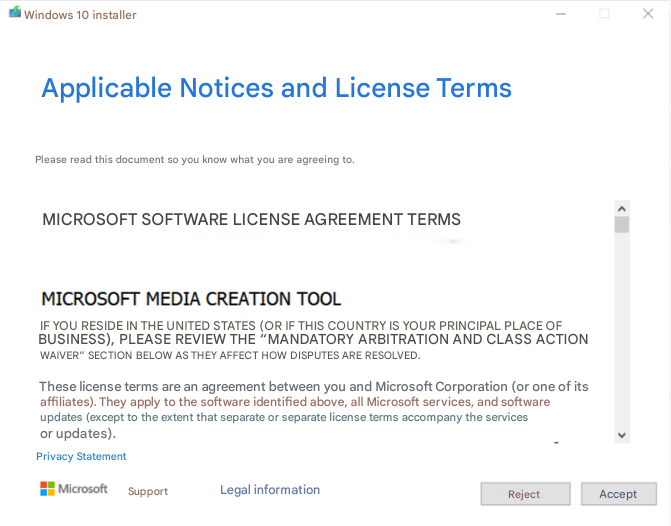
Then we accept the license terms
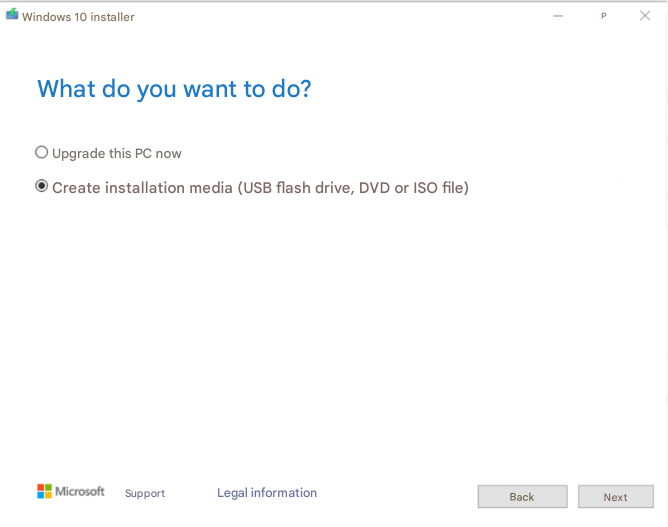
- Selecting an item Create installation media
-
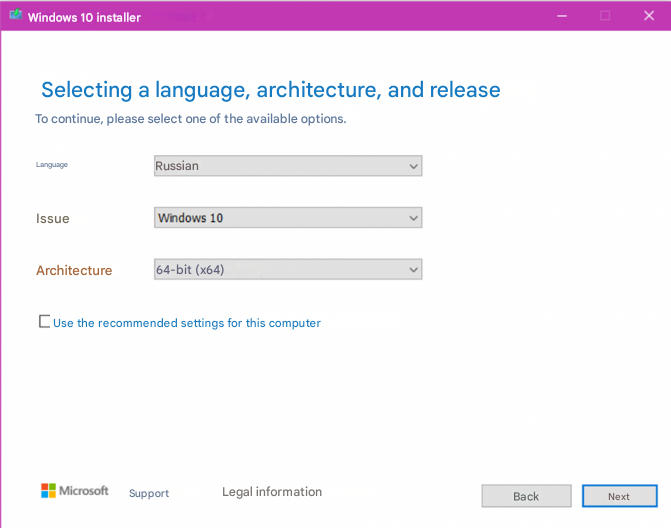
Uncheck Use recommended settings for this computer and select the desired language, release, and 64-bit architecture

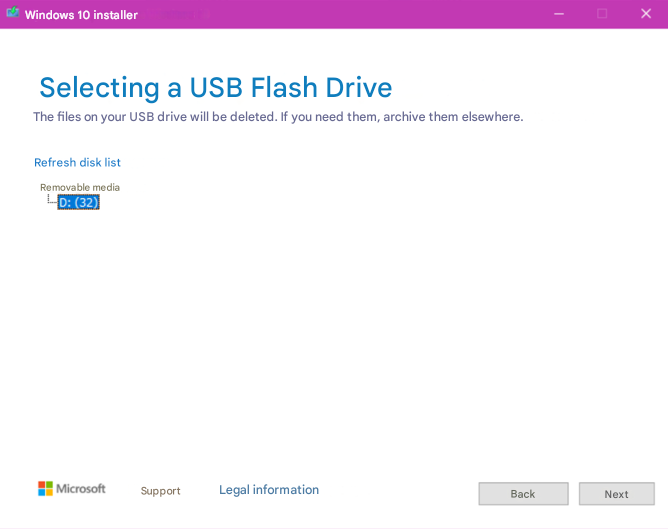
- Choose a USB device Flash memory
- We are waiting for the preparation to be completed. It may take some time. Then select the desired flash drive and click Next
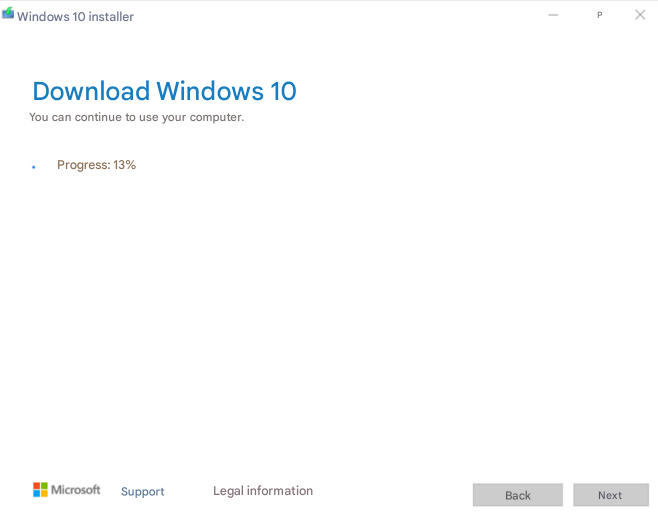
- Next, we are waiting for preparing the image and writing the image to your flash drive


Install all updates with the built-in Windows Update
- Right-click the icon Start and select from the menu item Options or press the Windows keyboard keys and I (Bus)simultaneously
- Selecting an item Update and Security the Windows Update window opens and we check if there are any updates by clicking on the button Check for updates install all updates and follow the prompts of the operating system – you need to restart after the installation is complete.
- After rebooting, go back to Update and security, click the Advanced Settings button in the update options, turn on the item When updating Windows, get updates for other Microsoft products and go back to the item Update and security.
- We re-check for updates by clicking on the button Check for updates, install all updates
- We check if there is an item View optional updates if available under the button To check for updates, then click on the blue label View optional updates and add them to Optional updates all check boxes next to drivers and other updates, and there will be a Download and Install button at the bottom.
- Install updates until the following message appears You have all the latest updates installed and when you click on the button Check for updates no updates appear
- We suspend Windows updates for the maximum period of time by clicking on the button Suspend updates for 7 days the maximum possible suspension period is 35 days
- At the end of this period, it is recommended to update Windows again by clicking on the Resume Updates button and after updating, suspend updates for 35 days.
Disabling Windows Security
- Right-click the icon Start and select from the menu item Options or press the Windows and I keys simultaneously on your keyboard
- Selecting an item Update and Security the Windows Update window opens, select Windows Security on the left and click on the button Open the Windows Security Service
- In the window that opens on the left or in the center, select Protection from viruses and threats
- Finding the item Settings for protection against viruses and threats and click on the label Managing settings
- Disable the Real-time protection option
- Turning off items Cloud Protection, Automatic sample Sending, Anti-counterfeiting
- At the bottom, we find the item Notifications and click on the label Changing Notification Settings
- Turn off all notifications using radio buttons, such as Receive informational notifications, Receiving notifications about account protection, Notify when the Microsoft Defender firewall blocks a new app
- On the left side of the menu, select the item Firewall and network security, select Turning off the domain network Microsoft Defender Firewall
- On the left side of the menu, select the item Firewall and network security, select Private network and turn it off Microsoft Defender Firewall
- On the left side of the menu, select the item Firewall and network security, select Turn off the public network Microsoft Defender Firewall
- On the left side of the menu, select the item Manage applications/browser, in the item Reputation-based protection, click on the blue text Reputation-based protection options, turn off the item Checking apps and files, SmartScreen for Microsoft Edge and SmartScreen for apps from the Microsoft Store
Editing Windows Group Policies
- Press the keys on the Windows keyboard and R to open the dialog box To perform. Here, type: gpedit. msc and press Enter or OK to open the Group Policy editor
- Go to Administrative Templates, Windows Components, and the Microsoft Defender Antivirus Program
- Finding the item Turn off the Microsoft Defender antivirus program, double-click and select in the window that appears Enabled and confirm OK
- It is important to select enabled, since the item implies enabling disabling antivirus protection according to the Windows logic
- It is important to select enabled, since the item implies enabling disabling antivirus protection according to the Windows logic
- Find the item Protection in real time, double-click and search for the item Disable real-time protection
- It is important to select enabled, since the item implies enabling disabling antivirus protection according to the Windows logic
Disabling alerts
- Click the Start icon and start writing Security and Maintenance Center, the search will return Security and Maintenance Center click Open
- On the left side of the menu, select Change the settings for the Security and Maintenance Center component
- Uncheck disable all available message types and click OK
Power Management – High performance
- Tap the icon Start and write: Power supply search will return Selecting a power management scheme in the menu that opens, click on the label Show additional diagrams and select the item High performance
- To the right of the label High performance click on the blue text Power Supply Circuit Setup
- In the parameter Disable display select Never and Save changes
- If the club has hard drives installed on gaming PCs, then click on the blue text that says Change advanced power settings and in the section Hard Disk - Disable hard disk via select 0 and click OK
- If the club has hard drives installed on gaming PCs, then click Start and write: Optimization and search will return Optimize disks and click Run as an administrator, find the item Change the settings and uncheck all the boxes to disable optimization, then click OK
Setting the PC name
- Right-click the icon Start and select from the menu item System
- Find the button Rename this PC click on the button and come up with a name, for example PC1, since the name must be in English
- Confirm the procedure by clicking Then, when prompted to restart, perform it.
Setting the static IP address of the PC
- Press the keys on the Windows keyboard and R to open the dialog box Run, enter: ncpa. cpl and press Enter or OK
- Double-click on the desired network adapter (check the speed of the adapter, the recommended network speed in the computer club is 1 Gbit / s) and click Intelligence
- Write down or remember the values in the network connection information:
- IPv4 address - for example 192.168.1.99
- IPv4 subnet mask - for example, 255.255.255.0
- The default gateway is IPv4 – for example, 192.168.1.1
- IPv4 DNS server - for example, 192.168.1.1
- Close the window with the button To close
- At the bottom, click on the Properties button
- Find IP version 4 (TCP /IPv4)in the list and select it then click Properties
- Select an item Use the following IP address and fill in the fields:
- The IP address is the IPv4 address from clause 10.3.1
- The subnet mask is the IPv4 subnet mask from clause 10.3.2
- The primary gateway is the IPv4 default Gateway from clause 10.3.3
- The preferred DNS server is the IPv4 DNS server from clause 10.3.4
- Sometimes, for different games and applications, you need to put the Google DNS IP addresses 8.8.8.8 and 8.8.4.4, respectively, in the preferred and alternative DNS servers.
- Save your changes with the OK button
- Close all open network settings windows with the button To close
- Check the network and Internet on your PC by going to the browser
- Restart your PC and check the Internet availability again
Installing NVIDIA or AMD drivers
- Specify the video card model in your PC
- Go to the website of the video chip manufacturer NVIDIA or AMD:
- https://www.nvidia.com/ru-ru/geforce/geforce-experience/ - the site will have a green button Download, after downloading and running the file, the GeForce Experience application will be installed, through which you can update drivers, it is recommended to create one NVIDIA account to log in to the application. This app makes it easier to update drivers.
- https://www.nvidia.ru/Download/index.aspx?lang=ru – на сайте нужно будет выбрать Тип видеокарты, Серию видеокарты, Семейство видеокарты и нажать на кнопку Поиск, после открытия страницы нажмите на кнопку Загрузить сейчас, после скачивания и запуска файла будет предложено распаковать архив и после запустится установка с выбором ставить только драйвер или драйвер вместе с GeForce Experience. Инструкция NVIDIA
- https://www.amd.com/ru/support - на сайте будет кнопка Загрузить сейчас после текста Автоматический поиск и установка обновлений драйверов для графики Radeon и чипсетов Ryzen для Windows после скачивания и запуска файла будет предложено распаковать архив и появится окно с выбором драйвера, рекомендуется ставить драйвер с надписью Recommended Driver программа сама скачает и установит обновление. Инструкция AMD
- Перезагрузите ПК после установки драйверов для видеокарт
Файлы для включения и отключения обновлений
Скачайте файлы по ссылке на рабочий стол: off-all и On-update
-
- OFF_all – .BAT файл, который заменяет сервер обновления Windows, чтобы Windows не находил обновления для операционной системы + отключает через реестр различные параметры операционной системы, которые мешают оптимальной работе игрового ПК. Так же, данный файл за вас базовую настройку, ниже приведены все настройки которые он выполняет, после его применения можете проверить всё ли у вас корректно применилось.
- Файл ON-update, который возвращает стандартные настройки обновления Windows
- Перейдите в папку куда были скачаны файлы (рабочий стол) и нажмите правой кнопкой мыши на файле OFF_all и запустите от имени администратора
- Дважды кликните на файле OFF_all и согласитесь на изменение в реестре кнопкой Да
- Windows предложит перезагрузиться для применения изменений в системе
- Перезагружаем Windows
Критически запрещается ставить стороннее программное обеспечение, в особенности запрещены все варианты VPN
На серверном компьютере должны стоять три основные программы: Anydesk, Steam, Oculus, Virtual Desktop (для Pico)
Регистрация аккаунта Steam и установка приложения
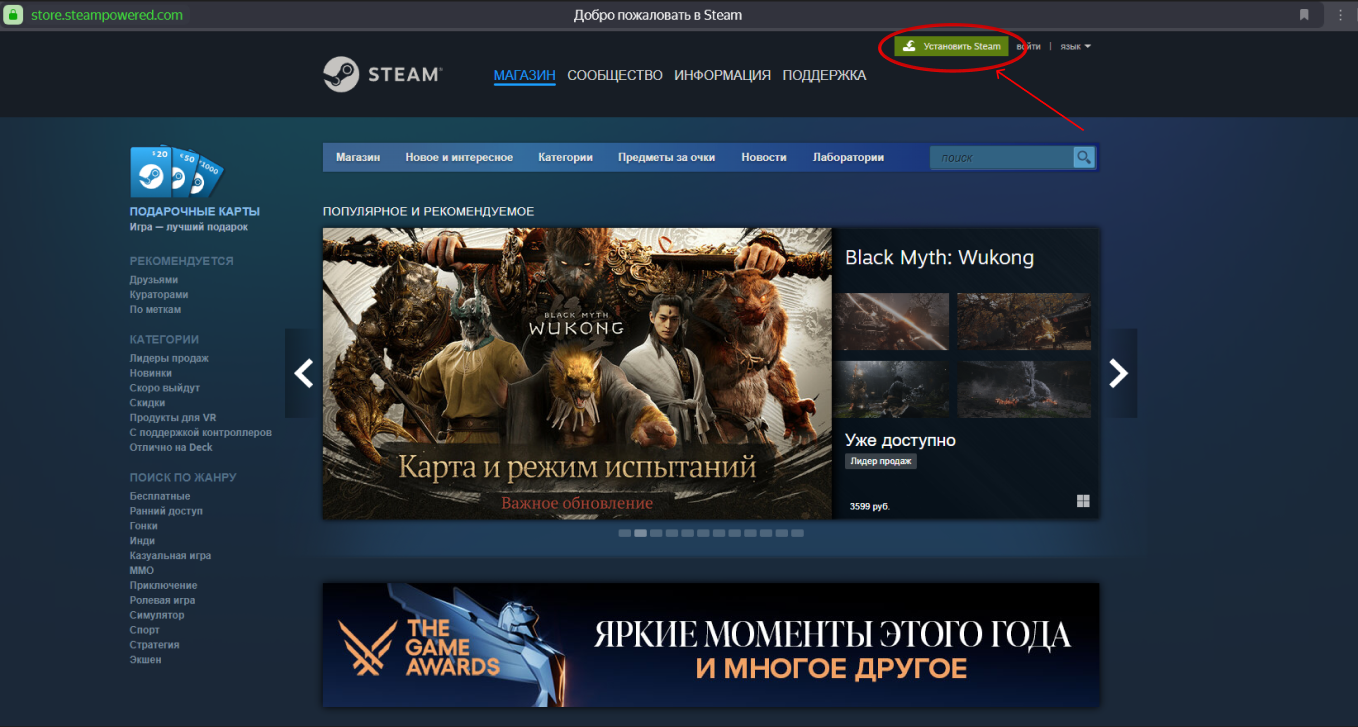
Регистрация аккаунта Steam и установка приложения на компьютер. Заходим на официальный сайт Steam по ссылке. В правом верхнем углу нажимаем на зеленую кнопку Установить Steam
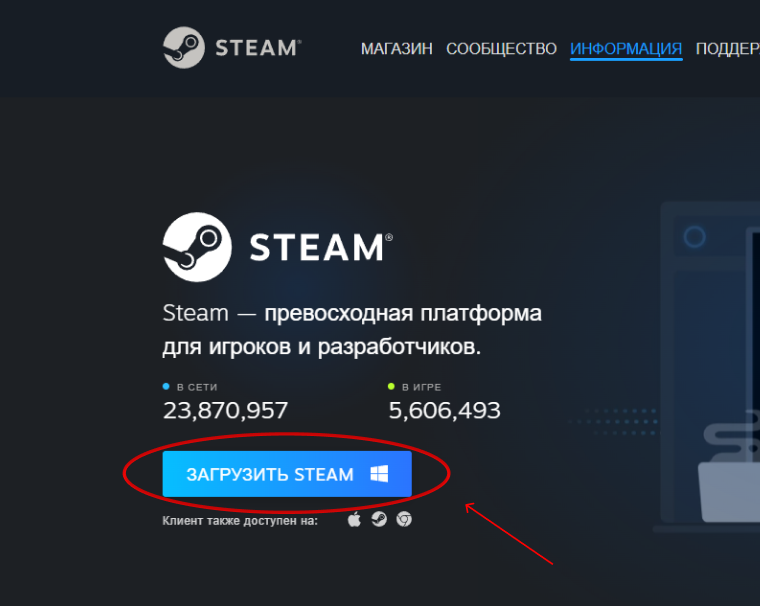
Откроется страница где нам нужно нажать кнопку Загрузить Steam и начнется загрузка установочного файла Steam на Ваш компьютер
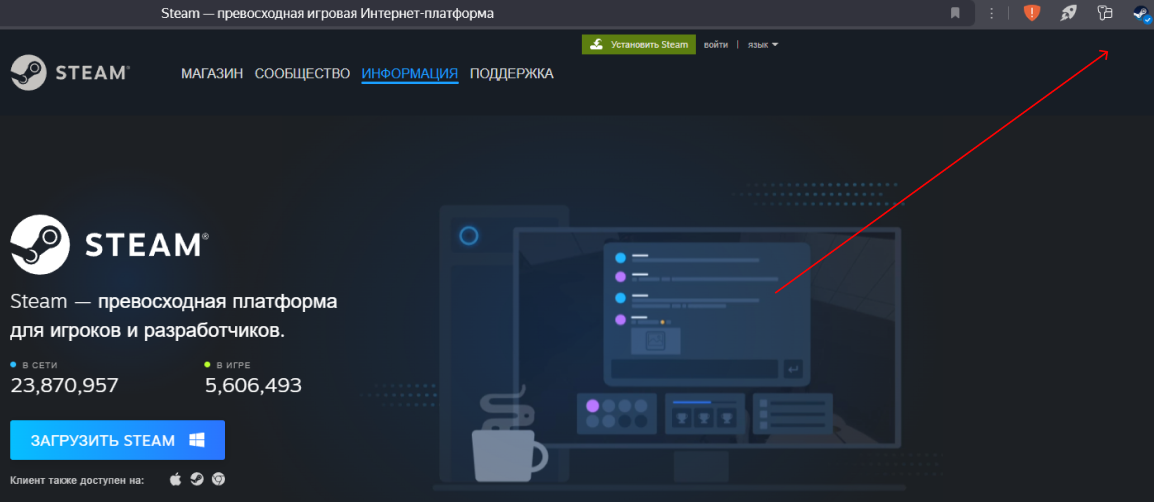
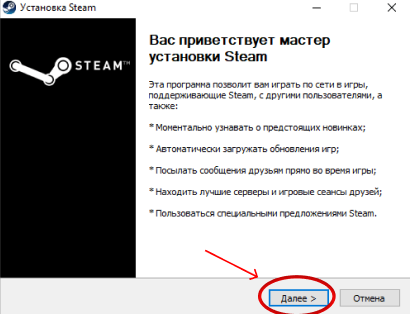
После окончания загрузки нажимаем на иконку Steam в правом верхнем углу. Как только установочный файл Steam откроется, нажимаем на кнопку Далее
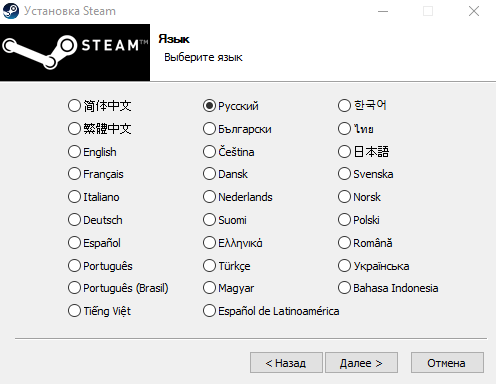
Выбираем нужный нам язык, в нашем случае это Русский
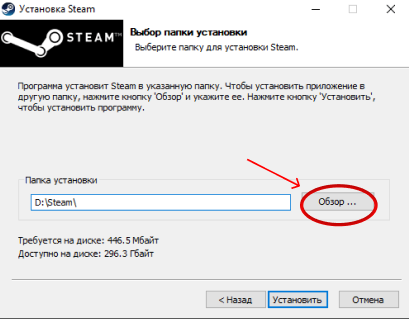
Далее нужно выбрать папку для установки приложения. Выбирайте на свое усмотрение, но если ваш системный диск C: имеет ограниченное количество свободного места, то нажимаем на кнопку Обзор
После чего находим нужный диск на котором у Вас будут находиться все игры и приложения (В нашем случае это диск D:) и нажимаем по нему правой кнопкой мыши, выбираем пункт Создать и нажимаем на Папку
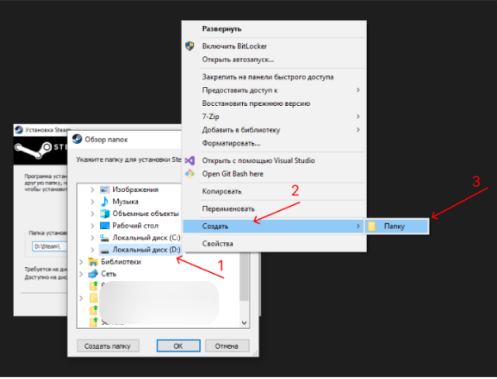
И называем папку чтобы ее потом не потерять Steam,после чего нажимаем ОК

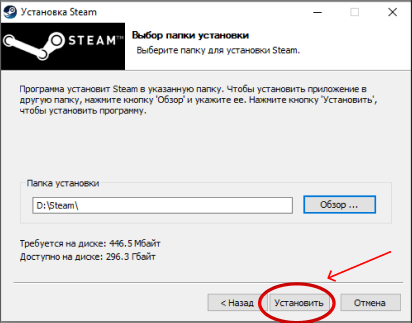
Далее нажимаем Установить
После завершения установки оставляем галочку напротив надписи Запустить Steam и нажимаем Готово
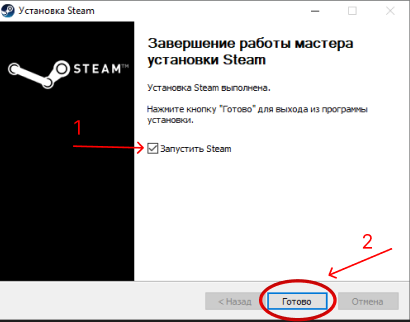
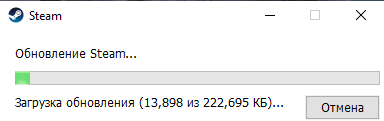
Начнется установка и обновление Steam
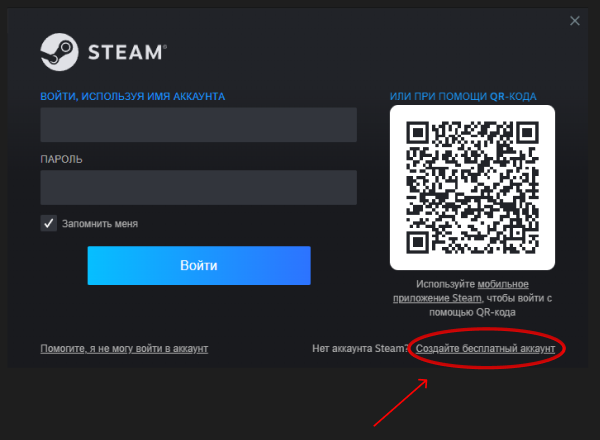
И по завершению установки в открывшемся окне мы можем ввести имя аккаунта и пароль, если у Вас уже имеется учетная запись Steam, если же нет, то нажимаем на надпись Создайте бесплатный аккаунт
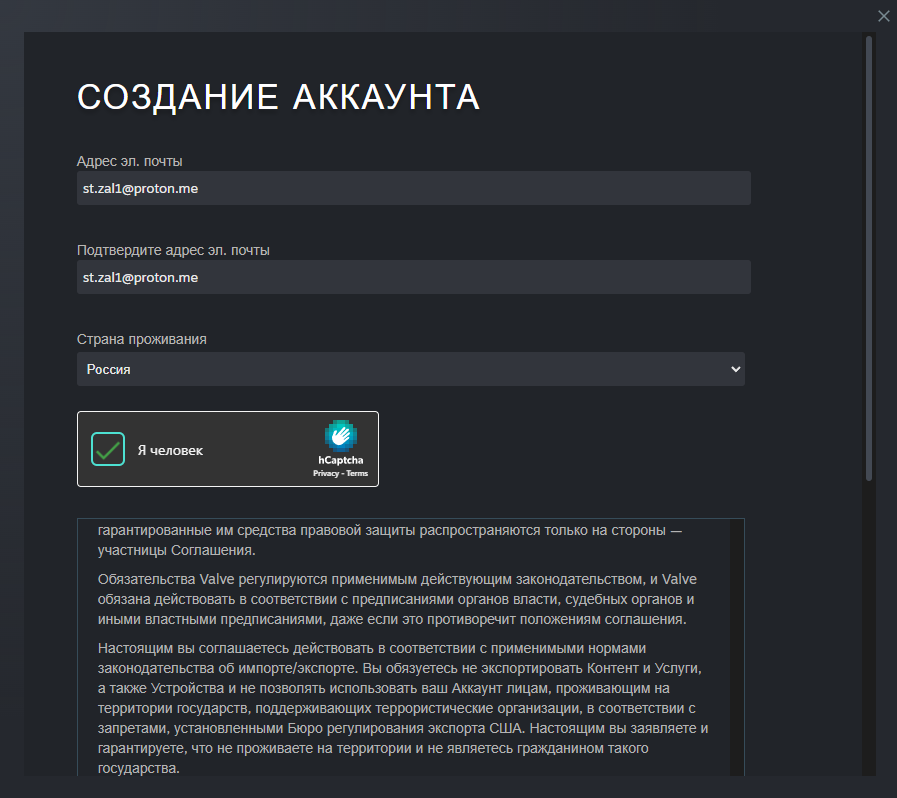
В открывшемся окне заполняем поля для создания аккаунта
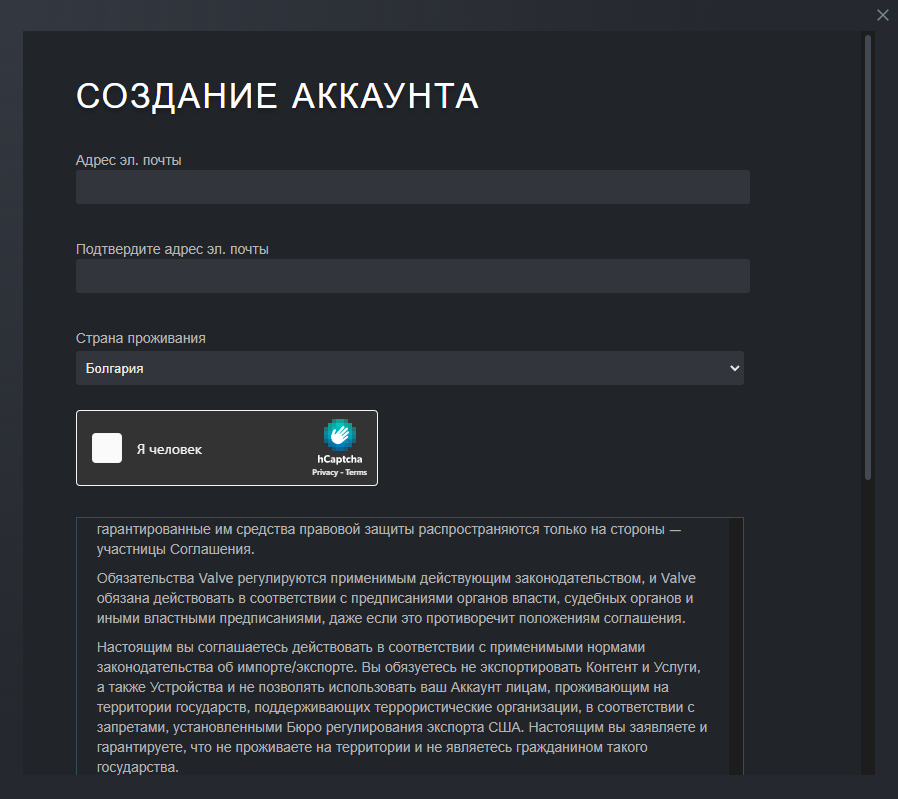
Пример заполненных полей и выбора страны проживания (если находитесь в РФ)
Далее пролистываем вниз ставим галочку, что мы подтвердили возраст и ознакомились с условиями, и нажимаем Продолжить

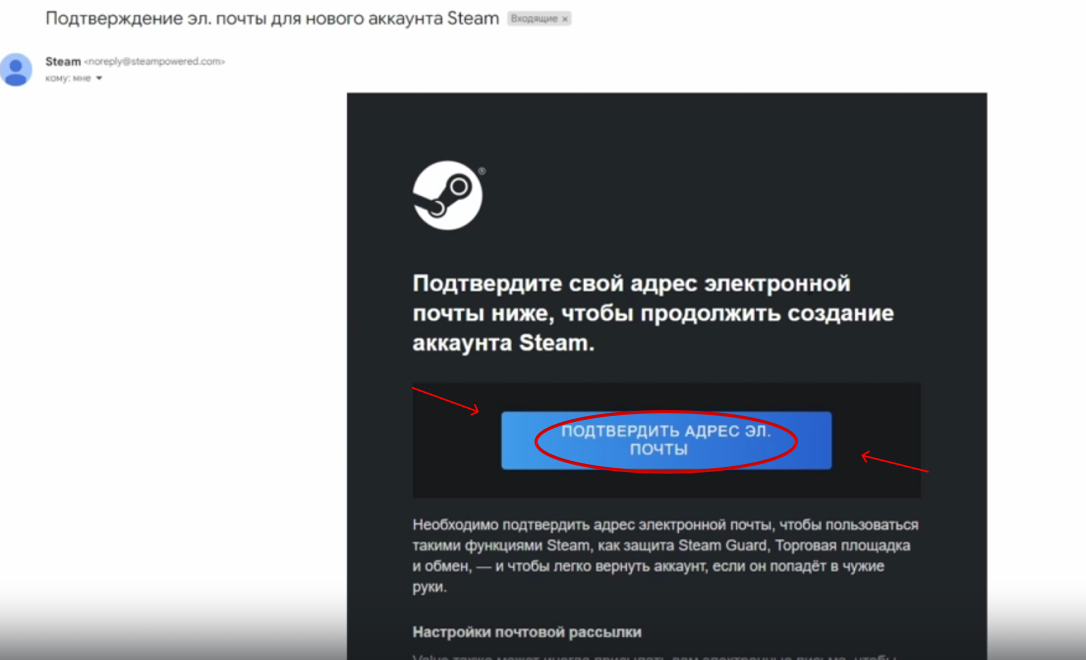
После чего нам отправят письмо подтверждения регистрации на почту. Переходим на почту и открываем письмо от Steam и в письме нажимаем на кнопку Подтвердить адрес электронной почты
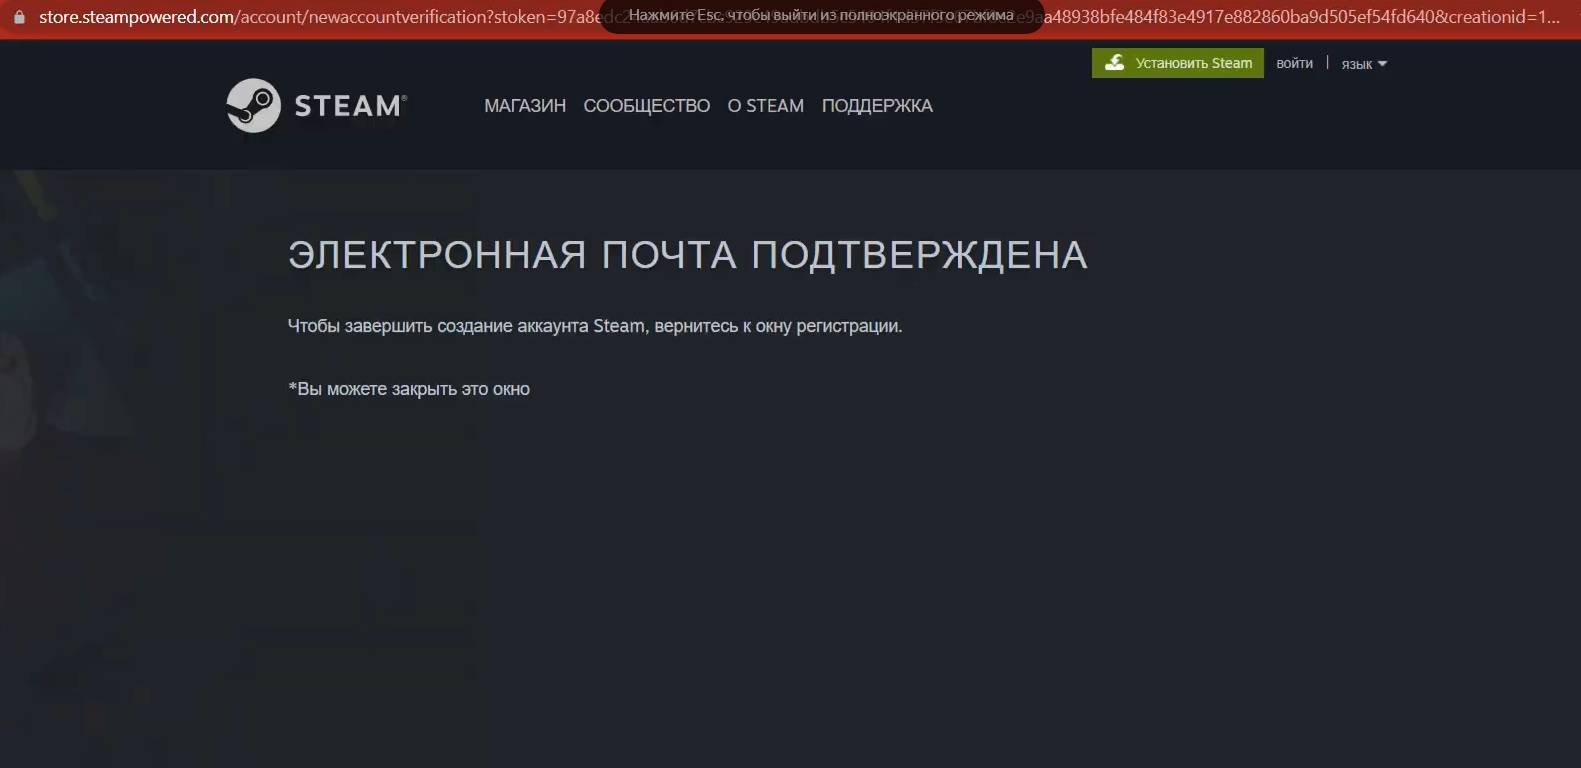
Далее открывшееся окно можно закрывать и переходить обратно в приложение Steam, где мы ранее начинали регистрацию
Вводим наши данные в предоставленные поля и нажимаем кнопку Готово
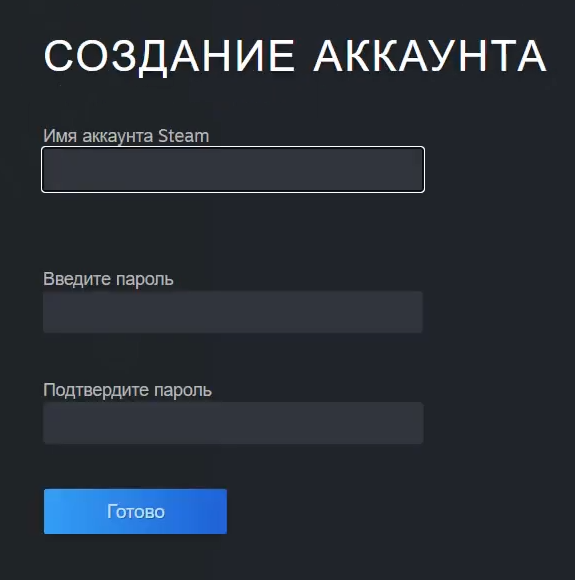
Поздравляю! Вы создали аккаунт Steam!
ВАЖНО! Если Вы создали новый аккаунт, не пополняйте аккаунт пока не посмотрите раздел "Пополнение аккаунта Steam"!
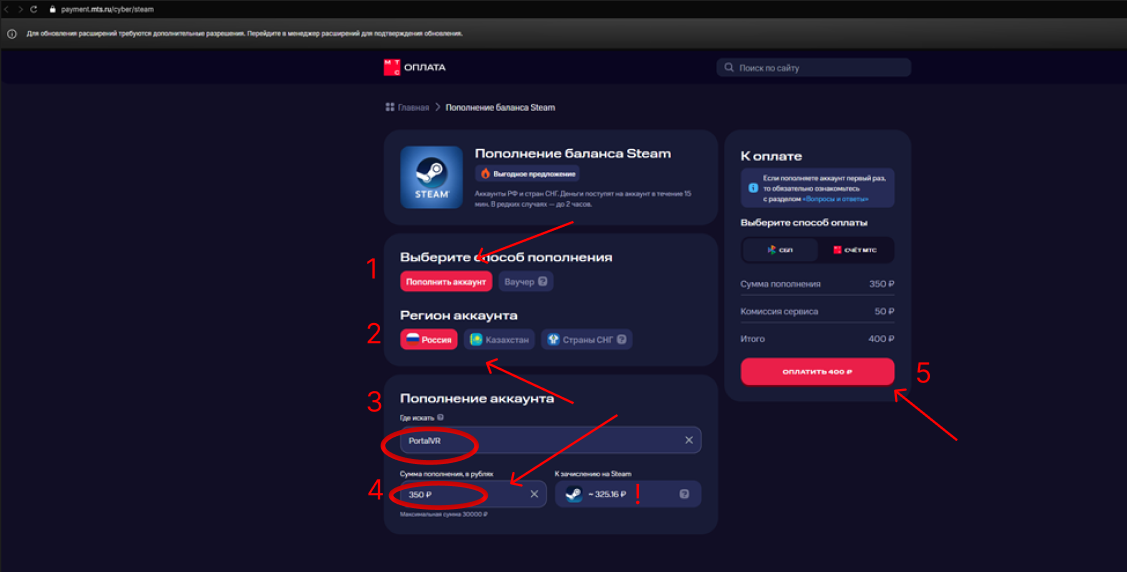
Пополнение аккаунта Steam
Чтобы пополнить аккаунт Steam, заходим на сайт МТС Банк
Далее на сайте выбираем регион аккаунта который потребуется пополнить (Россия или Казахстан).
Вводим в поле ниже логин Steam и сумму на которую хотим пополнить кошелек
Важно! Справа будет показано сколько зачислиться средств на сам аккаунт
Далее ниже выберите способ оплаты СБП
После чего нажимаем кнопку оплатить
Сканируем QR-код на экране и оплачиваем через любой удобный банк
Деньги поступят к Вам на счёт кошелька Steam в течении 15 минут и в редких случаях до 2 часов!

Примечание! 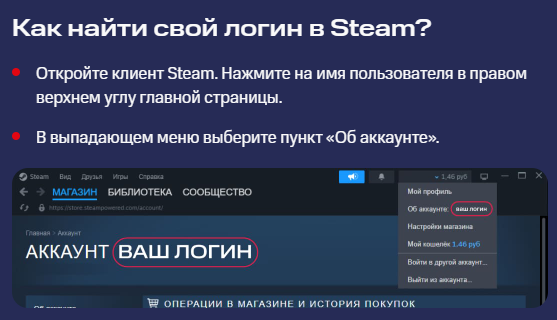
Настройка и оптимизация приложения Steam
Заходим в настройки Steam для этого в левом верхнем углу приложения нажимаем на Steam и далее в выпадающем списке выбираем Настройки

Далее выставляем все настройки как показано на фотографиях ниже


После того как выставили все предоставленные настойки, окно можно закрывать, оптимизация вашего Steam завершена!
Настройка приложения Oculus (Meta)
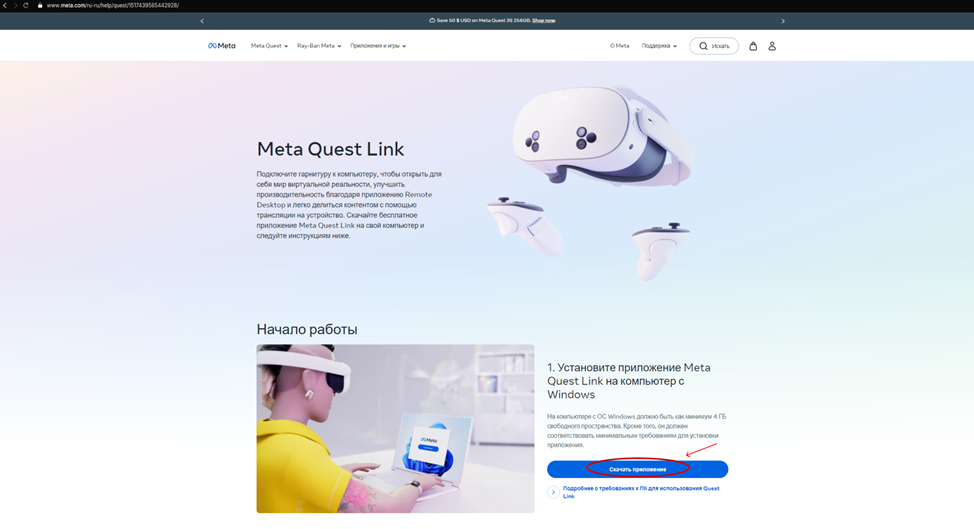
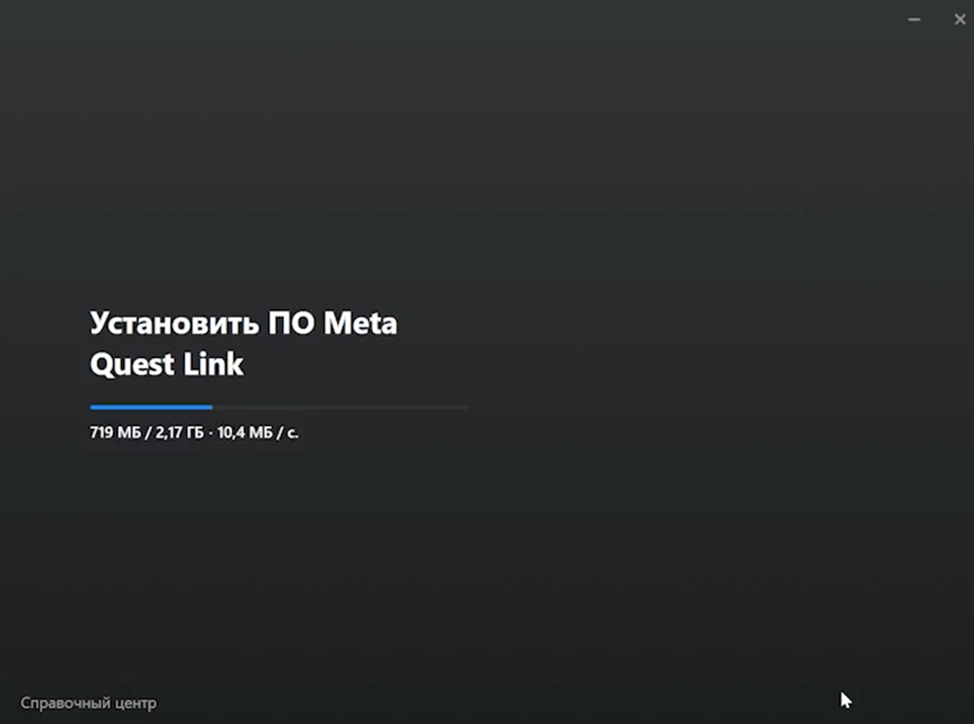
Установите приложение Meta Quest Link на компьютер
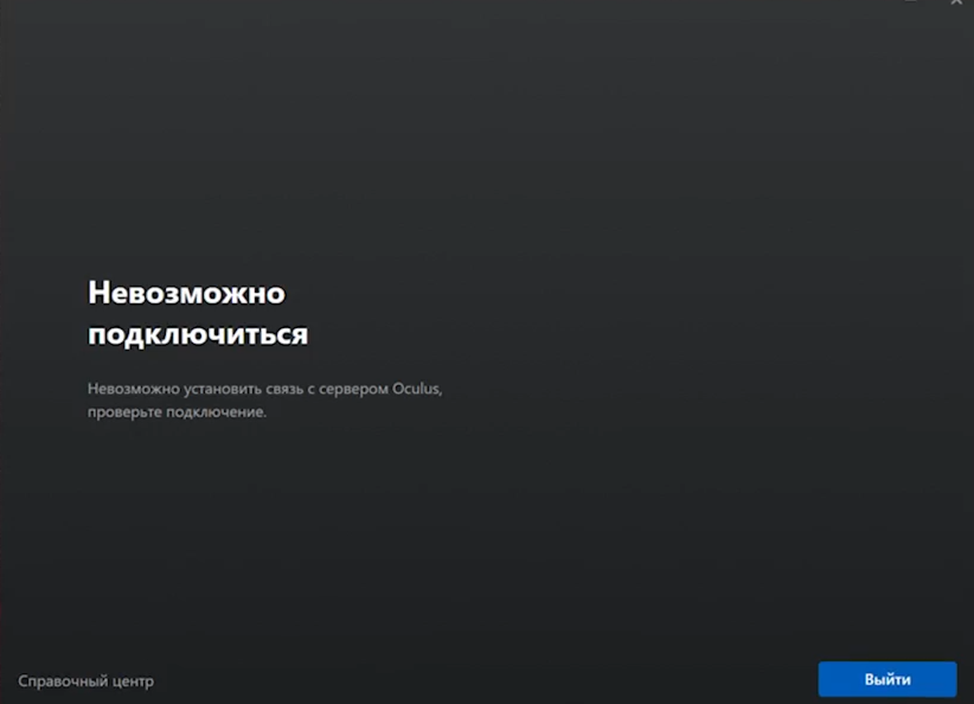
Чтобы зайти на сайт Meta потребуется VPN в вашем браузереУстанавливаем приложение Meta на компьютер
Устанавливаем приложение Meta на компьютер
Если Вы видите ошибку НЕВОЗМОЖНО ПОДКЛЮЧИТЬСЯ, то потребуется поменять VPN на другой