
Setting up a PC for car simulators + Software
Technical specifications (minimum)
Here are the minimum specs for the server computer for the arena, if you have the opportunity to take the characteristics of a higher level.
Build on Intel:
- Processor -- intel core i5 12400F;
- Graphics card -- NVIDIA Geforce RTX 3060;
- RAM -- 16 GB;
- Storage - 1000 GB (read and write speeds of at least 3000 rpm);
- Motherboard -- B-chipset and 1 Gbit/s network port bandwidth;
- Power supply - at least 500 watts.
Build on AMD:
- Processor -- AMD Ryzen 5 5600X;
- Graphics Card --AMD Radeon RX 6700 XT;
- RAM -- 16 GB;
- Storage - 1000 GB (read and write speeds of at least 3000 rpm);
- Motherboard -- B-chipset and 1 Gbit/s network port bandwidth;
- Power supply - at least 500 watts.
Pre-setup
- Format the hard drives on the gaming PC and on the administrator PC while preparing to install Windows, this can be done at the selection stage Where do you want to install Windows? by deleting all partitions and creating new ones
- Install a clean Windows 10 Pro operating system
- We do not use various ready-made builds of Windows in computer clubs.
- We recommend using a Windows image downloaded from the official website or made using Microsoft's Media Creation Tool or using auxiliary resources such as https://uup.rg-adguard.net/. Instructions for creating an image are below.
- Perform the initial setup of Windows, create a local account, and set a password for it before accessing the desktop.
- Also, we recommend adding a password to the BIOS in order to protect the PC from being bypassed by changing the bootable media.
- Install games and applications on your PC that should be accessible to guests and administrators. It is forbidden to use antivirus programs because they can negatively affect the operation of the software.
- You can also perform this step after installing the software in technical mode
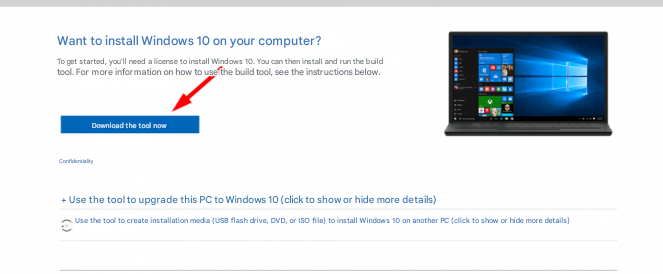
How to create an image using the Media Creation Tool
- Opening the site https://www.microsoft.com/ru-ru/software-download/windows10 and download MediaCreationa from there
-
Inserting the flash drive
-
After downloading, launch MediaCretionTool and wait for the preparation to complete
-
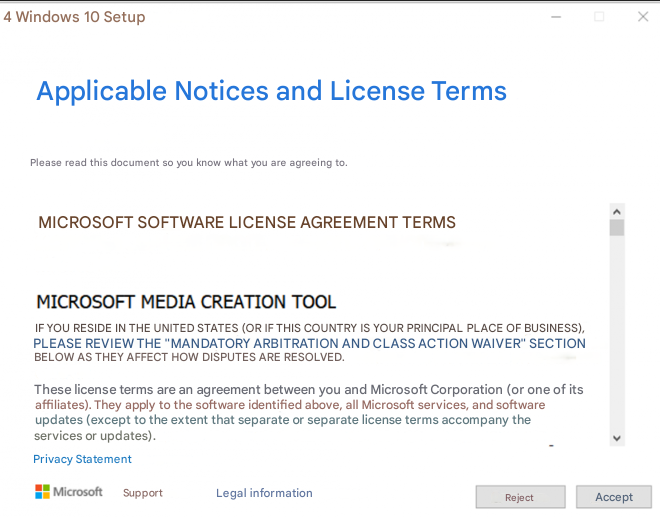
Then we accept the license terms
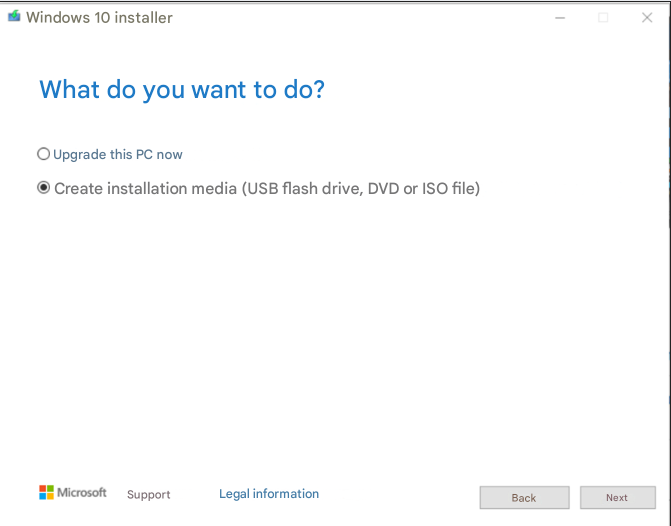
- Select Create Installation Media
-
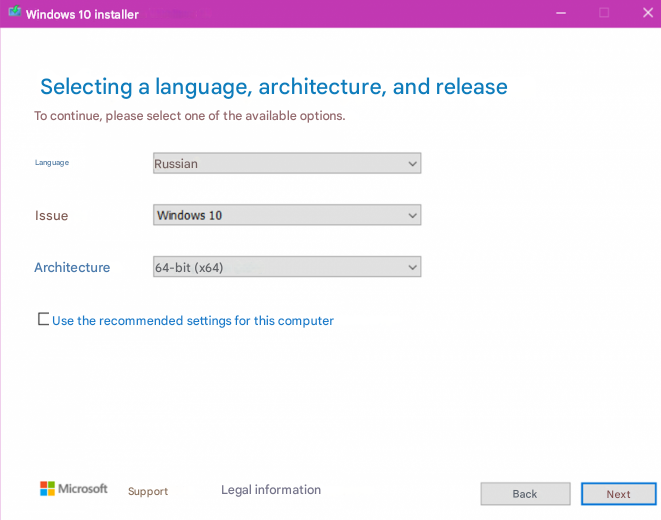
Uncheck Use recommended settings for this computer and select the desired language, release, and 64-bit architecture
- Choose a USB device Flash memory

- We are waiting for the preparation to be completed. It may take some time. Then select the desired flash drive and click Next


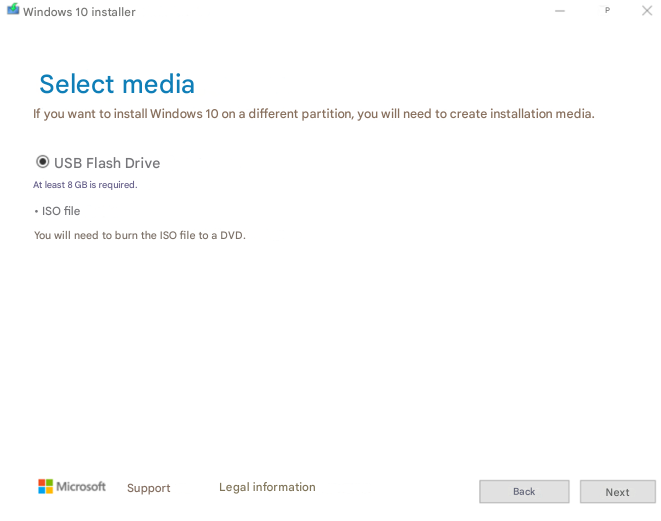
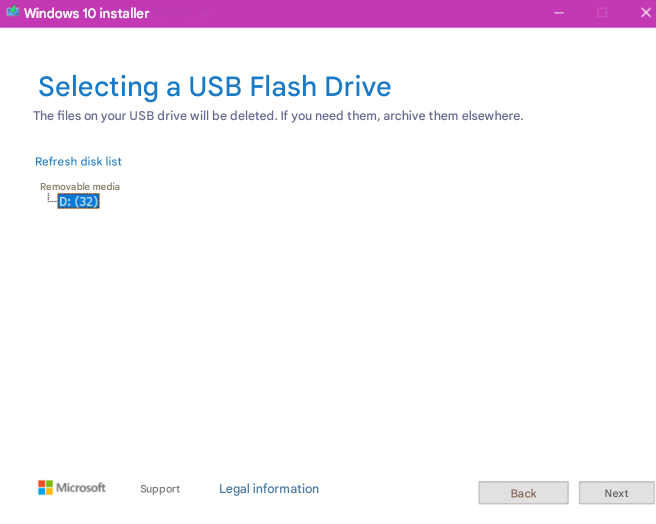
- Next, we are waiting for preparing the image and writing the image to your flash drive

Install all updates with the built-in Windows Update
- Right-click the icon Start and select from the menu item Options or press the Windows keyboard keys and I (Bus)simultaneously
- Selecting an item Update and Security the Windows Update window opens and check if there are any updates by clicking on the button Check for updates install all updates and follow the prompts of the operating system – you need to restart after the installation is complete.
- After rebooting, go back to Update and security, click the Advanced Settings button in the update options, turn on the item When updating Windows, get updates for other Microsoft products and go back to the item Update and security.
- Re-check for updates by clicking on the button Check for updates, install all updates.
- We check if there is an item View optional updates if available under the button To check for updates, then click on the blue label View optional updates and add them to Optional updates all check boxes next to drivers and other updates, and there will be a Download and Install button at the bottom.
- We check if there is an item View optional updates if available under the button To check for updates, then click on the blue label View optional updates and add them to Optional updates all check boxes next to drivers and other updates, and there will be a Download and Install button at the bottom.
- Install updates until the following message appears You have all the latest updates installed and when you click on the button Check for updates no updates appear
- Suspend Windows updates for the maximum period of time by clicking on the button Suspend updates for 7 days the maximum possible suspension period is 35 days
- At the end of this period, it is recommended to update Windows again by clicking on the Resume Updates button and after updating, suspend updates for 35 days.
Disabling Windows Security
- Right-click the icon Start and select from the menu item Options or press the Windows and I keys simultaneously on your keyboard
- Selecting an item Update and Security the Windows Update window opens, select Windows Security on the left and click on the button Open the Windows Security Service
- In the window that opens on the left or in the center, select Protection from viruses and threats
- Finding the item Settings for protection against viruses and threats and click on the label Managing settings
- Disable the Real-time protection option
- Turning off items Cloud Protection, Automatic sample Sending, Anti-counterfeiting
- At the bottom, we find the item Notifications and click on the label Changing Notification Settings
- We turn off all notifications using radio buttons, such as Receive informational notifications, Receiving notifications about account protection, Notify when the Microsoft Defender firewall blocks a new app
- On the left side of the menu, select the item Firewall and network security, select Turning off the domain network Microsoft Defender Firewall
- On the left side of the menu, select the item Firewall and network security, select Private network and turn it off Microsoft Defender Firewall
- On the left side of the menu, select the item Firewall and network security, select Turn off the public network Microsoft Defender Firewall
- On the left side of the menu, select the item Manage applications/browser, in the item Reputation-based protection, click on the blue text Reputation-based protection options, turn off the item Checking apps and files, SmartScreen for Microsoft Edge and SmartScreen for apps from the Microsoft Store
Editing Windows Group Policies
- Press the keys on the Windows keyboard and R to open the dialog box To perform. Here, type: gpedit.msc and press Enter or OK to open the Group Policy editor
- Go to Administrative Templates, Windows Components, and the Microsoft Defender Antivirus Program
- Finding the item Turn off the Microsoft Defender antivirus program, double-click and select in the window that appears Enabled and confirm OK
- It is important to select enabled, since the item implies enabling disabling antivirus protection according to the Windows logic
- Find the item Protection in real time, double-click and search for the item Disable real-time protection
- It is important to select enabled, since the item implies enabling disabling antivirus protection according to the Windows logic
- It is important to select enabled, since the item implies enabling disabling antivirus protection according to the Windows logic
Disabling alerts
- Click the Start icon and start writing Security and Maintenance Center, the search will return Security and Maintenance Center click Open
- On the left side of the menu, select Change the settings for the Security and Maintenance Center component
- Uncheck disable all available message types and click OK
Power Management – high performance
- Tap the icon Start and write: Power supply search will return Selecting a power management scheme in the menu that opens, click on the label Show additional diagrams and select the item High performance
- To the right of the label High performance click on the blue text Power Supply Circuit Setup
- In the parameter Disable display select Never and Save changes
- If the club has hard drives installed on gaming PCs, then click on the blue text that says Change advanced power settings and in the section Hard Disk - Disable hard disk via select 0 and click OK
- If the club has hard drives installed on gaming PCs, then click Start and write: Optimization and search will return Optimize disks and click Run as an administrator, find the item Change the settings and uncheck all the boxes to disable optimization, then click OK
Setting the PC name
- Right-click the icon Start and select from the menu item System
- Find the button Rename this PC click on the button and come up with a name, for example PC1, since the name must be in English
- Confirm the procedure by clicking Then, when prompted to restart, perform it.
Setting the static IP address of the PC
- Press the keys on the Windows keyboard and R to open the dialog box Run, enter: ncpa.cpl and press Enter or OK
- Double-click on the desired network adapter (check the speed of the adapter, the recommended network speed in the computer club is 1 Gbit / s) and click Intelligence
- Write down or remember the values in the network connection information:
- IPv4 address - for example, 192.168.1.99
- IPv4 subnet mask - for example 255.255.255.0
- The default gateway is IPv4 – for example 192.168.1.1
- IPv4 DNS server - for example 192.168.1.1
- Close the window with the button To close
- At the bottom, click on the Properties button
- Find IP version 4 (TCP /IPv4) in the list and select it then click Properties
- Select an item Use the following IP address and fill in the fields:
- The IP address is the IPv4 address from clause 10.3.1
- The subnet mask is the IPv4 subnet mask from clause 10.3.2
- The primary gateway is the IPv4 default Gateway from clause 10.3.3
- The preferred DNS server is the IPv4 DNS server from clause 10.3.4
- Sometimes, for different games and applications, you need to put the Google DNS IP addresses 8.8.8.8 and 8.8.4.4, respectively, in the preferred and alternative DNS servers.
- Save your changes with the OK button
- Close all open network settings windows with the button To close
- Check the network and Internet on your PC by going to the browser
- Restart your PC and check the Internet availability again
Installing NVIDIA or AMD drivers
- Specify the video card model in your PC
- Go to the website of the video chip manufacturer NVIDIA or AMD:
- https://www.nvidia.com/ru-ru/geforce/geforce-experience/ - the site will have a green button Download, after downloading and running the file, the GeForce Experience application will be installed, through which you can update drivers, it is recommended to create one NVIDIA account to log in to the application. This app makes it easier to update drivers.
- https://www.nvidia.ru/Download/index.aspx?lang=ru – on the site, you will need to select the video card Type, Video card Series, and Video card Family and click the button Search, after opening the page, click on the Download Now button, after downloading and running the file, you will be prompted to unpack the archive and then the installation will start with the choice to install only the driver or the driver with GeForce Experience. NVIDIA Instructions
- https://www.amd.com/ru/support - the site will have a Download Now button after the text Automatic search and installation of driver updates for Radeon graphics and Ryzen chipsets for Windows after downloading and running the file, you will be prompted to unpack the archive and a window will appear with the driver selection, it is recommended to install the driver with the inscription Recommended Driver. the program will download and install the update itself. AMD Instructions
- Restart your PC after installing the graphics card drivers
Files for enabling and disabling updates
Download the files from the desktop link: off-all and On-update
-
- OFF_all – .BAT file that replaces the Windows update server so that Windows does not find updates for the operating system + disables various operating system parameters through the registry that interfere with the optimal operation of the gaming PC. Also, this file provides you with the basic configuration, below are all the settings that it performs, after applying it, you can check whether everything was applied correctly for you.
- An ON-update file that returns the standard Windows update settings
- Go to the folder where the files were downloaded (desktop) and right-click on the OFF_all file and run as administrator
- Double-click on the OFF_all file and agree to the change in the registry with the Yes button
- Windows prompts you to reboot to apply the changes to the system
- Restart Windows
It is strictly forbidden to install third-party software, especially all VPN options are prohibited
There should be three main programs running on the server computer: Anydesk, Steam, Oculus, Virtual Desktop (для Pico)
Setting up car simulators
Step 1. Installing the car simulator
Before setting up the simulator, you need to build it. Let's take a look at what is included in the car simulator package and how it should look on your location.
The car simulator consists of:
1. The mobile platform on which the chair is installed
2. Computer
3. TV stands
4. A VR helmet
5. Steering wheel, pedals
6. Gear box
It is recommended to connect the VR helmet to the computer via cable, as this connection method will ensure full transfer of graphics from the computer to the helmet. When connecting the helmet via Wi-Fi (Air Link), the graphics will not be as high.
So that the cable from the helmet does not hang on the floor, it is recommended to hang it from the ceiling for two suspensions (retractors), and wrap the cable itself with additional protection – electrical tape and a mounting spiral in the color of the cable.
Three cables extend from the steering wheel-a USB cable to the computer, a power cable to the wall outlet, and a connecting cable to the pedals. These cables must be assembled together and attached to the steering base support with mounting pads or clamps. Two cables also extend from the platform itself-USB to the computer and a power cable to the wall outlet. They can be connected to cables from the steering wheel at floor level. Finally, if you put in a gearbox, it also has a USB connection cable to your computer.
In addition, 1 USB cable will connect the computer and the helmet, and the computer itself and the monitor also need to be plugged into an outlet.
-
In total, 4 sockets will be occupied: computer, TV, platform and steering wheel. It is recommended to add a 5 outlet for additional connections.
-
A total of 5 USB ports will be used: platform, steering wheel, gearbox, helmet, keyboard. It is recommended that the first 4 connections should be over USB 3.0 (the keyboard doesn't matter).
-
All cables should be assembled together and hidden from the client as much as possible, so it is necessary to organize cable management.
Step 2. Configuring your computer and helmet
Setting up a computer and helmet is almost the same as setting up a VR Zone.
-
You need to activate the helmet and link it to your account (if the helmet connects to the computer via a wire, then you don't need to create a new account, you can use the helmets account in the Arena).
-
You need to install Steam, create a new account, and buy games. Here, a Russian Steam account is created without a VPN to a new email address, the procedure is the same as when installing VR Zone.
-
You also need to install a VPN on your computer, enable it, and download the Meta Desktop App, which will connect your computer and helmet via cable. The app is downloaded only when VPN is enabled. You will also need it to log in to your Meta account in this app after installing it (the account on your helmet and computer must be the same).
Download link: https://www.oculus.com/download_app/?id=1582076955407037
-
After logging in to your account, connect your helmet to your computer by wire and follow the instructions in the app. After connecting, put on your helmet and click Settings-Quest Link. The daily connection of the helmet to the computer is made by clicking this button inside the helmet (instead of Steam Link, as in VR Zone).
Step 3. Configure the platform.
Install the AnyDesk app on the car simulator's computer.
Go to the mobile platform manufacturer's website 2dof.ru, contact their representative on WhatsApp and tell them the platform's serial number (shown on the sign at the bottom of the platform). Pass them your Anydesk code and tell them that you need to configure the car simulator software. Write down which games you need to configure the platform for. After that, the technician will connect to the computer remotely, install and configure the program for platform movement in the game, and then send you some additional settings in the games.
Step 4. Launch Games
All games from the list you can run both in virtual reality mode and just on a computer without a helmet (except for Forza Horizon 5, it does not support VR). To select a mode, click play on Steam and select 1 of the 2 options (you can't check the “Remember choice” box!). Before playing, offer the client a choice of how they want to play on the car simulator, with or without a VR helmet.
When playing with VR glasses, the first-person view may shift. In this case, you need to make alignment so that the view from the VR helmet coincides with the view of the driver of the racing vehicle. In each game, there is a line “Center VR " in the control settings. Link one of the free buttons on your steering wheel to this function and use it if the player's view is not centered.
Note: You may also need the “Return to Track " feature if a player crashes into a fence. You can also link this function to a free button.
2DOF Car Simulator Software
Installation and first launch
Go to website 2DOF and download the latest version of the 2DOF Center software
After downloading, run the setup file setup_2DOF_Center.exe, for proper operation and further updates, we recommend installing the program in the default folder.
important! Before starting the program, check the connection of the USB cable of the mobile platform or other device from "2DOF". Before setting up the program, all games must be closed!
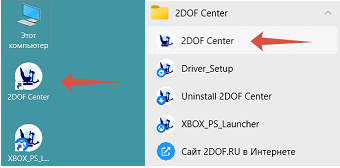
After installation, launch the 2DOF Center program (a shortcut on the desktop or in the Start menu).
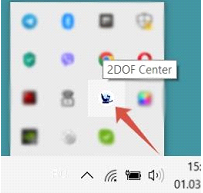
The program will start in the lower-right corner, on the taskbar, in the system icon area. Double-click the 2DOF Center icon with the left mouse button to open the main program window.
Next, on the Devices tab, check the connection of your devices (mobile platform, wind block, or belts), and the connected device model will become active. If the device is detected and active, then the program is configured and ready to work. You can go to the GAMES tab to configure the games you need.
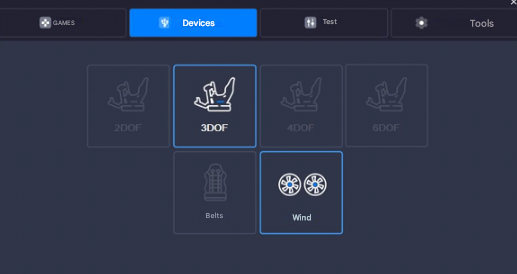
ВАЖНО!important! Платформы,Platforms которыеthat выпущеныhave сbeen началаreleased since the beginning of 2024 года,are определятьсяdetected автоматическиautomatically иand всеall настройкиsettings подтягиваютсяare поautomatically моделиadjusted автоматом.according Болееto ранниеthe модели,model. настраиваютсяEarlier вручную.models, set up manually.
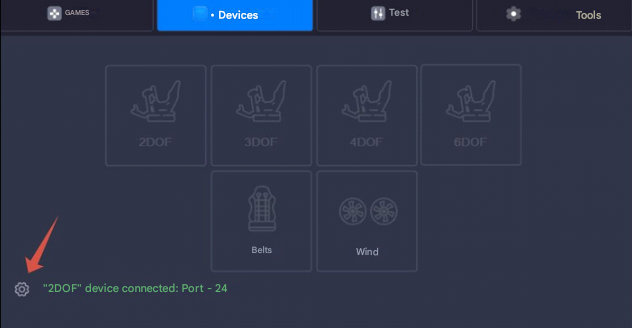
Если,If, вашаyour модельdevice устройстваmodel is detected and active, and a green label appears at the bottom: If обнаруженаthe 2DOF device иis активна,connected аand внизуthe появиласьport зеленаяnumber надпись:is specified, then you are ready to go! If not, it means that you have an earlier mobile platform model, released before the end of 2023. You must select the port manually.
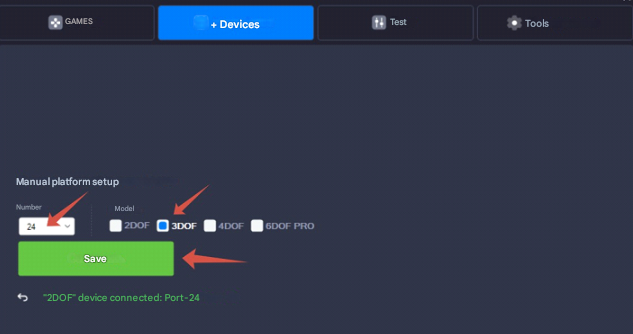
To manually configure the platform, on the Devices tab, click on the gear icon at the bottom, then select the desired port (which the program will detect) and the model of your platform, then click Устройство 2DOF подключено и указан номер порта, то у Вас все готово к работе! Если же нет, то значит что у Вас более ранняя модель подвижной платформы, выпущена до конца 2023 года. Необходимо выбрать порт вручную.Для ручной настройки платформы, на вкладке Устройства, нажмите на иконку шестерёнки в низу, далее выберете нужный порт (который обнаружит программа) и модель вашей платформы, после нажмите сохранитьsave.
ПрограммаThe настроенаprogram иis готоваconfigured кand работе.ready Можетеto переходитьwork. наYou вкладкуcan ИГРЫgo to the GAMES tab
Если,If, вашаyour модельdevice устройстваmodel неis обнаруженаnot иdetected неand активна,is аnot внизуactive, появиласьand краснаяa надпись:red message appears at the bottom:УстройствоDevice "2DOF" не найдено2DOF". Возможныеwas проблемы:not found. Possible problems:
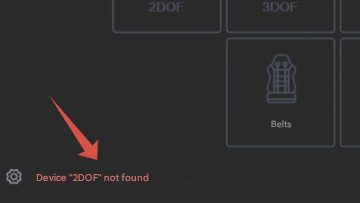
⦁ отключениеdisconnect the USB кабеляcable (проверьтеcheck подключениеthe connection of the USB провода,wire, подвижнойmobile платформыplatform илиor другихother девайсовdevices отfrom 2DOF), послеthen перезагрузитеrestart компьютер!your computer!
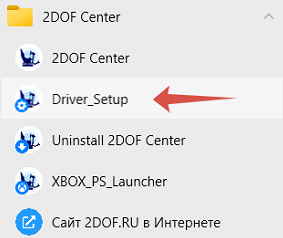
⦁ драйверthe устройстваdevice неdriver установленis not installed (вin некоторыхsome версияхversions of windows, драйверthe неdriver устанавливаетсяis автоматическиnot installed automatically, install it manually), установитеthen егоrestart вручную),your послеcomputer! перезагрузитеThe компьютер!driver Пакетpackage драйвераis доступенavailable вin менюStart Пускmenu -> папка 2DOF Center folder -> Driver Setup
Если,If, послеafter всехall вышеof перечисленныхthe действий,above вашаsteps, модельyour устройстваdevice неmodel обнаружена,is обратитесьnot заdetected, помощьюplease вcontact службу поддержки Компанииthe 2DOF. Mail:Mail support service for help: info@2dof.ru илиor Телеграмм:by Telegram: @help_2dof
ДляTo проверкиcheck работыthe подвижнойoperation платформы,of перейдитеthe наmobile вкладкуplatform, go to Тестthe Test tab, далееthen зеленуюclick кнопкуthe green buttonПодключить.Plug. ПеремещайтеMove ползунки,the влевоsliders иto вthe право,left подвижнаяand платформаright, должнаand двигатьсяthe вmobile platform should move in the desired direction. After that, click the нужномred Disable button направлении.and После,the нажмитеplatform краснуюwill кнопкуreturn to
its central position. The manual test is completed, you can go to Отключитьthe GAMES tab

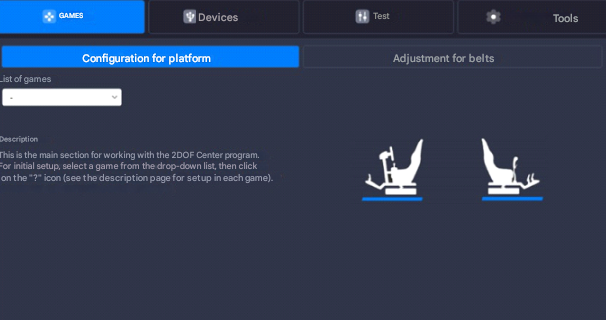
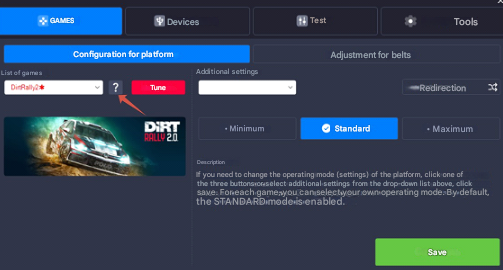
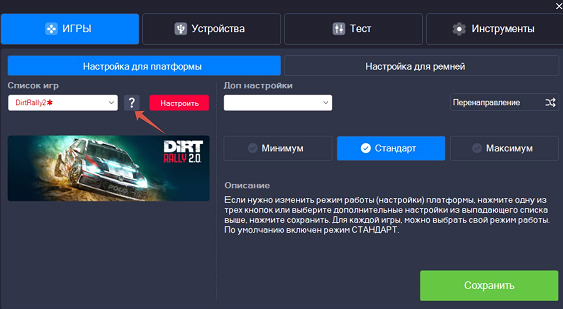
GAMES Section
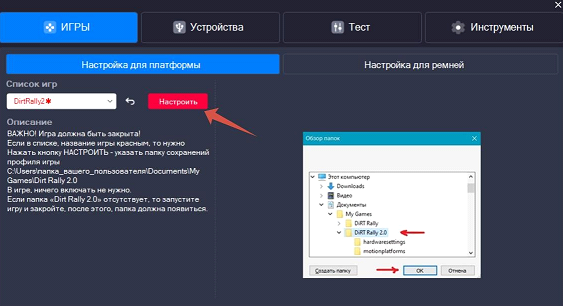
To set up the games you need, in the drop-down list, select a game and click on the question icon?, платформаnext вернётсяto вцентральноеthe положение.game Ручнойname. тестSee завершен,the можноdescription. переходитьEach наgame вкладкуhas its own setup instructions. Games highlighted in red must be customized! (this is done only once, after installing ИГРЫthe 2DOF Center program).
Раздел ИГРЫ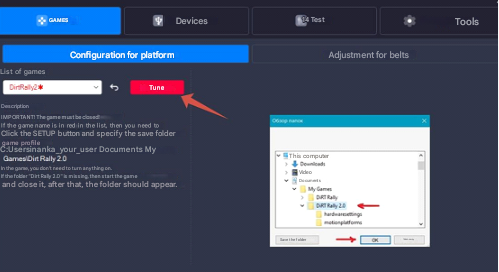
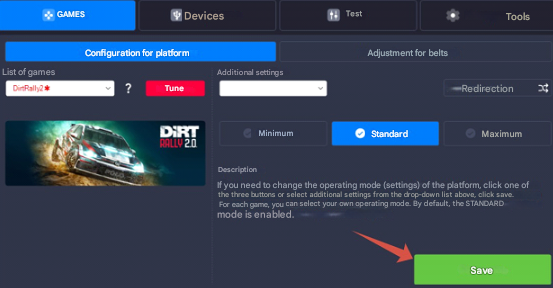
ДляSetup настройкиis complete, you can start the game
Recommendations
After all the settings, the 2DOF Center program window can be closed by clicking on the cross in the upper-right corner, the program will collapse into the windows system tray, and will work automatically. You just start the game and turn on the power button on the platform, the program automatically pulls up the desired profile (no need to open the program window every time and select the game from the list, the program works in minimized form, нужных Вам игр, в выпадающем списке, выберите игру и нажмите на значок вопроса ?, напротив названия игры. Смотрите описание, для каждой игры своя инструкция по настройке. Игры, выделенные красным цветом, обязательно настроить! (делается только один раз, после установки программы 2DOF Centeralways).
For convenience, you can enable autorun of the program, put a check mark on the Tools tab (Autorun), then the program will start automatically when the computer starts up.
Настройка завершена, можете запустить игру
РЕКОМЕНДАЦИИ
После всех настроек, окно программыon 2DOFthe CenterGAMES можно закрыть, нажатием на крестик в правом верхнем углу, программа свернётся в системный трей windows, и будет работать в автоматическом режиме. Вы только запускаете игру и включаете кнопку питания на платформе, программа автоматом подтянет нужный профиль (не нужноtab, каждыйyou разcan открыватьchange окноthe программыoperating иmode выбирать(settings) игруfor изyour списка,platform. программаBy работает в свернутом виде, всегда).
Для удобства можете включитьdefault, автозапускthe Standard mode программы,is поставитьenabled галочкуfor наeach вкладке Инструменты (Автозапуск), тогда программа будет запускаться при загрузке компьютера автоматически.
Так же, на вкладке ИГРЫ можно изменить режим работы (настройки), для вашей платформы. По умолчанию, для каждой игры, включен режим Стандартgame
⦁ СтандартStandard - подойдетsuitable дляfor большинстваmost пользователей.users. Наклоны,Tilt, углы,angle, подъемlift, иand смещениеoffset настроеныsettings наare configured for 60% работыof подвижнойthe платформы.mobile Оптимальныйplatform's режим.operation. Optimal mode.
⦁ Минимум - отклонениеdeviation доof up to 30%, подойдетsuitable дляfor тех,those ктоwho используетuse ВРa шлемVR илиhelmet сосредоточенor наfocus результате.on the result.
⦁ Максимум - отклонениеdeviation доof up to 90%, дляfor самыхthe отважныхmost courageous
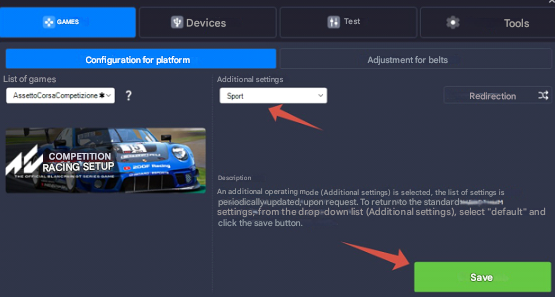
⦁ ДопAdditional настройкиsettings - индивидуальныеindividual настройкиsettings поon запросу,request, списокthe настроекlist периодическиof пополняется.settings Дляis возвратаupdated кperiodically. стандартнымTo настройкам,return изto выпадающегоthe спискаdefault (Доп.settings, настройки),select выберитеdefault from поthe умолчаниюdrop-down list (Advanced Settings) иand нажмитеclick кнопку сохранитьSave
ЕслиIf уyou Вас,still осталисьhave вопросыany илиquestions возниклиor сложностиhave сany программой,difficulties обращайтесьwith вthe службуprogram, поддержкиplease Компанииcontact «2DOF».the Mail:2DOF support service. Email address: info@2dof.ru илиor Телеграмм:by Telegram: @help_2dof