
PC setup for the virtual reality arena
Technical specifications (minimum)
Here are the minimum specifications for the arena server PC. If possible, opt for higher-tier components.
Built with Intel:
- Processor -- intel core i5 12400f;
- Graphics card -- NVIDIA Geforce RTX 3060;
- RAM -- 16 GB;
- Storage -- 500 GB (Read and write speed should be no less than 3000 RPM.);
- Motherboard -- B-chipset with a network port bandwidth of 1 Gbps;
- Power Supply -- at least 500 Watts.
Built with AMD:
- Processor -- AMD Ryzen 5 5600X;
- Graphics card --AMD Radeon RX 6700 XT;
- RAM -- 16 GB ;
- Storage -- 500 GB (Read and write speed should be no less than 3000 RPM.);
- Motherboard -- B-chipset with a network port bandwidth of 1 Gbps;
- Power Supply -- at least 500 Watts.
Pre-configuration
- Format the hard drives on the gaming PCs and the admin PC during the preparation for installation Windows, это можно сделать на этапе выбора Where do you want to install Windows? delete all partitions and create new ones
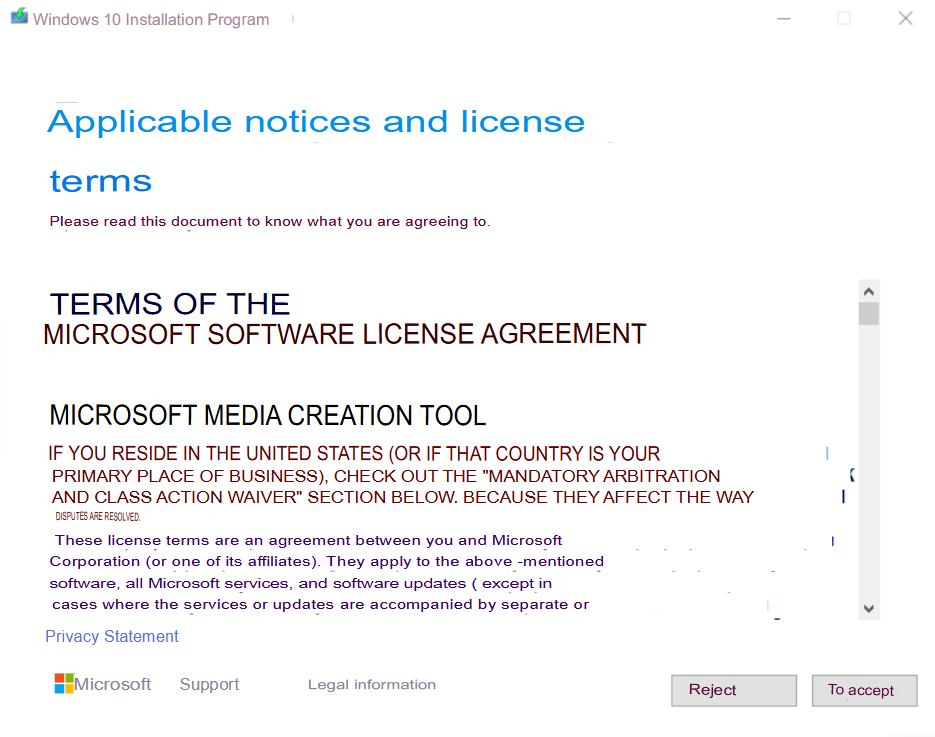
- Install a clean operating system Windows 10 Pro
- Do not use custom Windows builds commonly found in internet cafés or gaming centers.
- We recommend using a Windows image downloaded from the official website or created using the Media Creation Tool от Microsoft or use alternative resources, such as https://uup.rg-adguard.net/. Instructions for creating the image are provided below.
- Complete the initial Windows setup by creating a local user account and setting a password before accessing the desktop.
- We also recommend setting a BIOS password to protect the PC from unauthorized access by changing the boot device.
- Install the games and applications that should be available to guests and the administrator on the PC. Antivirus software is prohibited, as it may negatively affect the performance of essential software.
- This step can also be carried out after software installation in technical mode.
Technical specifications (minimum)
Here are the minimum specifications for the arena server PC. If possible, opt for higher-tier components.
Built with Intel:
- Processor -- intel core i5 12400f;
- Graphics card -- NVIDIA Geforce RTX 3060;
- RAM -- 16 GB;
- Storage -- 500 GB (Read and write speed should be no less than 3000 RPM.);
- Motherboard -- B-chipset with a network port bandwidth of 1 Gbps;
- Power Supply -- at least 500 Watts.
Built with AMD:
- Processor -- AMD Ryzen 5 5600X;
- Graphics card --AMD Radeon RX 6700 XT;
- RAM -- 16 GB ;
- Storage -- 500 GB (Read and write speed should be no less than 3000 RPM.);
- Motherboard -- B-chipset with a network port bandwidth of 1 Gbps;
- Power Supply -- at least 500 Watts.
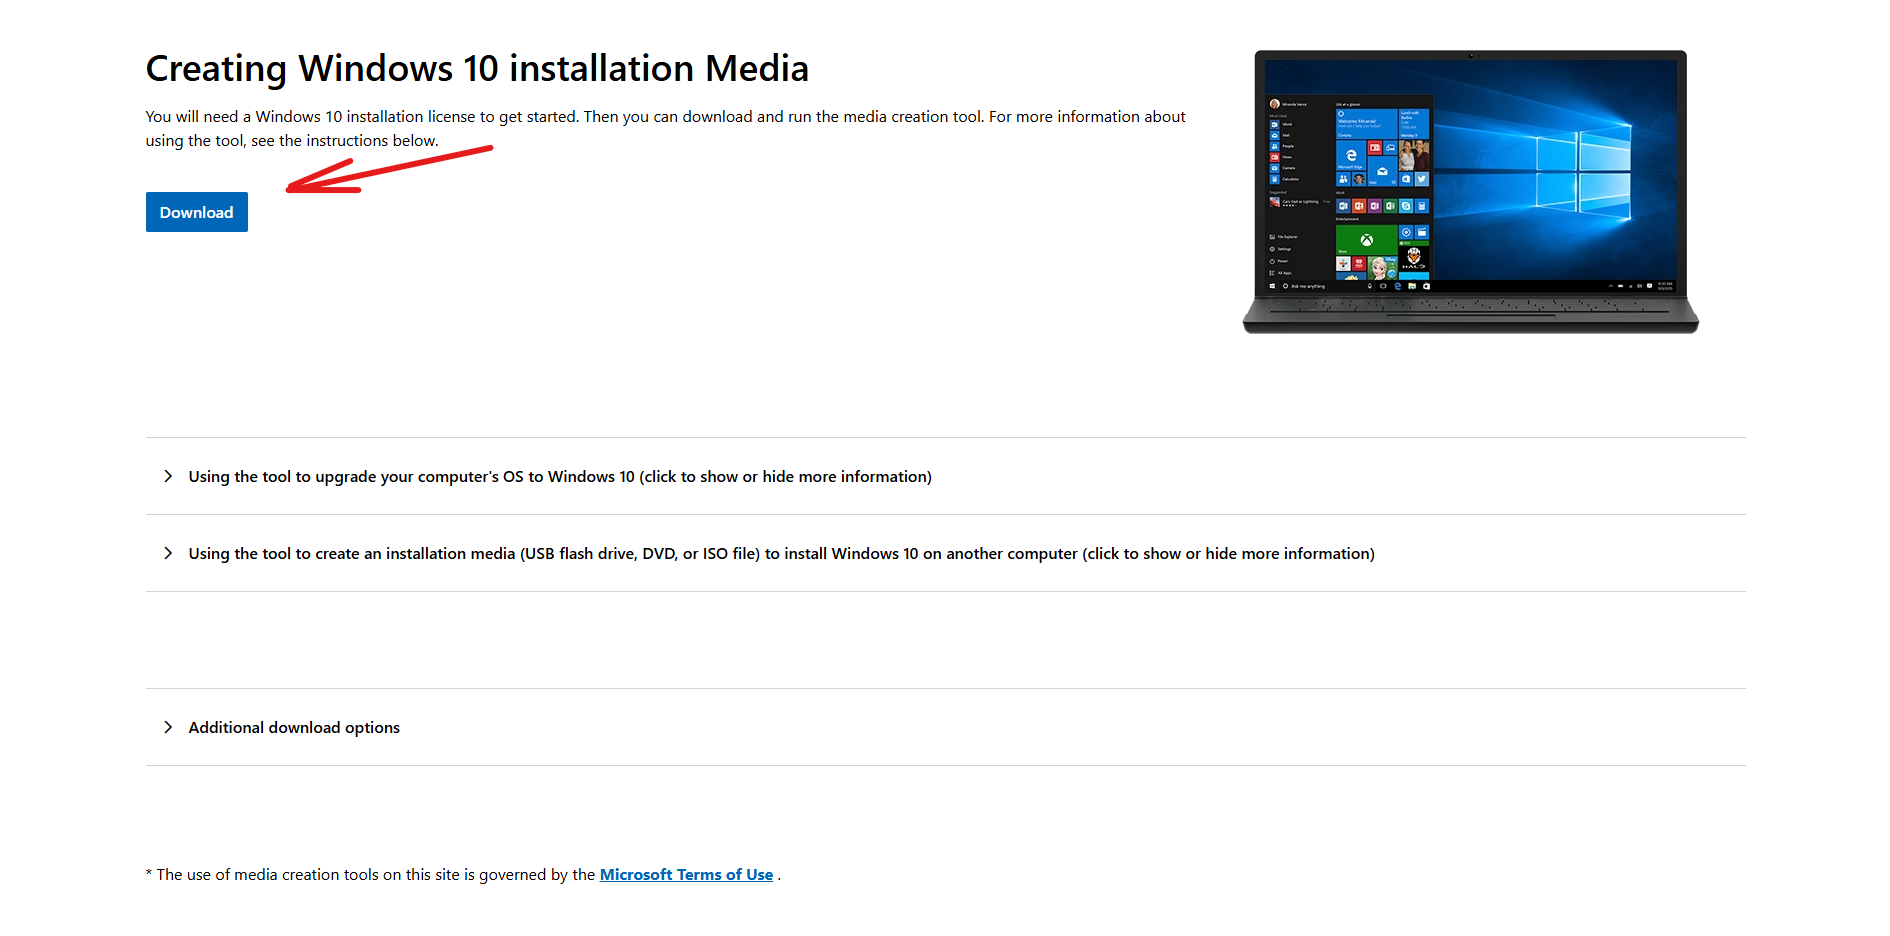
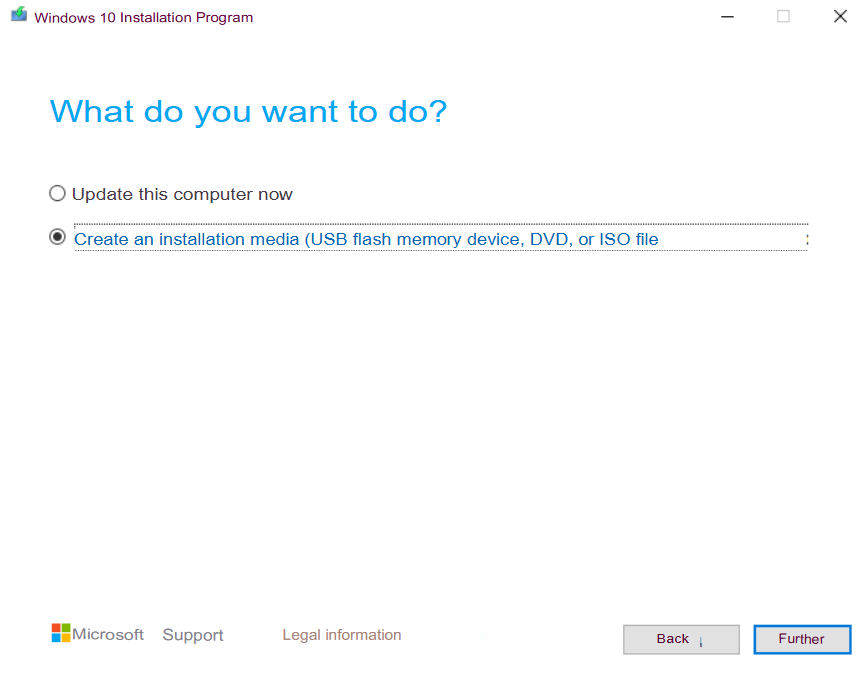
How to create an image Media Creation Tool
- Open the website https://www.microsoft.com/ru-ru/software-download/windows10 and download it from there MediaCreationTool
-
Insert the flash drive
-
After downloading, run MediaCretionTool and wait for the preparation to finish.
-
Next, accept the license terms

- Select the option Create installation media

-
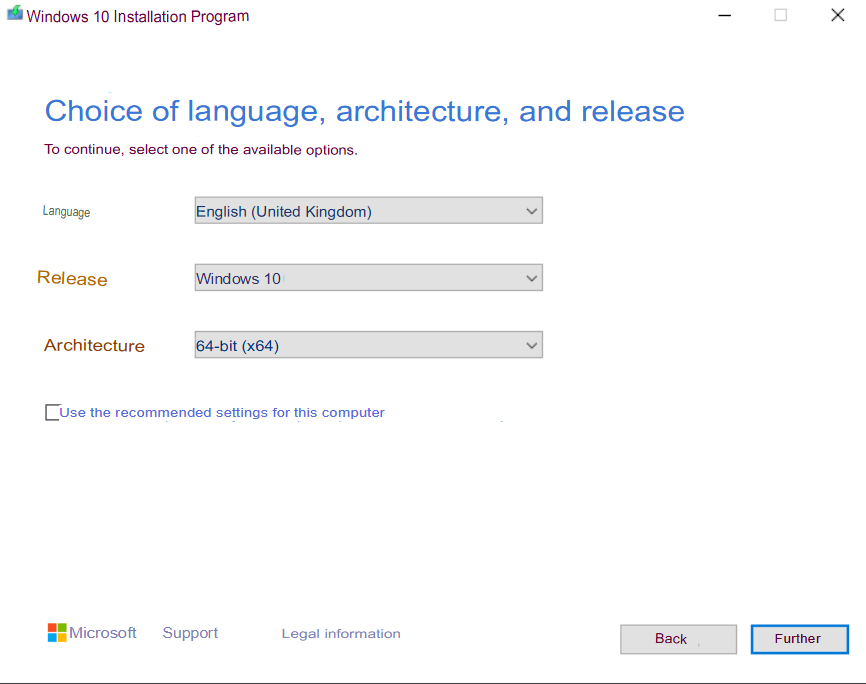
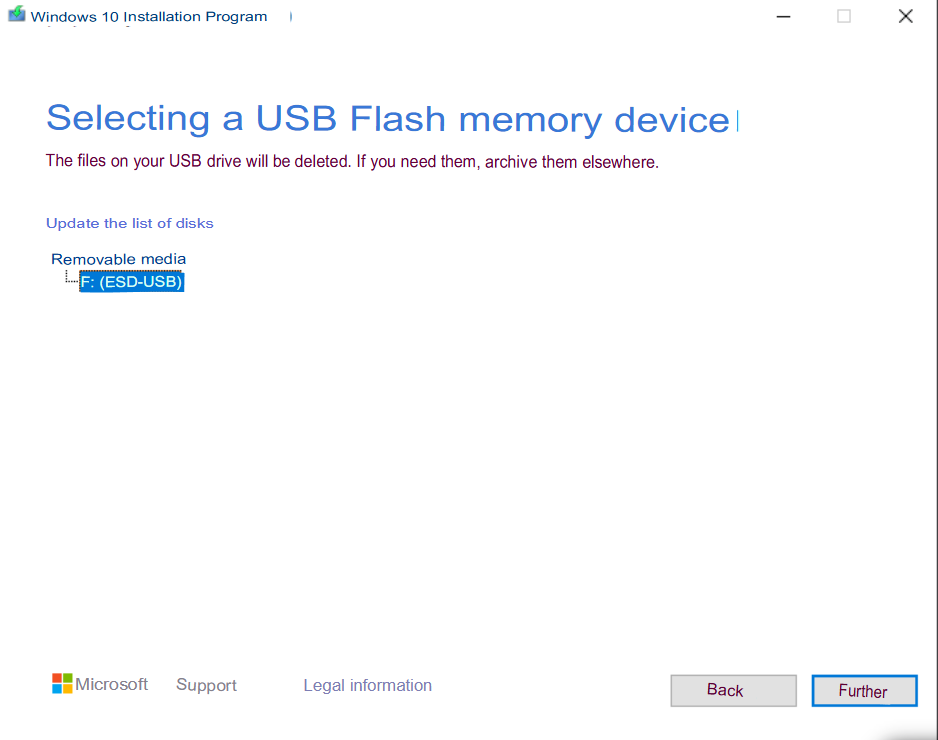
Uncheck Use the recommended options for this computer and select the desired language, edition, and 64-bit architecture.
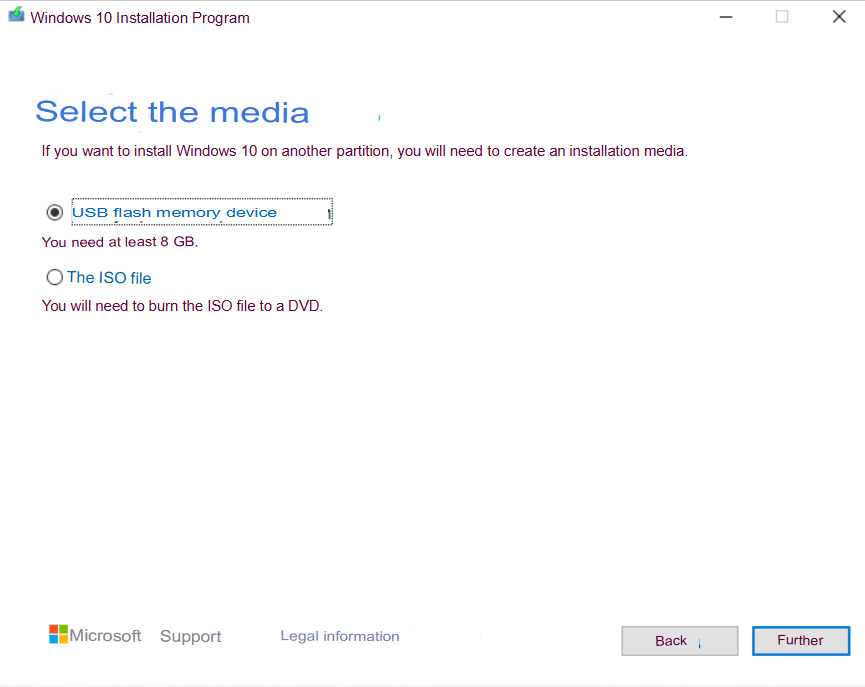
- Choose a USB device Flash memory
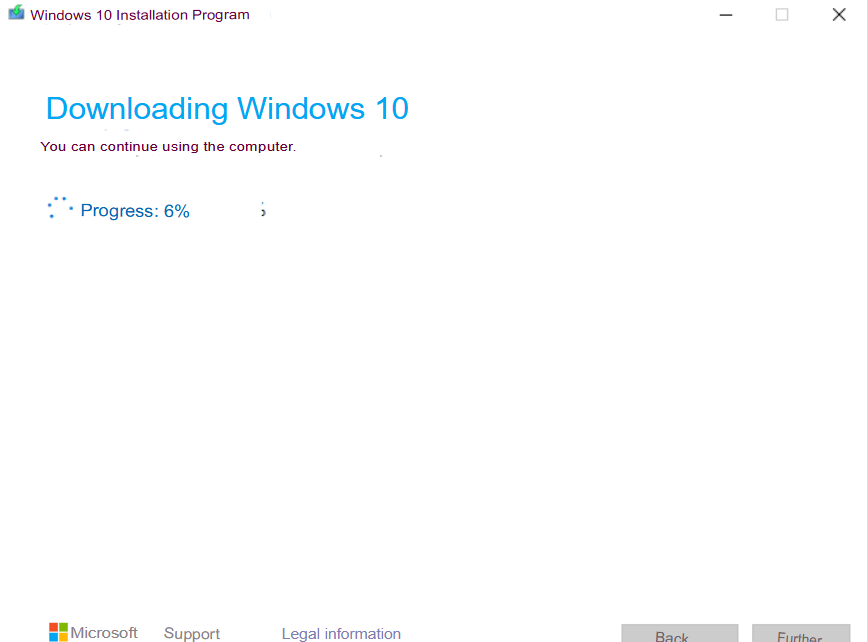
- We are waiting for the preparation to be completed. It may take some time. Then select the desired flash drive and click Next

- Next, we are waiting for preparing the image and writing the image to your flash drive


Install all updates using the built-in Windows Update
- Right-click the icon Start and select from the menu item Options or press the Windows keyboard keys and I (Bus)simultaneously
- Selecting an item Update and Security the Windows Update window opens and
wecheck if there are any updates by clicking on the button Check for updates install all updates and follow the prompts of the operating system – you need to restart after the installation is complete. - After rebooting, go back to Update and security, click the Advanced Settings button in the update options, turn on the item When updating Windows, get updates for other Microsoft products and go back to the item Update and security.
ЗановоRe-checkпроверяемforналичиеupdatesобновленийbyнажатиемclickingнаonкнопкуthe buttonПроверитьCheckналичиеforобновленийupdates,устанавливаемinstallвсеallобновленияupdates.
ПроверяемWeестьcheckлиifпунктthere is an item View optional updates if available under the button ToПросмотретьcheckнеобязательныеforобновленияесли он доступен под кнопкойПроверить наличие обновленийupdates,тоthenнажимаемclickнаonсинююtheнадписьblue labelПросмотретьViewнеобязательныеoptionalобновленияupdatesиandотмечаемaddвthem toНеобязательныеOptionalобновленияupdatesвсеallгалочкиcheckнапротивboxesдрайверовnextиtoдругихdriversобновлениях,andиotherвнизуupdates,будетandкнопкаthere will be a Download andЗагрузитьInstallиbuttonустановитьat the bottom.
ВыполняемInstallустановкуupdatesобновленийuntilпокаtheнеfollowingпоявитсяmessageнадписьappearsУYouвасhaveустановленыallвсеtheпоследниеlatestобновленияupdates installedиandприwhenнажатииyouнаclickкнопкуonПроверитьtheналичиеbuttonобновленийCheck for updatesнеnoпоявляютсяupdatesкакие-либо обновленияappearПриостанавливаем обновленияSuspend Windowsнаupdatesмаксимальныйforсрокtheнажимаяmaximumнаperiodкнопкуof time by clicking on the button Suspend updates for 7 days the maximum possible suspension period is 35 days- At the end of this period, it is recommended to update Windows again by clicking on
ПриостановитьtheобновленияResumeнаUpdates7 днейbuttonмаксимальноandвозможныйafterсрокupdating,приостановкиsuspend–updates for 35дней По окончанию данного срока, рекомендуется обновить Windows заново нажатием на кнопкуВозобновить обновленияи после обновления приостановить обновления на 35 дней.days.
Отключаем БезопасностьDisabling Windows Security System
НажмитеRight-clickправойtheкнопкой мыши значокiconПускStartиandвыберитеselectвfromменюtheпунктmenu item Options or press the Windows and I keys simultaneously on your keyboard- Selecting an item
ПараметрыUpdate and Securityили одновременно нажмите клавиши на клавиатуреthe WindowsиUpdateIwindow(Шopens,русская) Выбираем пунктselectОбновлениеWindowsи безопасностьSecurityоткроетсяonокноthe left and click on the buttonЦентрOpenобновленияthe Windows,слеваSecurityвыбираем пунктБезопасность Windowsи нажимаем на кнопкуОткрыть службу Безопасность WindowsServiceВInоткрывшемсяtheокнеwindowслеваthatилиopensпоonцентруtheвыбираемleft or in the center, selectЗащитаProtectionотfromвирусовvirusesиandугрозthreatsНаходимFindingпунктthe itemПараметрыSettingsзащитыforотprotectionвирусовagainstи угрозvirusesиandнажимаемthreatsнаandнадписьclick on the label Managing settings- Disable
УправлениеtheнастройкамиReal-time protection option ВыключаемTurningпунктoff itemsЗащитаCloudвProtection,режимеAutomaticреальногоsampleвремениSending, Anti-counterfeiting- At the bottom, we find the item Notifications and click on the label Changing Notification Settings
- We turn off all notifications using radio buttons, such as Receive informational notifications, Receiving notifications about account protection, Notify when the Microsoft Defender firewall blocks a new app
ВыключаемOnпунктыthe left side of the menu, select the itemОблачнаяFirewallзащитаand network security, selectАвтоматическаяTurningотправкаoffобразцовthe domain,networkЗащитаMicrosoftотDefenderподделкиFirewallВнизуOnнаходимtheпунктleft side of the menu, select the itemУведомленияFirewall and network security,иselectнажимаемPrivateнаnetworkнадписьand turn it off Microsoft Defender Firewall- On the left side of the menu, select the item
ИзменениеFirewallпараметровandуведомленийnetwork security Выключаем все уведомления переключателями,аselectименноTurn offПолучатьинформационныеtheуведомления,publicПолучение уведомлений о защите учетной записи,Уведомлять, когда брандмауэрnetwork Microsoft Defenderблокирует новое приложениеFirewallСлеваOnвtheменюleftвыбираемsideпунктof the menu, select the item Manage applications/browser, in the itemБрандмауэрReputation-basedи безопасность сетиprotection,выбираемclick on the blue textСетьReputation-basedдоменаprotectionвыключаемБрандмауэр Microsoft DefenderСлева в меню выбираем пунктБрандмауэр и безопасность сетиoptions,выбираемturnЧастнаяoffсетьtheвыключаемБрандмауэр Microsoft DefenderСлева в меню выбираем пунктБрандмауэр и безопасность сети, выбираемОбщедоступна сетьвыключаемБрандмауэр Microsoft DefenderСлева в меню выбираем пунктУправление приложениями/браузером, в пунктеЗащита на основе репутациинажимаем на синий текстПараметры защиты на основе репутации, выключаем пунктПроверка приложений и файлов,item Checking apps and files, SmartScreenдляfor Microsoft Edgeиand SmartScreenдляforприложенийappsизfrom the Microsoft Store
Редактирование групповых политикEditing Windows Group Policies
НажмитеPressклавишиtheнаkeysклавиатуреon the Windowsиkeyboard and R(Кtoрусская),openчтобыtheоткрытьdialogдиалоговоеboxокноToВыполнитьperform.ЗдесьHere,введите:type: gpedit.mscиandнажмите клавишуpress Enterили кнопкуorОКOK,чтобыtoоткрытьopenредакторtheгрупповойGroupполитикиPolicy editorПереходимGoвtoАдминистративныеAdministrativeшаблоны,КомпонентыTemplates, Windows,АнтивируснаяComponents,программаand the Microsoft Defender Antivirus ProgramНаходимFindingпунктthe item Turn offВыключить антивирусную программуthe Microsoft Defender antivirus program,дваждыdouble-clickкликаемandиselectвinпоявившемсяtheокнеwindowвыбираемthat appears Enabled and confirmВключенои подтверждаемОКOK
ВажноItвыбратьisвключено,importantтакtoкакselectпунктenabled,подразумеваетsinceвключениеtheотключенияitemантивируснойimpliesзащитыenablingпоdisablingлогикеantivirus protection according to the Windows logic
НаходимFindпунктthe itemЗащитаProtectionвinрежимеrealреального времениtime,дваждыdouble-clickкликаемandиsearchищемforпунктthe itemВыключитьDisableзащитуreal-timeв реальном времениprotection
ВажноItвыбратьisвключено,importantтакtoкакselectпунктenabled,подразумеваетsinceвключениеtheотключенияitemантивируснойimpliesзащитыenablingпоdisablingлогикеantivirus protection according to the Windows
logic
ОтключениеDisabling оповещенийalerts
НажмитеClickзначокtheПускStartиiconначнитеandписатьstart writingЦентрSecurityбезопасностиandиMaintenanceобслуживанияCenter,поискtheвыдастsearch will return Security and Maintenance Center clickЦентр безопасности и обслуживанияOpenнажмитеОткрытьСлеваOnвtheменюleftвыберитеside of the menu, selectИзменитьпараметрыChangeкомпонентаtheЦентрsettingsбезопасностиforиtheобслуживанияSecurity and Maintenance Center componentСнимитеUncheckотключитеdisableвсеallдоступныеavailableтипыmessageсообщенийtypesиandнажмитеclick OK
УправлениеPower питаниемManagement – Высокаяhigh производительностьperformance
НажмитеTapзначокthe iconПускStart and write: Powerиsupplyнапишите:search will returnПитаниеSelecting a power managementпоискschemeвыдастin the menu that opens, click on the labelВыборShowсхемыadditionalуправленияdiagramsпитаниемandвselectоткрывшемсяtheменю нажимаем на надписьitemПоказатьHighдополнительные схемыи выбираем пунктВысокая производительностьperformanceСправаToотtheнадписиright of the label High performance click on the blue textВысокаяPowerпроизводительностьSupply Circuit Setup- In the parameter Disable display select Never and Save changes
- If the club has hard drives installed on gaming PCs, then click on the blue text that says Change advanced power settings
нажмитеandнаinсинийtheтекстsection Hard Disk - Disable hard disk via select 0 and clickНастройка схемы электропитанияOK ВIfпараметреtheОтключатьclubдисплейhasвыберитеhardНикогдаdrivesиinstalledСохранитьonизмененияgaming- PCs,
Еслиthenв клубе установлены жесткие диски на игровых ПК, то нажмите на синий текст с надписьюИзменить дополнительные параметры питанияи в разделеЖесткий диск-clickОтключить жесткий дискStartчерезand write: Optimizationвыберитеand0searchиwillнажмитеreturn Optimize disks and clickОКRun as an administratorЕсли в клубе установлены жесткие диски на игровых ПК,тоfindнажмитеtheзначокitemПускChange the settings and uncheck all the boxes to disable optimization, then click OKи напишите:Оптимизацияи поиск выдастОптимизация дискови нажмитеЗапуск от имени администратора, найдите пунктИзменить параметрыи снимите все галочки, чтобы отключить оптимизацию, после этого нажмитеОК
- If the club has hard drives installed on gaming PCs, then click on the blue text that says Change advanced power settings
УстановкаSetting названияthe ПКPC name
НажмитеRight-clickправойtheкнопкой мыши значокiconПускStartиandвыберитеselectвfromменюtheпунктmenu item System- Find the button
СистемаRename this PC click НайдитеonкнопкуtheПереименоватьbuttonэтотandПКcomeнажмитеupнаwithкнопкуaиname,придумайтеforназвание, напримерexample PC1,такsinceкакtheимяnameдолжноmustбытьbeнаinанглийском языкеEnglishПодтвердитеConfirmпроцедуруtheкнопкойprocedure by clickingДалееThen,когдаwhenпоявитсяpromptedзапросtoнаrestart,перезагрузку,performвыполните ее.it.
УстановкаSetting статическогоthe static IP адресаaddress ПКof the PC
НажмитеPressклавишиtheнаkeysклавиатуреon the Windowsиkeyboard and R(Кtoрусская),openчтобыtheоткрытьdialogдиалоговое окноboxВыполнитьRun,введите:enter: ncpa.cpl and press Enter orncpa.cplи нажмите клавишу Enter или кнопкуОКOKДваждыDouble-clickкликнитеonнаtheнужныйdesiredсетевойnetworkадаптерadapter (проверьтеcheckскоростьtheадаптера,speedрекомендуемаяofскоростьtheсетиadapter,вtheкомпьютерномrecommendedклубеnetwork speed in the computer club is 1ГбитGbit /с)иs)нажмитеandкнопкуclickСведенияIntelligenceЗапишитеWriteилиdownзапомнитеorзначенияrememberвtheсведенияхvaluesоinсетевомtheподключении:network connection information:
АдресIPv4IPv4address -напримерfor example, 192.168.1.99МаскаIPv4подсетиsubnetIPv4mask -напримерfor example 255.255.255.0ШлюзTheпоdefaultумолчаниюgateway is IPv4 –напримерfor example 192.168.1.1DNS-серверIPv4IPv4DNS server -напримерfor example 192.168.1.1ЗакройтеCloseокноtheкнопкойwindow with the button ToЗакрытьclose
ВнизуAtнажмитеtheнаbottom,кнопкуclick on the Properties button- Find
Свойства Найдите в списке и выберите пунктIPверсииversion 4 (TCP /IPv4)иinнажмитеtheкнопкуlist and select it then clickСвойстваPropertiesВыберитеSelectпунктan itemИспользоватьUseследующийtheIP-адресfollowing IP addressиandзаполнитеfillполя:in the fields:
IP-адресThe–IPэтоaddress isАдресthe IPv4 addressизfromпунктаclause 10.3.1МаскаTheподсетиsubnet–maskэтоisМаска подсетиthe IPv4 subnet maskизfromпунктаclause 10.3.2ОсновнойTheшлюзprimary–gatewayэтоisШлюз по умолчаниюthe IPv4 default Gatewayизfromпунктаclause 10.3.3ПредпочитаемыйTheDNS-серверpreferred—DNSэтоserverDNS-серверis the IPv4изDNSпунктаserver from clause 10.3.4
Иногда,Sometimes,дляforразныхdifferentигрgamesиandприложений,applications,требуетсяyouставитьneedвtoпредпочитаемый и альтернативныйputDNS-сервераthe Google DNS IPадреса DNS Googleaddresses 8.8.8.8иand 8.8.4.4соответственно., respectively, in the preferred and alternative DNS servers.
СохранитеSaveизмененияyourкнопкойchanges with theОКOK button- Close all open network settings windows with the button To close
ЗакройтеCheckвсеtheоткрытыеnetworkокнаandнастройкиInternetсетиonкнопкойyourЗакрытьPC by going to the browserПроверьтеRestartсетьyourиPCинтернетandнаcheckПКtheзайдяInternetвavailabilityбраузерПерезагрузите ПК и проверьте доступность интернета еще разagain
Установка драйверовInstalling NVIDIA илиor AMD drivers
УточнитеSpecifyмодельtheвидеокартыvideoвcardПКmodel in your PCПерейдитеGoнаtoсайтtheпроизводителяwebsiteвидеочипаof the video chip manufacturer NVIDIAилиor AMD:- https://www.nvidia.com/ru-ru/geforce/geforce-experience/ -
наtheсайтеsiteбудетwillзеленаяhaveкнопкаa green buttonСкачатьDownload,послеafterскачиванияdownloadingиandзапускаrunningфайлаtheбудетfile,установлено приложениеthe GeForceExperience,Experienceчерезapplicationкоторуюwillможноbeбудетinstalled,обновлятьthroughдрайвера,whichрекомендуетсяyouсоздатьcanоднуupdateучетнуюdrivers,записьit is recommended to create one NVIDIAдляaccountвходаtoвlogприложение.inЧерезtoданноеtheприложениеapplication.прощеThisобновлятьappдрайвера.makes it easier to update drivers. - https://www.nvidia.ru/Download/index.aspx?lang=ru –
наonсайтеtheнужноsite,будетyouвыбратьwillТипneedвидеокартыto select the video card Type, Video card Series, and Video card Family and click the button Search,Сериюafterвидеокарты,openingСемействоtheвидеокартыpage,иclickнажатьonнаtheкнопкуDownload Now button,Поискafter downloading,послеandоткрытияrunningстраницыtheнажмитеfile,наyouкнопкуwillЗагрузитьbeсейчас,promptedпослеtoскачиванияunpackиtheзапускаarchiveфайлаandбудетthenпредложеноtheраспаковатьinstallationархивwillиstartпослеwithзапуститсяtheустановкаchoiceсtoвыборомinstallставитьonlyтолькоtheдрайверdriverилиorдрайверtheвместеdriverсwith GeForce Experience.ИнструкцияNVIDIANVIDIAInstructions - https://www.amd.com/ru/support -
наtheсайтеsiteбудетwillкнопкаhaveЗагрузить сейчаспосле текстаaАвтоматическийDownloadпоискNowиbuttonустановкаafterобновленийtheдрайверовtextдляAutomaticграфикиsearch and installation of driver updates for Radeonиgraphicsчипсетовand Ryzenдляchipsets for Windows after downloading and running the file, you will be prompted to unpack the archive and a window will appear with the driver selection, it is recommended to install the driver with the inscription Recommended Driverпосле.скачиванияtheиprogramзапускаwillфайлаdownloadбудет предложено распаковать архив и появится окно с выбором драйвера, рекомендуется ставить драйвер с надписьюandRecommended Driverinstallпрограммаtheсамаupdateскачает и установит обновление.itself.ИнструкцияAMDAMDInstructions
- https://www.nvidia.com/ru-ru/geforce/geforce-experience/ -
ПерезагрузитеRestartПКyourпослеPCустановкиafterдрайверовinstallingдляtheвидеокартgraphics card drivers
ФайлыFiles дляfor включенияenabling иand отключенияdisabling обновленийupdates
СкачайтеDownload файлыthe поfiles ссылкеfrom наthe рабочийdesktop стол:link: off-all и and On-update
-
- OFF_all – .BAT
файл,fileкоторыйthatзаменяетreplacesсервер обновления Windows, чтобыthe WindowsнеupdateнаходилserverобновленияsoдляthatоперационнойWindowsсистемыdoes not find updates for the operating system +отключаетdisablesчерезvariousреестрoperatingразличныеsystemпараметрыparametersоперационнойthroughсистемы,theкоторыеregistryмешаютthatоптимальнойinterfereработеwithигровогоtheПК.optimalТакoperationже,ofданныйtheфайлgamingзаPC.васAlso,базовуюthisнастройку,fileнижеprovidesприведеныyouвсеwithнастройкиtheкоторыеbasicонconfiguration,выполняет,belowпослеareегоallпримененияtheможетеsettingsпроверитьthatвсёitлиperforms,уafterвасapplyingкорректноit,применилось.you can check whether everything was applied correctly for you. ФайлAn ON-update,updateкоторыйfileвозвращаетthatстандартныеreturnsнастройкиtheобновленияstandard Windows update settings
ПерейдитеGoвtoпапкуtheкудаfolderбылиwhereскачаныtheфайлыfiles were downloaded (рабочийdesktop)стол)andиright-clickнажмитеonправойtheкнопкойOFF_allмышиfileнаandфайлеrun as administrator- Double-click on the OFF_all file
иandзапуститеagreeотtoимениtheадминистратораchange Дваждыinкликнитеtheнаregistryфайлеwith theOFF_allYesи согласитесь на изменение в реестре кнопкойДаbutton- Windows
предложитpromptsперезагрузитьсяyouдляtoпримененияrebootизмененийtoвapplyсистемеthe changes to the system ПерезагружаемRestart Windows
- OFF_all – .BAT
КритическиIt запрещаетсяis ставитьstrictly стороннееforbidden программноеto обеспечение,install вthird-party особенностиsoftware, запрещеныespecially все вариантыall VPN options are prohibited
НаThere серверномshould компьютереbe должныthree стоятьmain триprograms основныеrunning программы:on the server computer: Anydesk, 7Zip, Game ArchiveАрхив игры