Configuring network equipment
- The more correct you make the network structure, the less it will take for other employees and people to understand it.
- A competent network structure allows you to properly configure the equipment so that it does not interfere with other equipment (or even neighbors).
- In addition, it guarantees the stability of your club's operation in order to avoid incidents related to the network part.
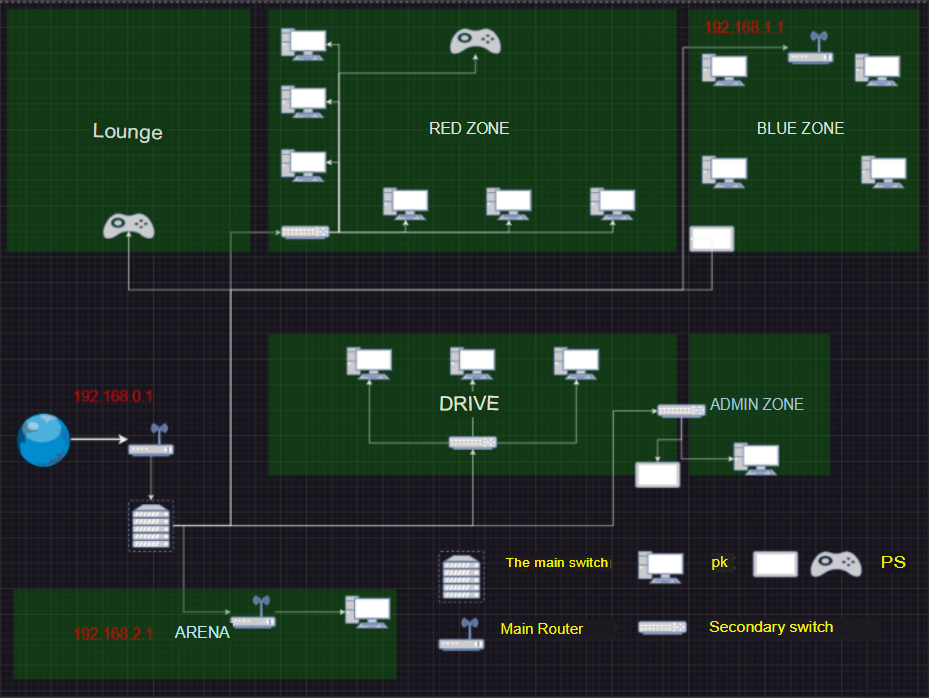
- Playing the game on virtual reality helmets in an arena with free movement.
- Image quality and the absence of "Friezes" on stationary zones with a wireless connection.
- Head router, it doesn't have to be super powerful, but it must support Gigabit ports
- If you have fixed zones that are connected wirelessly, then accordingly, each of the helmet has its own router, the subnet is necessarily changed for them, and configuration is also made in the router itself.
- Will add another component - the Arena with free movement. You also need a separate router with its own specific settings, with a dedicated subnet.
Keenetic
Initial setup of the Keenetic router
First of all, we need to configure the head router, which will be the central control body of the entire network part.
The router must have Gigabit ports in order not to become a bottleneck in the local network. A good option is the Keenetic Hero 4G router. The router has a USB port. In case of an emergency, you can always quickly reconfigure it to receive a signal from a USB modem (This situation is relevant when the provider has a problem with its hosting and equipment).
Go to settings:
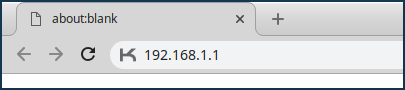
1) Authorization and configuration -- in order to get into the router's admin panel, you need to connect it to the power supply, as well as plug the provider's wire into the input port, and plug a regular cable into the output port and connect it to the computer.
Enter in the browser my.keenetic.net and 192.168.1.1 (by default, keenetic routers have this IP address for logging in.

Go to configuring the router:
On the welcome page of the web configurator, click the "Start configuration" button. A step-by-step search will start Wizard for initial configuration of the Internet center. Choose one of the settings options provided.
The first router setup
We will show you an example of configuring Internet access using a direct Ethernet connection, when the Internet cable from the provider is connected directly to the input port on the router. This connection without authorization is also called IPoE.

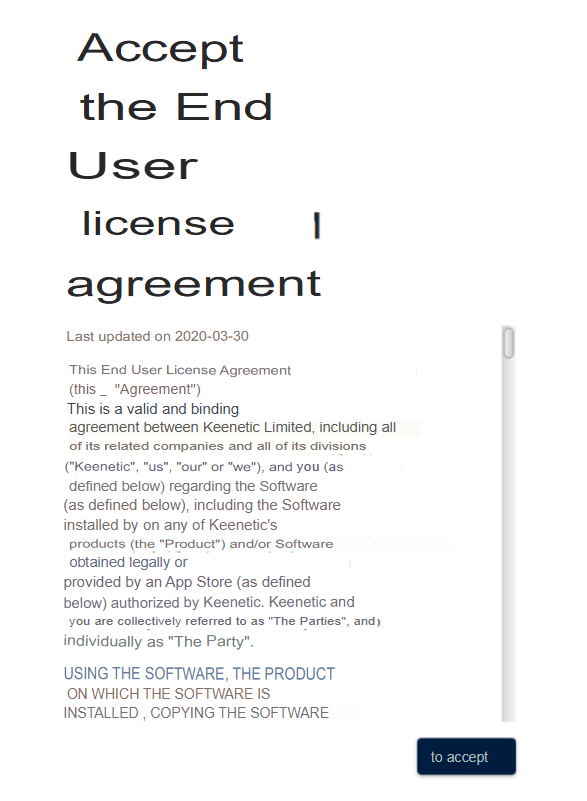
When you first configure your router, you must accept the license agreement. Read it and click "Accept" to continue.
Enter the Internet Center administrator password and click Next (write the password in a safe place).
In the Internet center, you must enter the password for the administrator account (Admin). This is necessary to protect against unauthorized access to the Internet center settings.
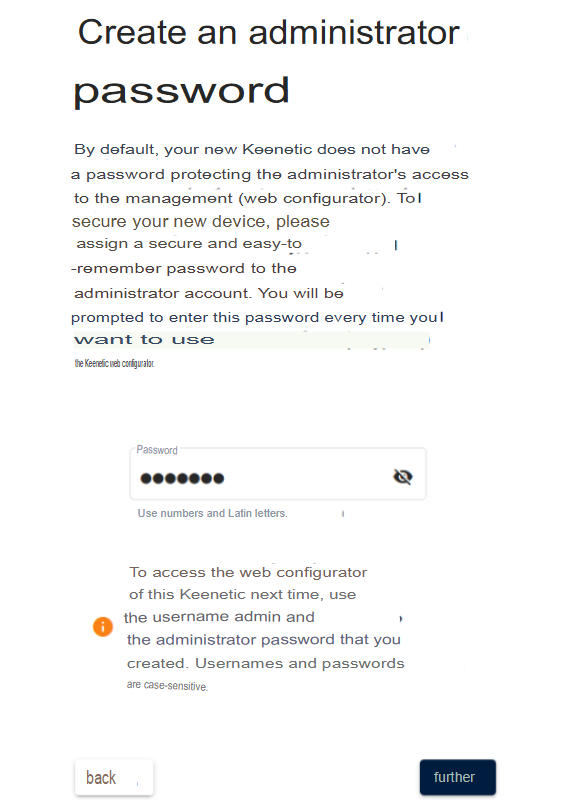
Set a complex Internet Center administrator password that is at least 8 characters long, including letters and numbers. A complex (strong) password is a password that is difficult to guess and takes a long time to find using the full search method. You can check the password complexity here.
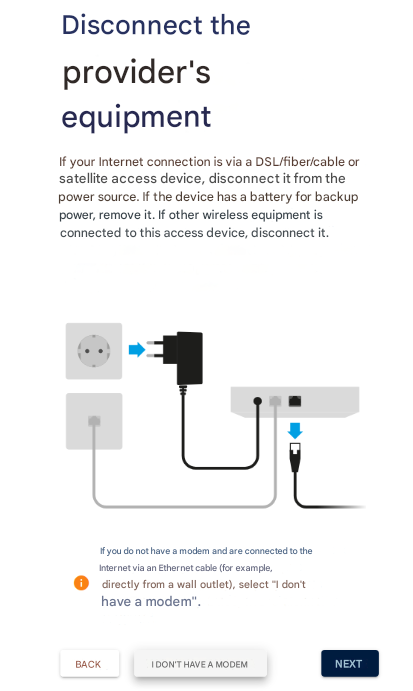
In our example, the Keenetic Internet center is connected to the Internet via a network cable from the provider and will work in the main mode The router. Click I don't have a modem to continue configuring.
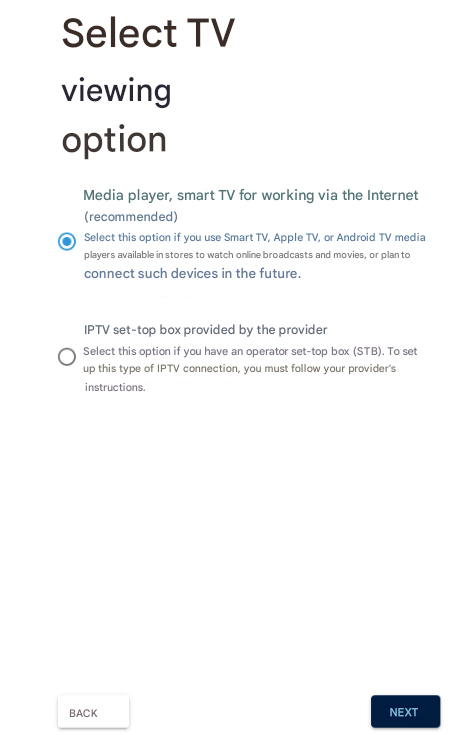
On the next screen, select the TV viewing option. If you plan to use a TV or Smart TV media player, choose the first (recommended) option. If the provider has provided you with an IPTV set-top box and you need to allocate a specific port on the router for it, choose the second option.
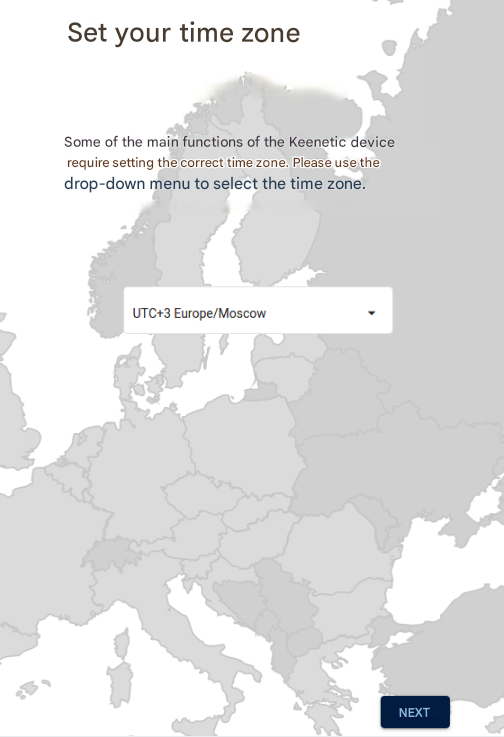
Set the time zone. Some of the key features of Keenetic (such as scheduling) require setting up the correct time zone.
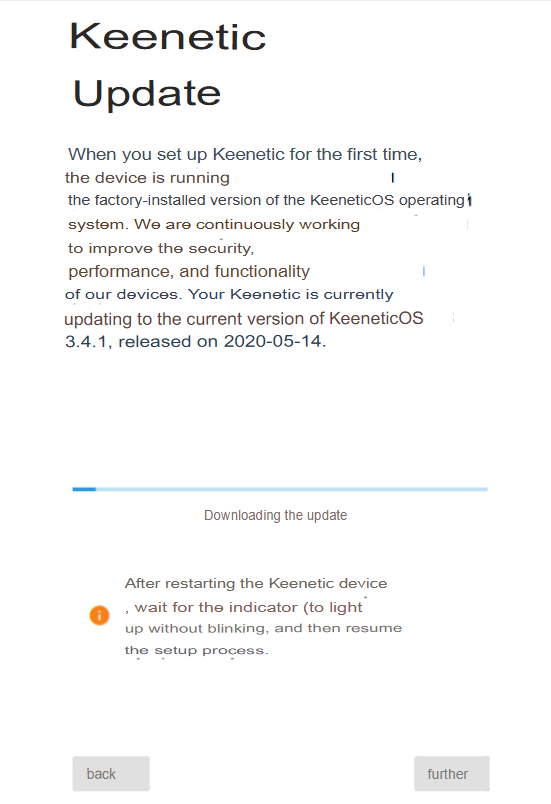
If you set the correct parameters, the Internet center will connect to the Internet and check the current version of the Internet center's operating system. If the device detects an update, the router will update the KeeneticOS operating system itself.
We recommend that you enable automatic updates of the router's operating system on a schedule that is convenient for you.
Additional information on how to use and configure the auto-update function You will find KeeneticOS in the article "Automatic update of the operating system".
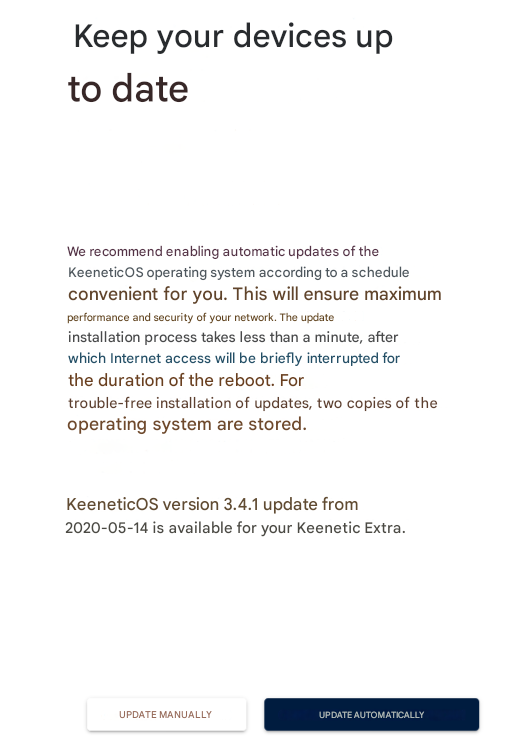
Do not turn off the Internet center during the update process! Installing updates takes a few minutes, after which the Internet center will restart.
In the next step, you will see a screen with data for connecting to a Wi-Fi network. Use them when connecting wireless home devices (smartphones, tablets, laptops, etc.) to the router's Wi-Fi access point. If you want, you can change the preset settings.
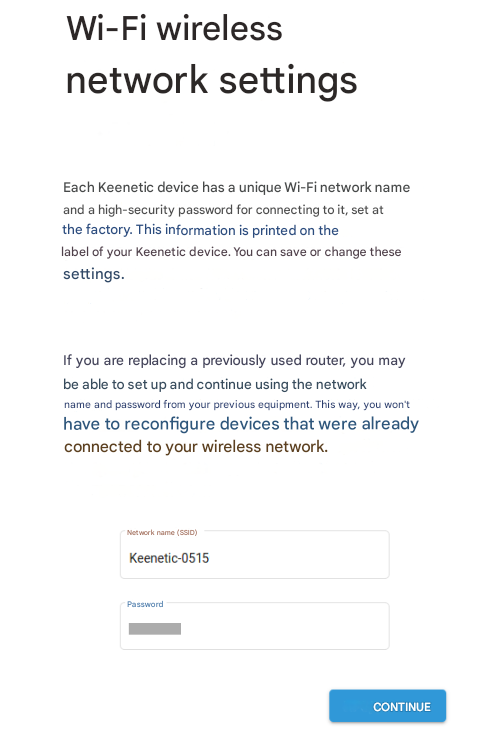
When changing the network name (SSID), specify the new name of your Wi-Fi network, but we recommend that you do not use spaces or special characters in the name, because some devices may not connect to this network. The name must consist of letters of the Latin alphabet and / or numbers (it is also not recommended to use Cyrillic letters, letters of the Russian alphabet). You can use a hyphen.
In the "Password" field, enter a new password for accessing the Wi-Fi network. The password can be from 8 to 63 characters long. Use a complex password to connect to your Wi-Fi network, which is difficult to guess and takes a long time to find using the full search method.

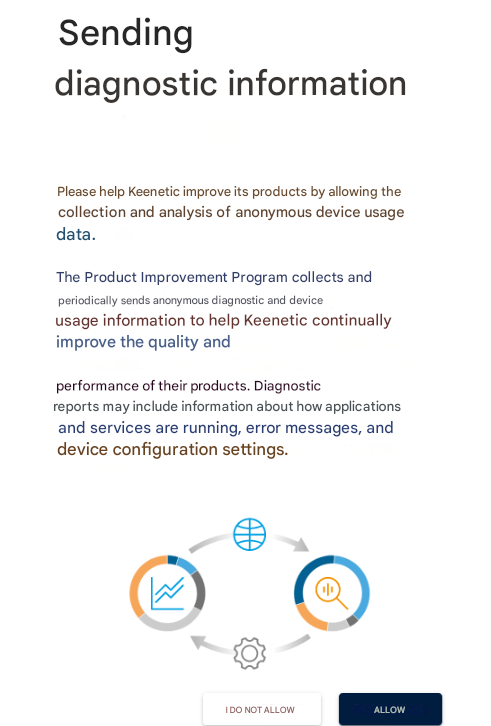
On the next screen, you can enable or disable the periodic sending of anonymous diagnostic information and device usage information as part of the product improvement program. This information helps Keenetic continuously work to improve the quality and performance of our products.
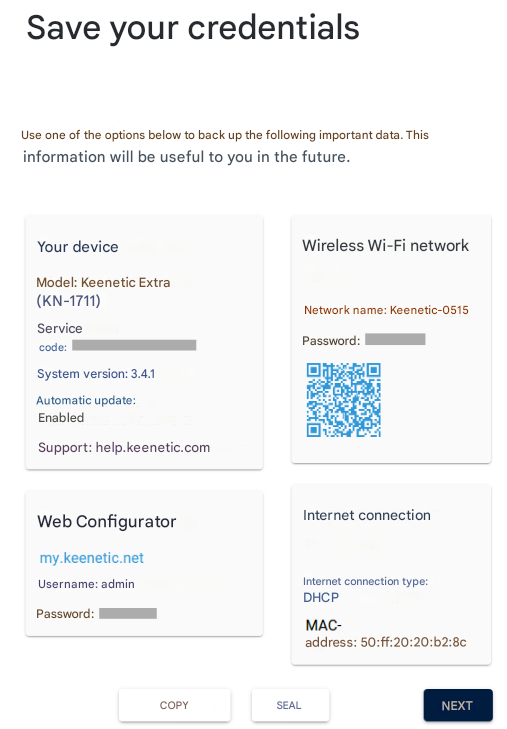
Save your credentials that will be useful in the future, for example, when connecting new devices to your router's Wi-Fi network or when contacting Keenetic support. Print the information on a printer or copy it to the clipboard and then paste it into a text editor and save the file.
So, the Initial Setup Wizard for the Keenetic Internet Center is complete. Click Finish.

Подключение к Интернету
Keenetic Internet centers allow you to set up an Internet connection over a dedicated Ethernet line through providers that use any type of connection.: IPoE, PPPoE, PPTP, L2TP, 802.1x, VLAN 802.1q, IPv4/IPv6.
Internet connection via Ethernet
A dedicated Ethernet cable from the provider that ends with a standard 8-pin RJ-45 connector must be routed to the location of the Internet center and connected to its input (WAN) port./The Internet).
If the contract with the Internet service Provider specifies the MAC address of another device, such as your computer, please tell the WAN provider the MAC address of the Internet center printed on its label before connecting the dedicated line cable, or change the MAC address of the Internet center during the connection setup process (you can do this by following the instructions "Changing the WAN MAC address").
The most popular and easiest way to connect to the network using IPoE technology. This method does not require a username and password to access the Internet. It is enough to connect the provider's cable to port 0 of the Internet center, and connect home devices to its Wi-Fi network or connect an Ethernet cable to free network ports. As a rule, no additional configuration is required.
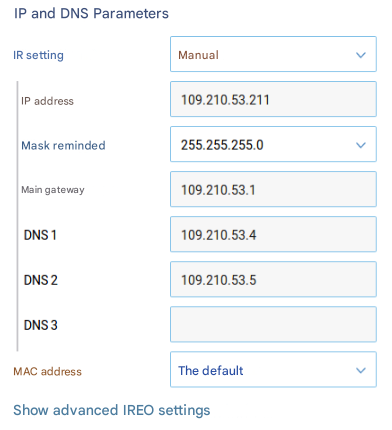
If your Internet service provider has assigned you a permanent white IP address for working on the Internet, you need to specify it in the Internet center settings. To do this, go to the "Wired" page. In the "IP and DNS Settings" section, in the "IP Settings" field, set the value to "Manual".
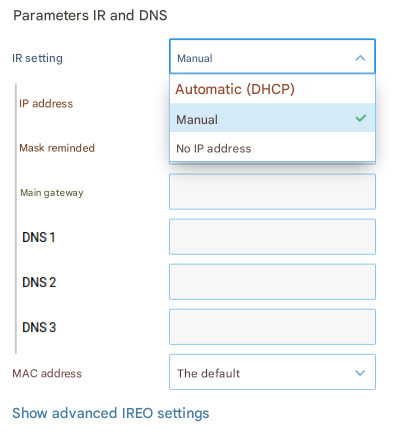
Then enter the address provided by the provider in the "IP address" field.If the ISP also provided other IP parameters (subnet mask, gateway address, and DNS), specify them in the appropriate fields.
For example:
Internet connection via PPPoE protocol
The PPPoE protocol is usually used when connecting to the Internet via ADSL / VDSL (the most common method), but sometimes this type of connection is also used for providers that provide Internet over a dedicated Ethernet line.
On the page 2 In the section Authentication with a provider (PPPoE / PPTP / L2TP), in the Type (Protocol) field, specify the PPPoE value.
Then in the fields User Name and Password enter the username and password provided by the provider to connect to the Internet, respectively.
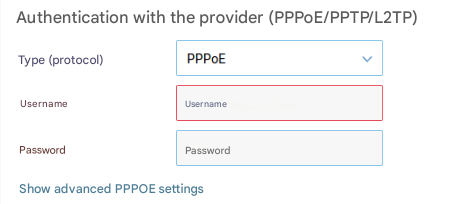
Click Show Advanced PPPoE Settings to display fields with additional parameters.
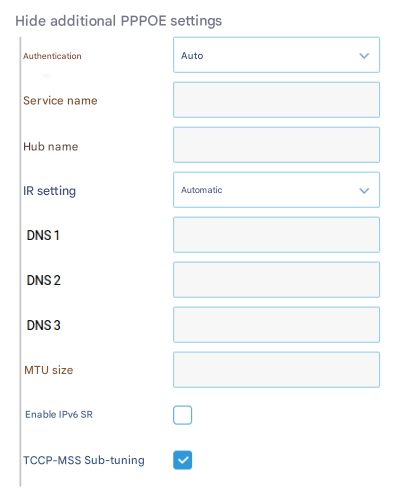
Fields The Service name and Hub name are optional. Leave them blank if your provider has not provided additional information.
In the field IP setting leave the value Automatic if the IP address for Internet access is assigned automatically by the ISP.
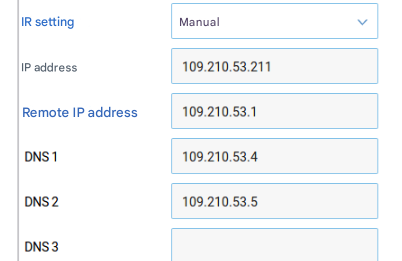
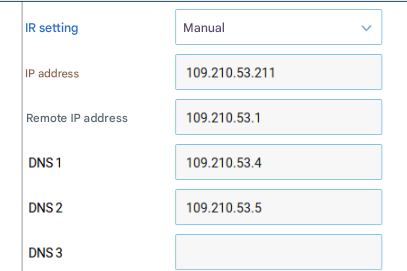
If the provider provided you with a permanent (static)one Enter the IP address in the field IP setting the value is Manual and in the IP Address and Remote IP Address fields that appear, specify the IP address and gateway address, respectively. For example:
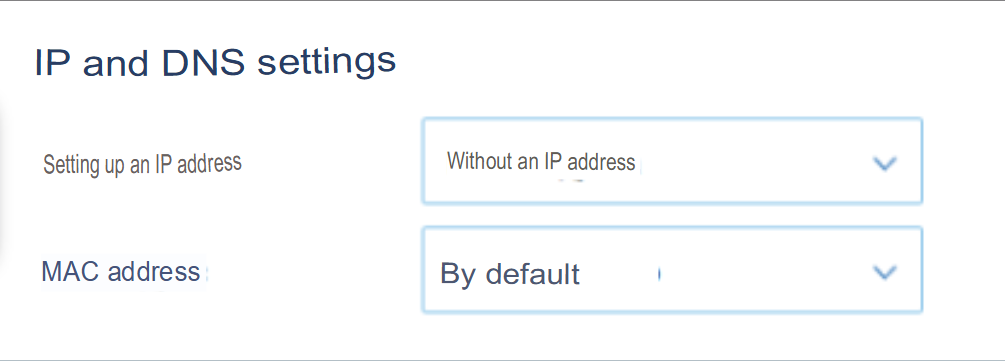
If your ISP does not issue an IP address to the external interface of the Internet center and does not require its assignment, disable automatic IP address acquisition via DHCP on the WAN port. To do this, go to IP and DNS settings in the IP Settings field, specify the value Without an IP address.
Internet connection via PPTP or L2TP protocol
The PPTP and L2TP protocols are often used in the networks of Internet service providers. The main advantage of these protocols is the security of data transmission over the Internet. Next, we'll look at an example of configuring a PPTP connection, which is the most common one. The L2TP connection is configured similarly.
On the page Wired In the Provider Authentication (PPPoE / PPTP / L2TP) section, in the Type (Protocol) field, specify either PPTP or L2TP, depending on which type of connection you want to configure. In the field Server address enter the IP address or domain name of the PPTP or L2TP server. In the Username and Password fields, enter the username and password provided by the provider for connecting to the Internet, respectively.
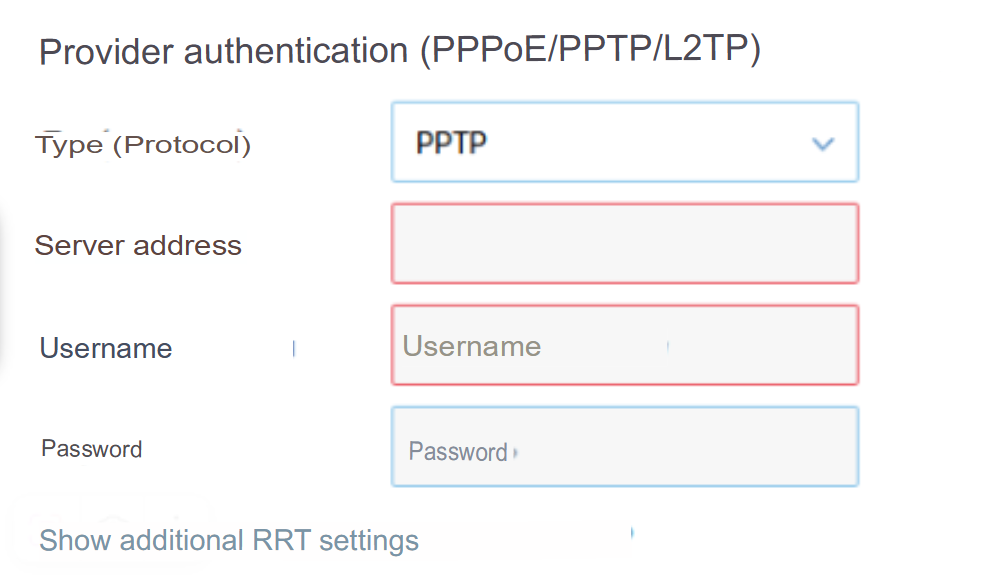
Click Show Advanced PPTP Settings to display fields with additional parameters.
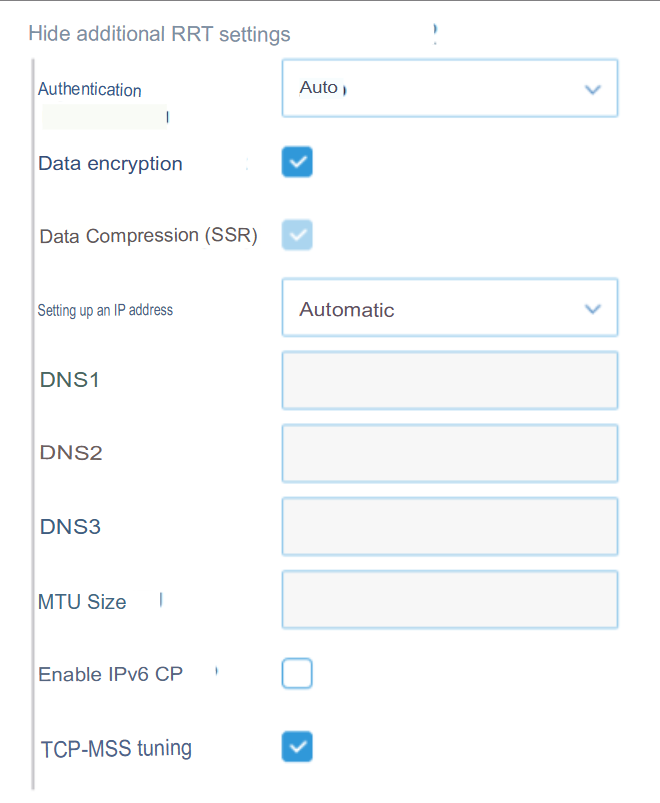
If the PPTP protocol uses Data encryption (MPPE), enable the appropriate option.
In the field IP setting leave the value Automatic if the IP address for Internet access is assigned automatically by the ISP.
If the provider provided you with a permanent (static)one Enter the IP address in the field IP setting the value is Manual and in the IP Address and Remote IP Address fields that appear, specify the IP address and gateway address, respectively. For example:
Connection via USB modem/hub
Internet connection via 3G/4G modem
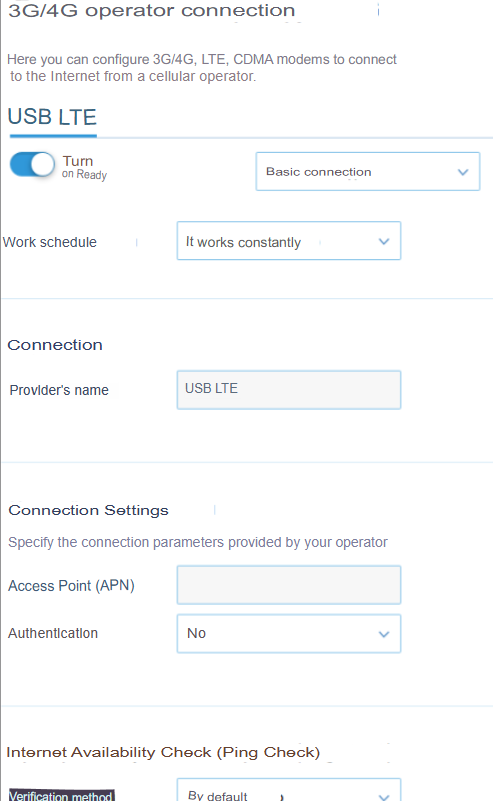
Any Keenetic Internet center that has a USB port allows you to configure 3G/4G, LTE, CDMA modems to connect to the Internet from a mobile operator. All devices on your home network can simultaneously use the Internet via a single USB modem.
You can use a 4G / 3G modem as your primary Internet connection or as a backup modem in addition to a dedicated Ethernet connection. You can even reserve one modem with another: on Internet centers with two USB ports, connect them directly to the ports on the device, and on models with one USB port-via a USB hub. In the Internet center, you will only need to specify in which order the modems should replace each other or insure the wired provider (act as a backup connection).
For Keenetic models that do not have a built-in LTE / 4G / 3G modem (these are all models with a USB port, except for Hero 4G and Runner 4G), you will need a USB modem (sold separately) to connect to 4G/3G Internet connection. Currently, more than 150 modems are supported.
Check the list of supported USB modems and make sure that your modem is listed in it.
Modern 3G/4G/LTE USB modems can operate in several modes: RAS, CDC-Ethernet, NDIS, QMI. If the modem is included in the list of supported devices, be sure that the Internet center will start it in the optimal speed mode (i.e. CDC-Ethernet or NDIS, not RAS). Our Internet centers support Yota modems according to the Yota Ready specification, when the Internet center initializes the LTE modem and starts distributing the Internet without any configuration at all.
Place the 3G/4G modem near the window and do not block it with objects that can weaken the cellular network signal. If necessary, use a small USB extension cable up to 1 meter.
Before installing the modem, disable the PIN request on the modem's SIM card. You can do this in the cell phone menu by temporarily installing a card from the modem, or using the modem utility by connecting the modem to your computer.
In most cases, connecting a USB modem to an Internet center is done on the "Plug and play" principle, meaning you just need to connect the modem with the SIM card installed to the Keenetic USB port and make sure that the Internet Center indicator lights up  (Online). Then check your Internet connection from your computer or mobile device connected via Keenetic.
Some USB modems take up to 30 seconds to prepare for operation.
You can view the connection status on the System Monitor home page. Click "Learn more about Connection" to display more information.
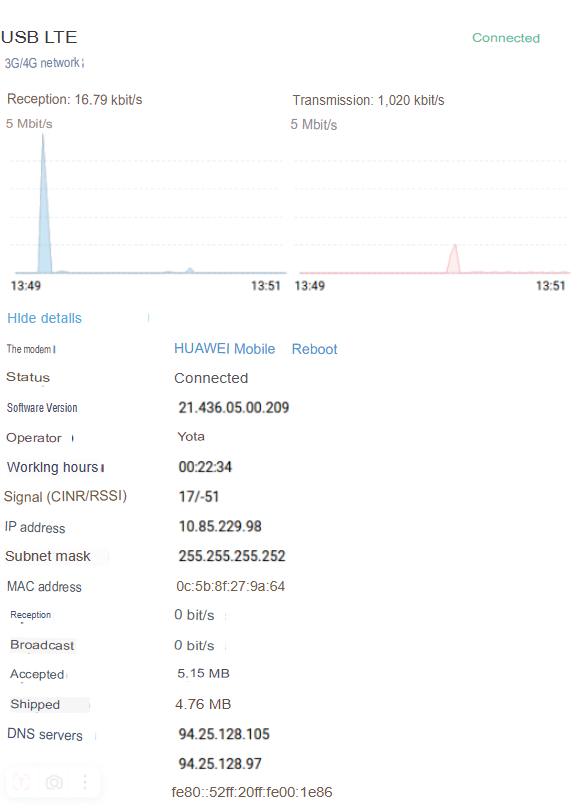
For more information about connection quality, see the article "LTE Signal Quality Parameters".
In the web configurator, on the System Monitor home page, signal quality parameters may not be displayed for some modem models. The output of this information depends on the type of modem and its capabilities. This option is not available for some modems. Signal quality parameters are displayed only when the modem itself transmits them to Keenetic. Typically, NDIS or CdcEthernet modems transmit signal strength information, not RAS. You can view these parameters in your own USB modem interface.
Additional configuration of the 3G/4G, LTE, CDMA USB modem can be performed on the "4G/3G Modem" page. For example, you can create a work schedule or enable the Ping Check feature.
Keenetic Internet centers can manage the power supply of USB modems. The fact is that many modern modems are independent devices that start and work independently of the Internet center. On the one hand, this is good. But on the other hand, many compact USB modems are designed mainly for occasional work in a laptop, but not for round-the-clock work, from which, alas, they can fail or hang. Using the Ping Check function, the Keenetic Internet Center will automatically detect that there is no Internet connection for some reason, and automatically restart the modem on power so that communication can be restored.
If you encounter difficulties connecting or operating the USB modem, please refer to the instructions "Recommendations for diagnosing 3G/4G connectivity".
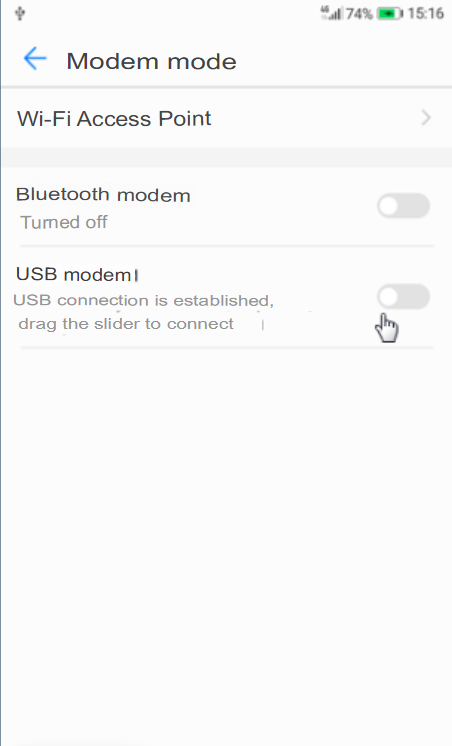
Connecting the phone in modem mode to the USB port of the router
Question: Is it possible to connect a phone (smartphone, tablet) running in modem mode to the Keenetic router via a USB port for full operation and distribution of the Internet to home devices? If possible, how do I set up my phone and router correctly?
Answer: If the mobile device is based on the Android operating system, then most of them support a special "USB modem" mode, which in most cases works correctly with Keenetic Internet centers, creating a USB modem connection like CdcEthernet.
If the mobile device is based on iOS (Apple), then it does not have this feature. On these devices, you can enable your own Wi-Fi access point and then connect your Keenetic router to it using a special WISP (Wireless ISP) mode.
Some models of Keenetic Internet centers are equipped with a USB port, which is designed to connect compatible LTE/4G/3G USB modems. See this article for an up-to-date list of compatible USB modems. Connecting a smartphone or tablet in modem mode to the USB port of the Internet center is an undeclared possibility and completely depends on the implementation in the OS of the mobile device. In such cases, the functionality of the connected devices is not guaranteed.
Example of connecting an Android smartphone in modem mode
Connect your phone to the router's USB port using a USB cable. On your phone, enable mobile Internet (in the OS settings, this parameter is called Data, Data transmission or Mobile data transmission). Then turn on the USB modem mode. Go to Settings > Network and Internet > Access Point and Modem and enable USB Modem mode.
The process may vary slightly between different versions of the Android operating system.
Our example uses a device with the following version Android 7. In this version, open Settings, tap on More, go to Modem Mode, and enable USB Modem mode.
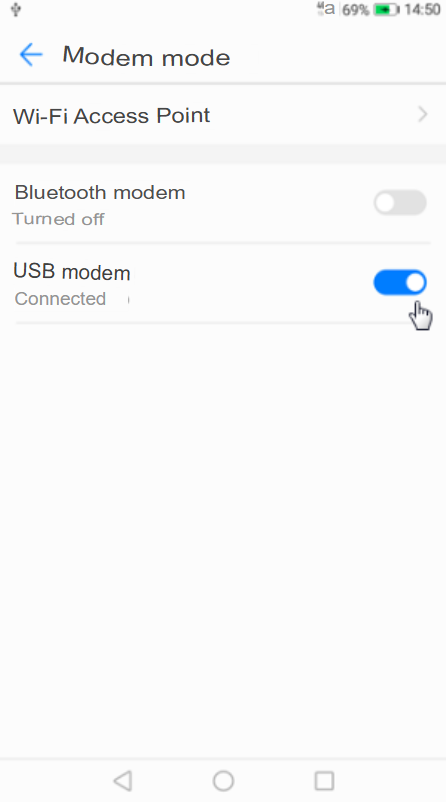
This completes the phone setup process.
Now connect to the web configurator of the Keenetic Internet Center from a device on your home network.
When you connect your phone to the router's USB port in this mode, you will see a new automatically created connection in the "4G/3G / Mobile Modem" section. In our example, this is "Huawei Mobile Broadband".
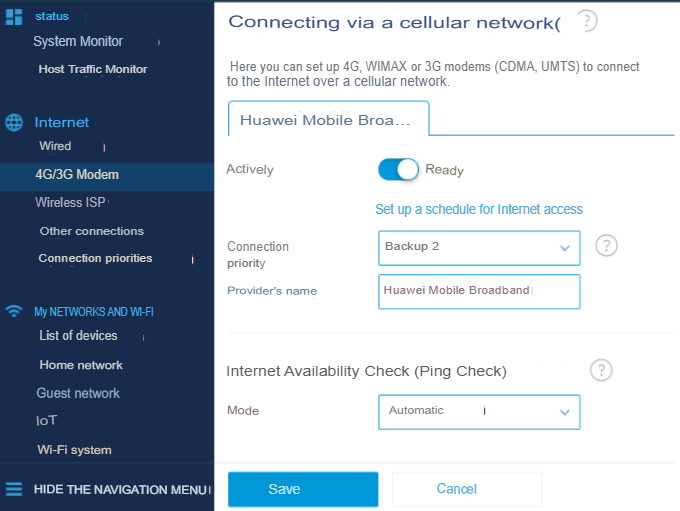
On the Connect via Cellular Network page, make sure that the connection is enabled. In the Connection Priority field, select Primary or Backup. If this is your only Internet connection, install Basic, and specify Backup, if you plan to use this connection only as a backup channel, which will only be enabled if there is no Internet on the main channel.
After changing the settings, click Save.
Now check your home network devices for Internet access. In this case, the Internet connection will be made via the phone (via the mobile operator's network).
To disable it, just turn off the USB modem mode in your phone.
Devices connected to the router will use the Internet connection via the mobile operator. If you do not have an unlimited data plan, we recommend that you read the terms of your data plan beforehand, because when you reach a certain data volume limit, an additional fee will be charged from your Internet connection account or a speed limit may be enabled.
If the Internet connection via the router does not work, make sure that the Internet is working on the mobile device. Open a website on your phone using a web browser. If the Internet works on the phone, but is not available through the router, then there may be some restrictions on the part of the mobile operator.
Some operators and tariffs prohibit distributing mobile Internet using the phone as a modem. Please check with your carrier's support service if this restriction exists.
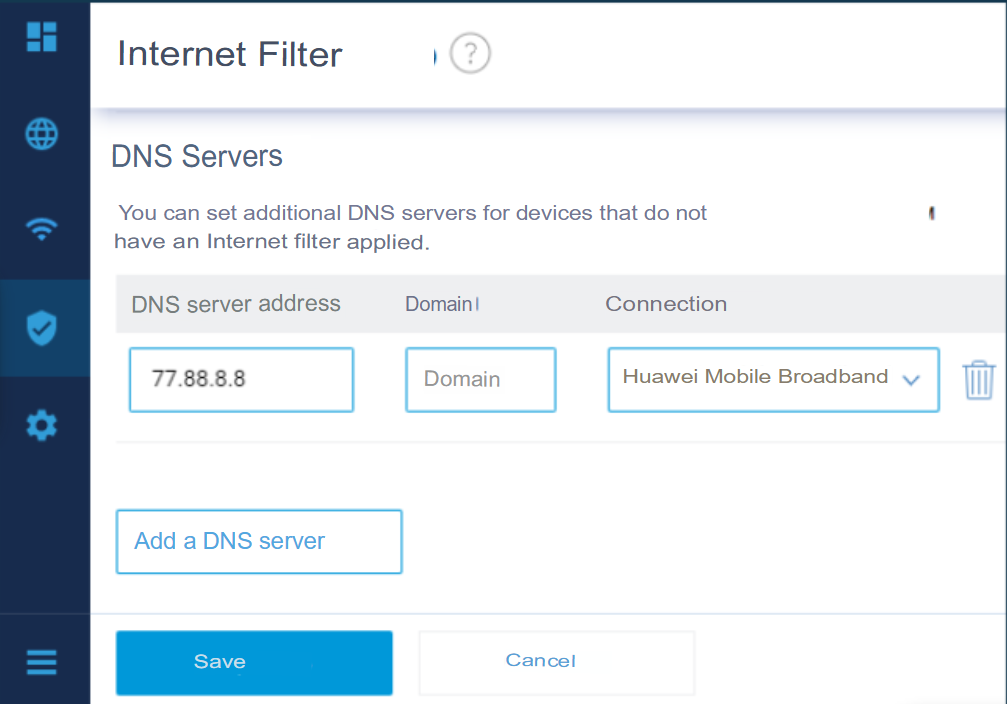
If sites don't open when using the router, try adding additional DNS server addresses. You can do this on the "Internet Filter" page in the "DNS Servers" section. In our example, we added a public DNS server from Yandex for connecting "Huawei Mobile Broadband".
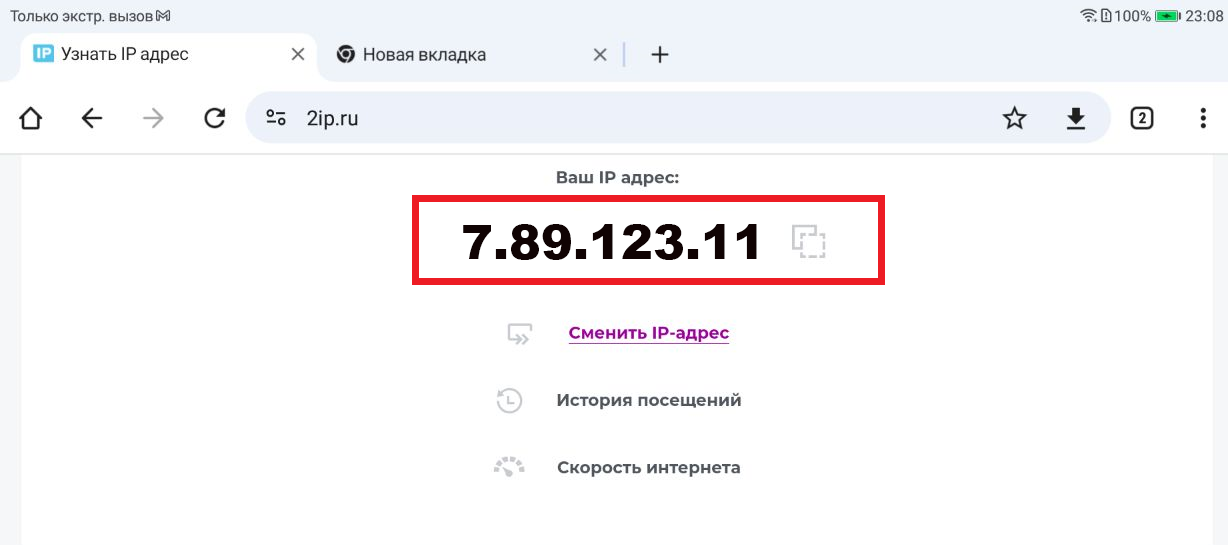
Setting the IP address on the router
With the default settings (factory settings), the Keenetic Internet Center has a pre-set local IP address for managing 192.168.1.1. The Internet Center automatically assigns IP addresses from the same subnet (192.168.1. x) to all devices on the home network using the DHCP protocol.
You can make this configuration on the page Home network.
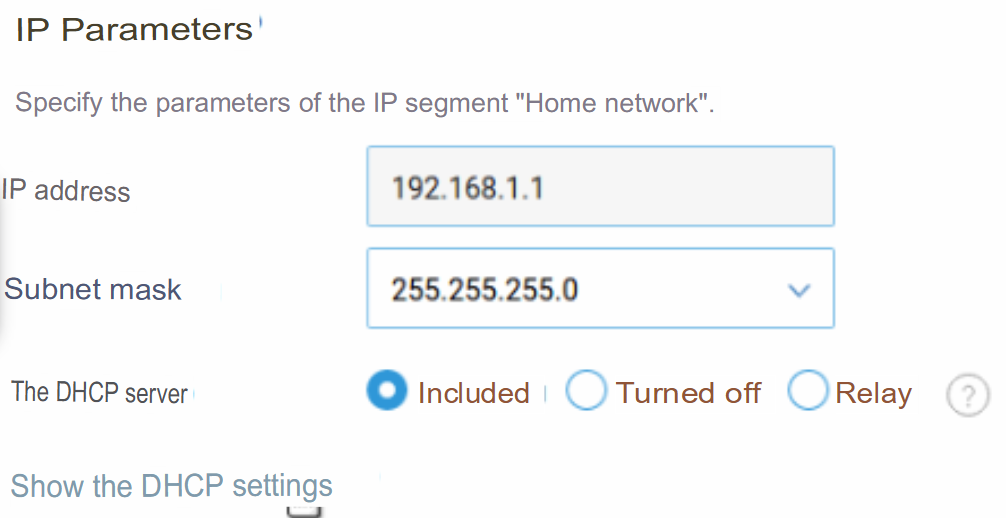
In the IP Settings section, in the IP Address field, specify the new local IP address of the Internet center. In the future, you will need to use it to connect to the Internet center.
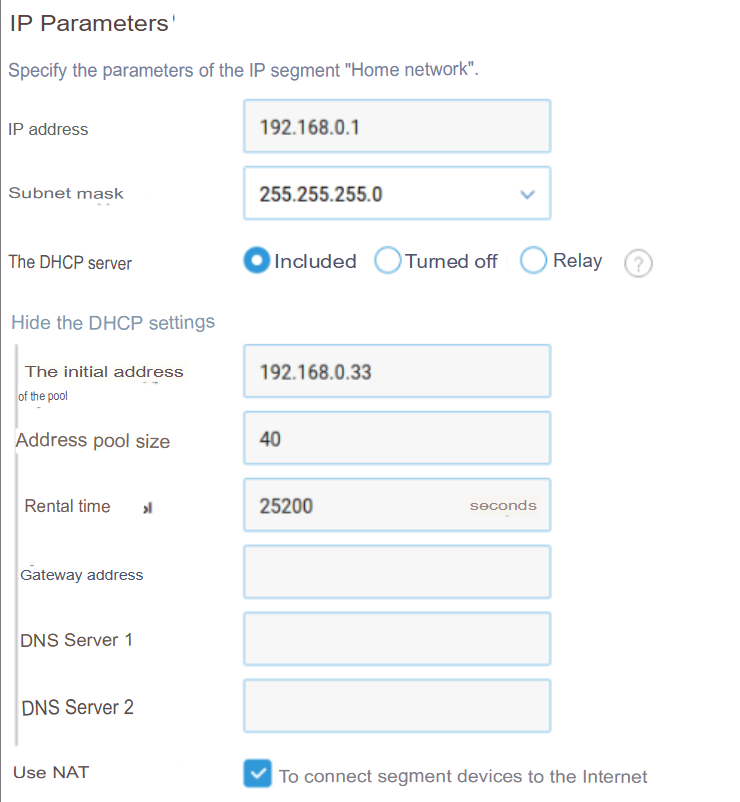
Tip: Click Show DHCP Settings to configure additional settings.
In the field Pool start address you can specify the start IP address of a range of addresses. It must be from the same subnet as the local IP address of the Internet center.
For example, let's change the preset IP address of the Internet center 192.168.1.1 to an IP address from another subnet 192.168.0.1. In the IP address field, specify the new address 192.168.0.1, and in the Pool Start Address field, specify the IP address from the same subnet, i.e. from 192.168.0.x (excluding only the IP address of the Internet center).the center). In our example, the address specified is 192.168.0.33. If necessary, you can change the lease time of the IP address.
Important! After you change the IP address and save the setting, access to the Internet center will be lost.
On the device that you used to connect to the Internet Center web configurator, you need to update the IP address.
If you are connecting to Keenetic via a network cable, disconnect this cable from the Internet center for a few seconds and then reconnect it to one of the ports on your home network.
If you are connecting to the Internet center via Wi-Fi, manually disable Wi-Fi on your laptop or mobile device and then re-enable it.
This way, you initiate a reconnection to the Internet center.
Important! Now, when connecting to the web configurator, use the new IP address.
On the connected device, you can view information about what IP address was issued to it.
Here is an example of getting information about IP settings in the Windows 10 operating system.
Right-click on the icon when connecting via a network cable, or by clicking the icon
when connected via Wi-Fi, and click "Network and Sharing Center".

In the window that opens, in the View Active Networks section, left-click on the connection name.
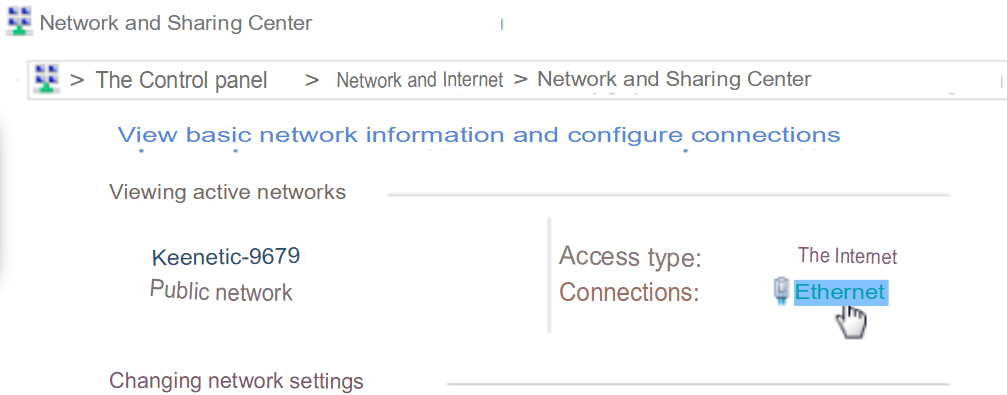
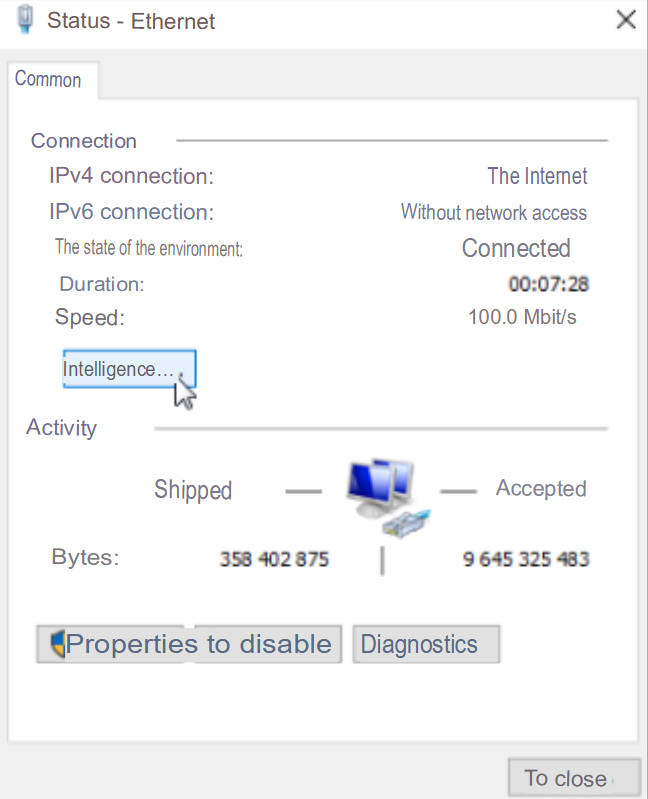
In the Status window, click Details to get detailed information about the connection.
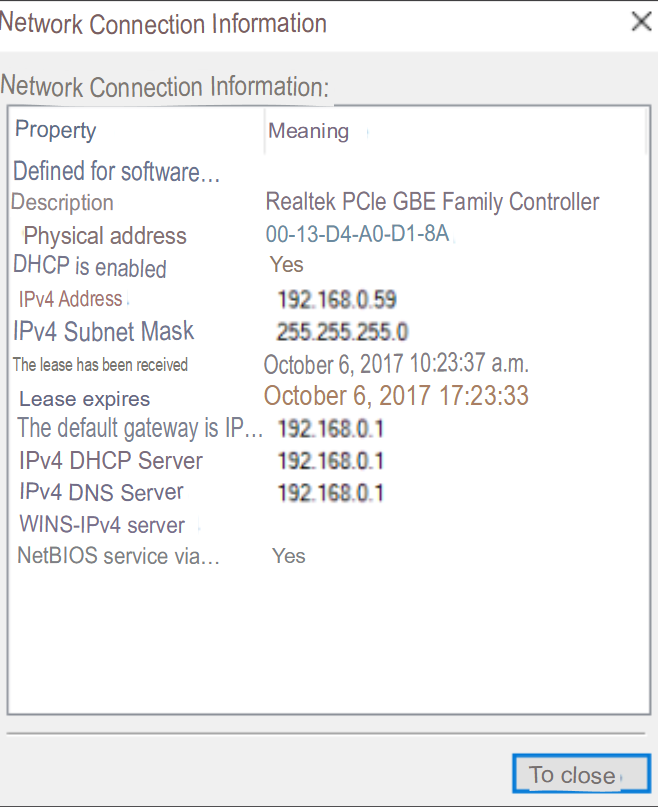
You will see information about your network connection. The IPv4 Address line will contain the IP address issued by the Keenetic Internet Center over the DHCP protocol.
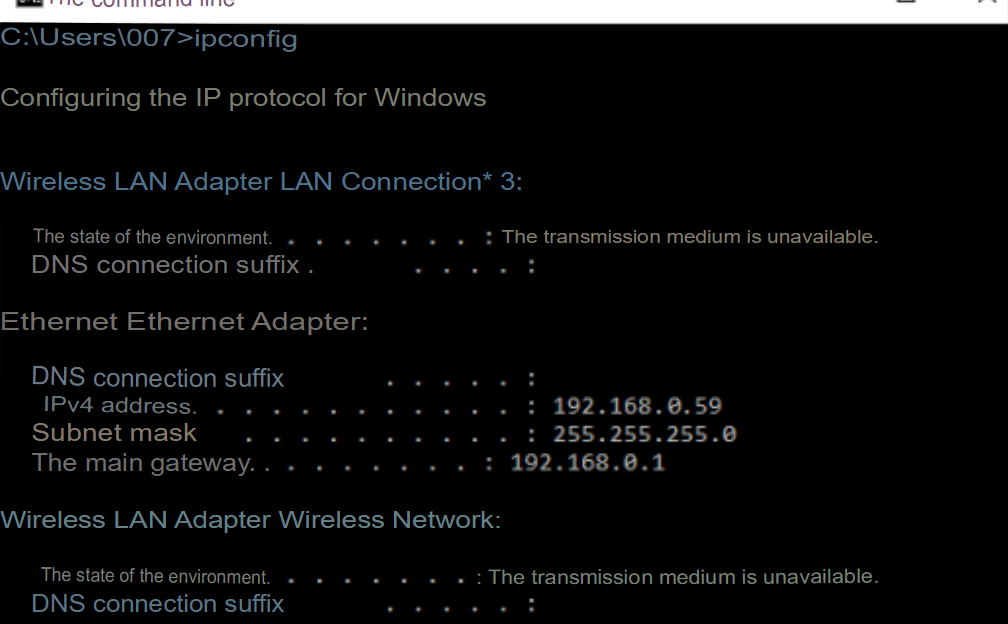
You can get similar information from the Windows command prompt by running:
ipconfig
Setting up networks
Programs to help you configure your router -- Wi-Fi Analyzer (Available only on Android OS)
The head router
On the head router, we recommend setting the network exclusively at the 2.4 GHz frequency in order not to overflow the channels with networks that will not be used
Example:
SSID: VRCLUB
Password: ************
Router in fixed zones
We create exclusively at the frequency of 5 GHz, as the helmet perceive the network of this frequency better.
We set networks (names/access) in the 2.4 GHz and 5GHz bands. In the Wireless Network Settings, disable Smart Connect, disable the 2.4 GHz network, and set the following parameters for the 5 GHz network
1) disable all settings related to MU-MIMO, DL/UL OFDMA
2) download the Wi-Fi Analyzer program on your Android phone and watch the 5 GHz broadcast on the busy channels
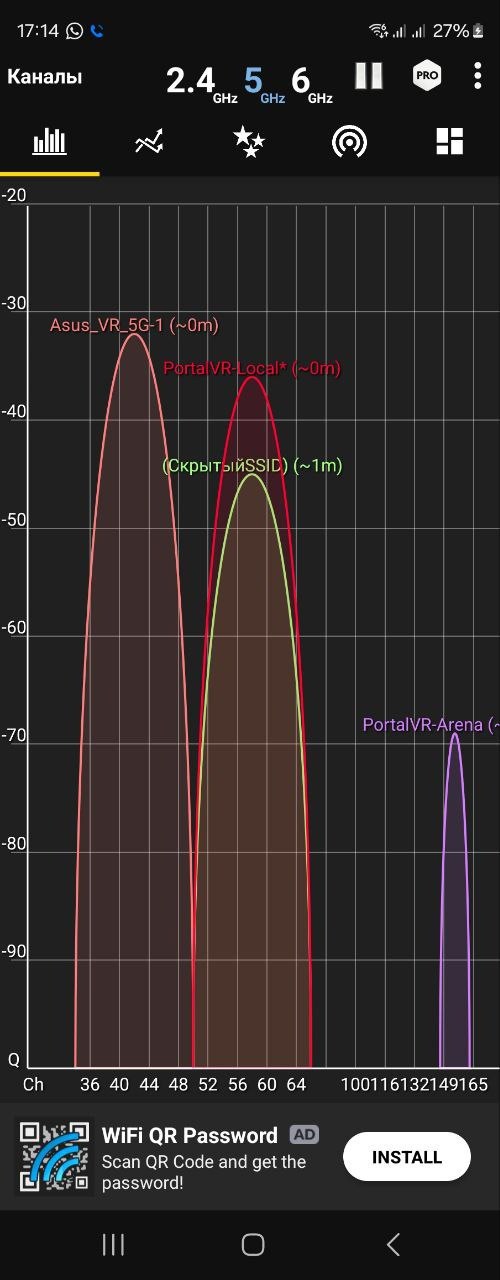
3) we distribute the ranges to free channels. As a rule, as follows:
- for the 5GHz band, set the channel width to 80 MHz, select channels 50-66 (this corresponds to channel 58)
A router in the arena with free movement
We create exclusively at the frequency of 5 GHz, as the helmet perceive the network of this frequency better.
We set networks (names/access) in the 2.4 GHz and 5GHz bands. In the Wireless Network Settings, disable Smart Connect, disable the 2.4 GHz network, and set the following parameters for the 5 GHz network
1) disable all settings related to MU-MIMO, DL/UL OFDMA
2) download the Wi-Fi Analyzer program on your Android phone and watch the 5 GHz broadcast on the busy channels
3) we distribute the ranges to free channels. As a rule, as follows:
- A channel width of 20 MHz is set for the Arena, and the 5 GHz band is selected in channels 34-50 (in the router, this corresponds to channel 42).
Installing a VPN on a router (arena only)
OpenVPN is one of the most popular protocols for organizing a VPN connection. You can use it to create a virtual private network or combine local networks. OpenVPN is open source and distributed for free under the GNU GPL license. OpenVPN can be called one of the most secure protocols. All transmitted data is securely protected using the OpenSSL encryption library and SSLv3/TLSv1 protocols, which ensures high security and anonymity.
The Keenetic Internet Center for connecting to OpenVPN provides features such as TCP and UDP mode, TLS authentication, and the use of certificates and encryption keys to increase the security level of a VPN connection.
Checking for availability OpenVPN on the router
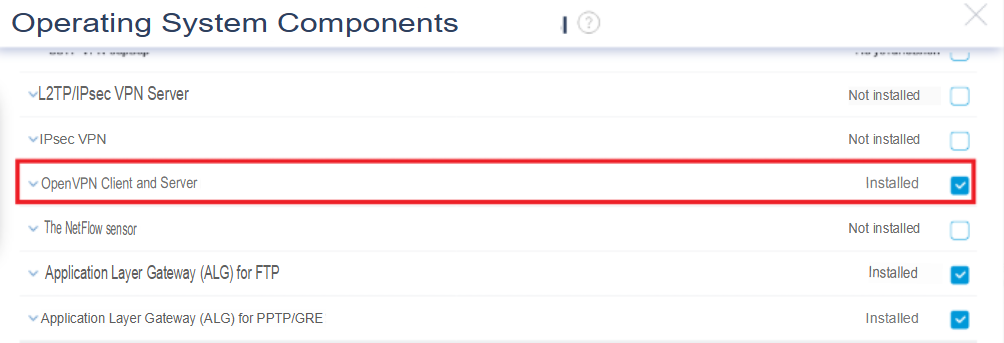
First, let's check the presence of the OpenVPN component among the router's software. To do this, go to the section Manage — General Settings and click Change the set of components.
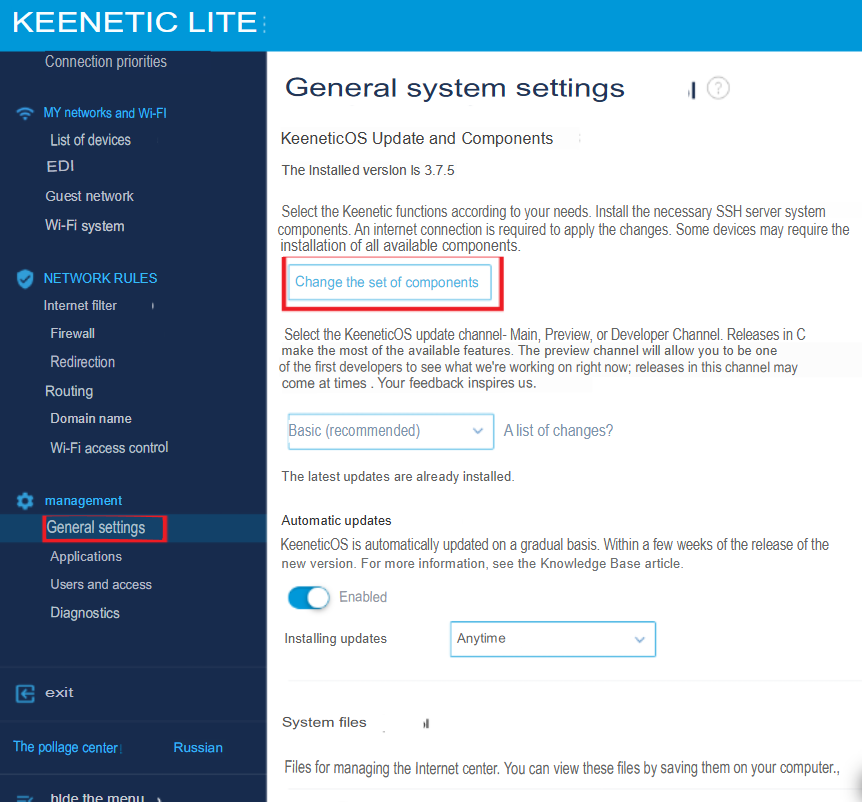
The OpenVPN component must be installed, but if not, it must be installed.
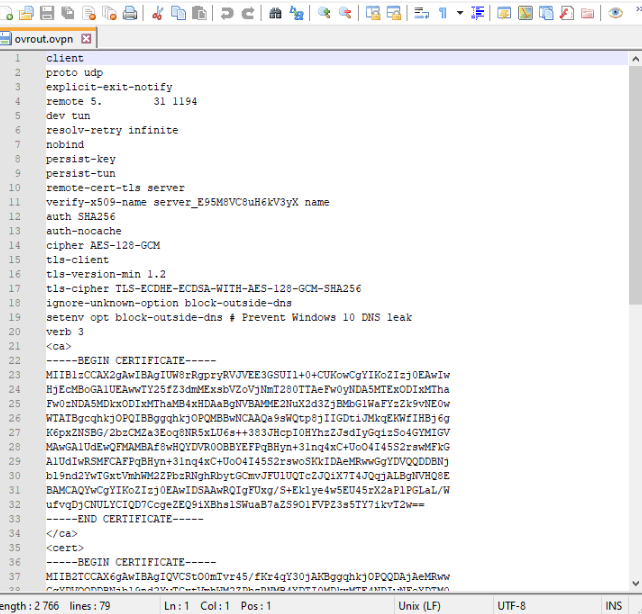
OpenVPN configuration file
Next, we need to download the configuration file .ovpn c VPS on which OpenVPN is installed and open it in a text editor.
To get the configuration file, write to our technical support and the operator will send you the configuration.
Adding a VPN connection to your router
Go to the section Internet — Other connections. We need the VPN connection section-Add a connection.
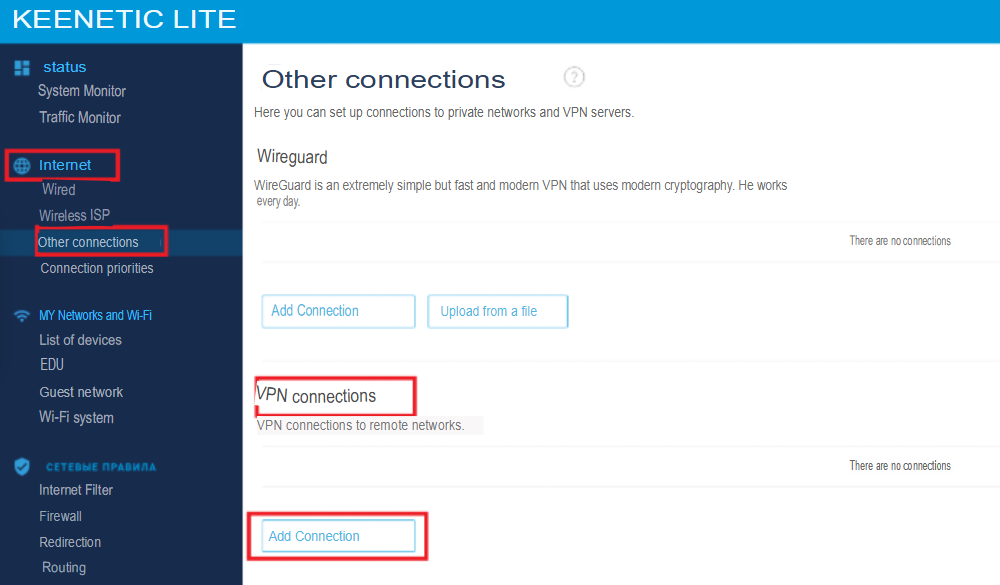
In the window that opens, in the Type (protocol) field, select OpenVPN, then enable both available options Use to access the Internet and Get routes from a remote party, and specify the name of our connection.
In the field OpenVPN configuration paste the contents of our ovpn file from a text editor and save the settings.
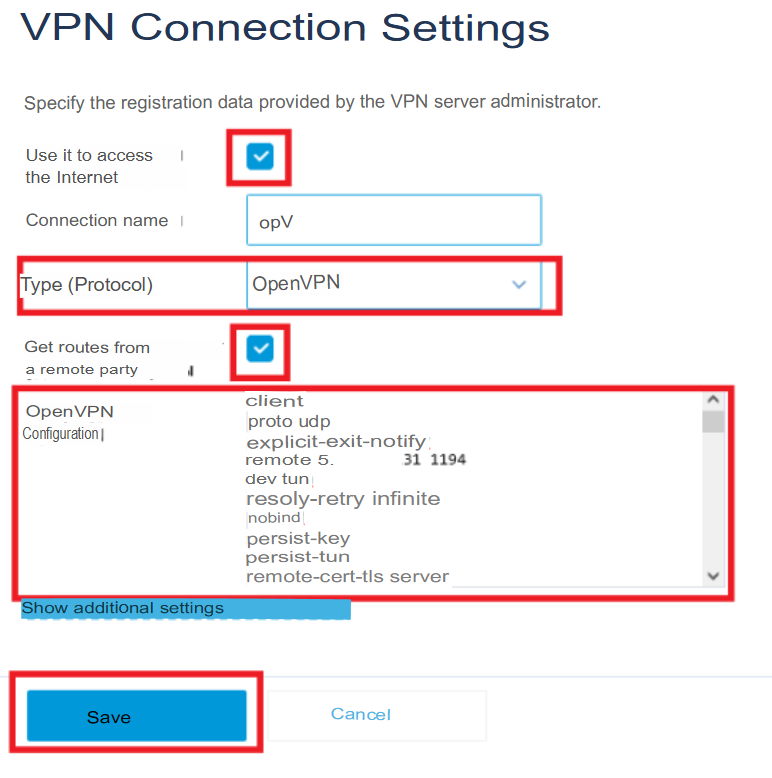
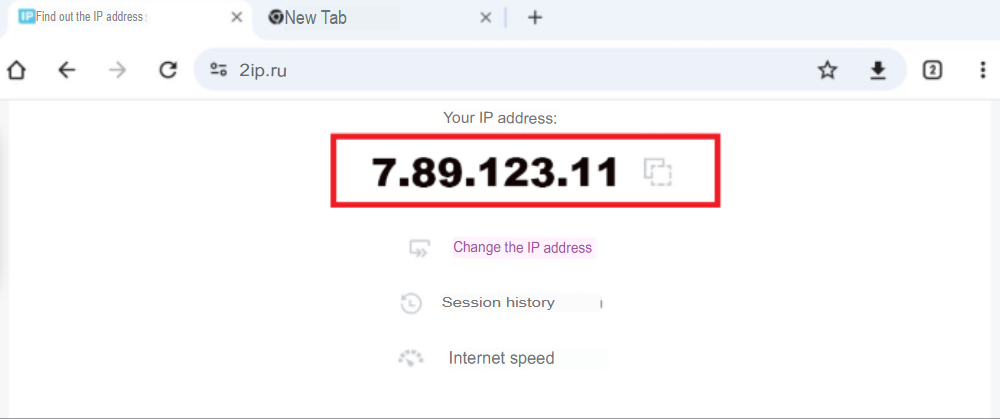
When we activate our connection, the status should change to ready.

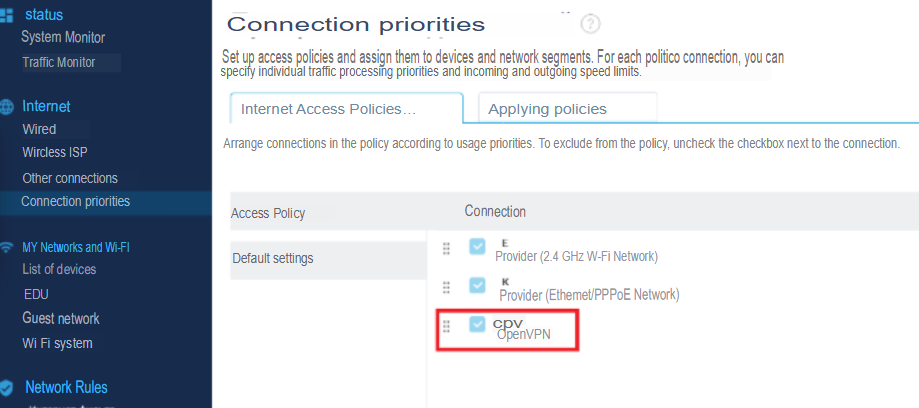
Priorities of Internet connections on the router
Go to the section Connection priorities, tab Internet access policies. This is where our VPN connection should be displayed.
Move our OpenVPN connection above other providers and save it.
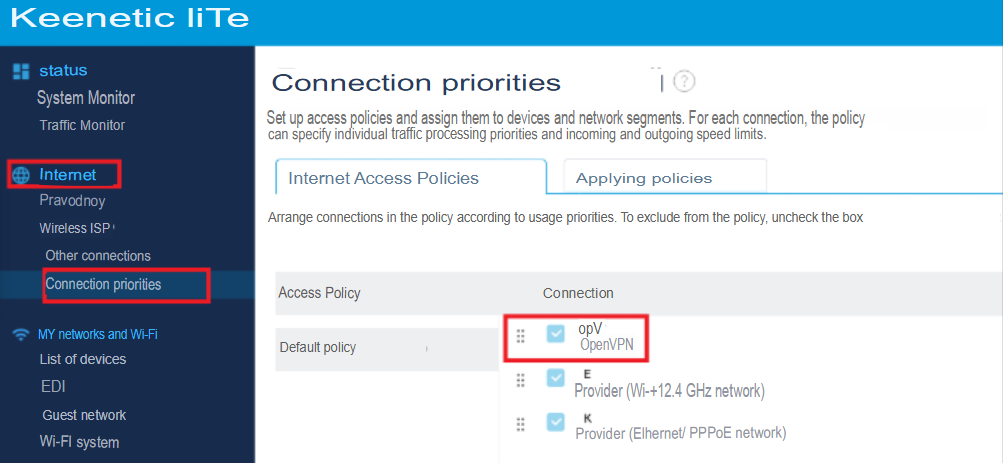
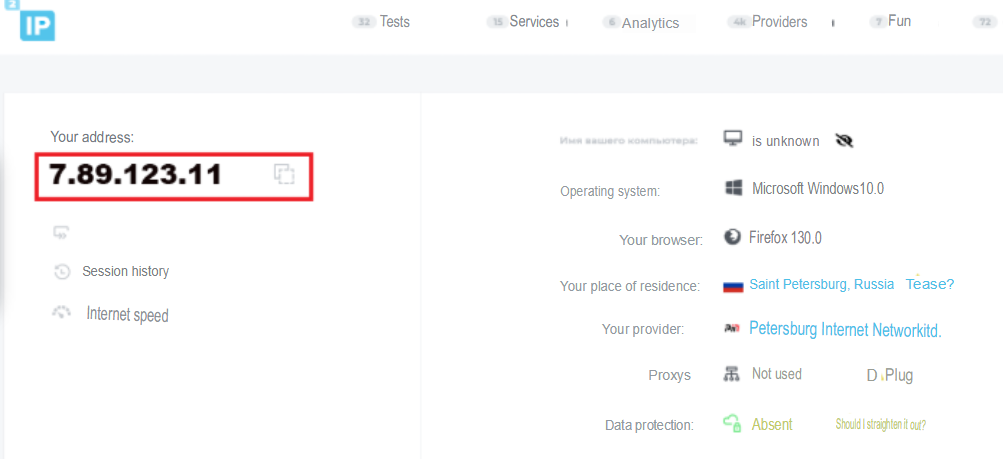
Now all devices connected to the router and included in the default policy will access the Internet via OpenVPN on our VPS.
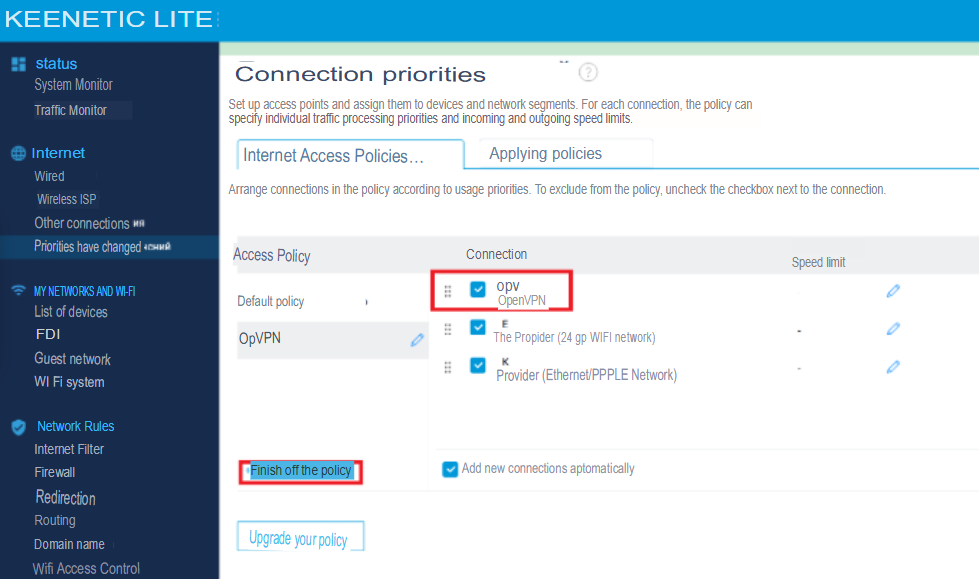
For situations where we need specific devices to connect via a VPN, for example, we need to place the VPN connection below other connections.
The next step is to create a new policy (called OpVPN in the screenshot) and place the VPN connection in it above the provider connections. Also enable the Add new connections automatically option.
Now, on the Apply Policies tab, we will assign the necessary devices to the policy we created (in our case, OpVPN) and apply these changes.
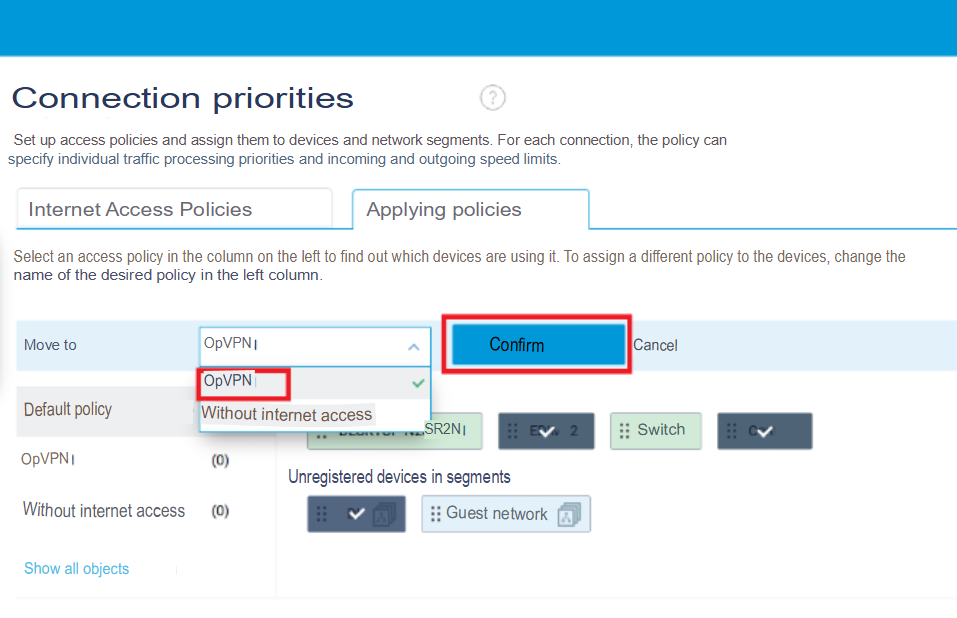
Assigned devices will connect via a VPN, while others will connect via a regular Internet connection.
Asus
Initial setup
Connect your computer to the router's network via a wired connection.
An example of a properly wired connection (using a patch cord and an RJ-45 twisted pair) can be found in the image below:
Note: The router specifications may vary depending on the model. Download the manual for your model via ASUS Download Center
- Connect the twisted pair (RJ45) cable to the router's WAN port.
- Connect the computer's network card to the router's free LAN port using a patch cord (RJ-45).
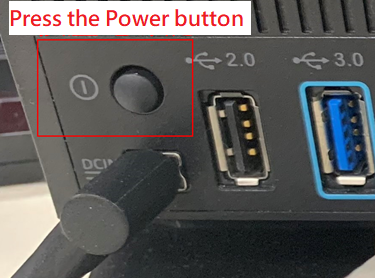
- Connect the charger to the DC-IN port on the router and then plug it into the wall outlet.
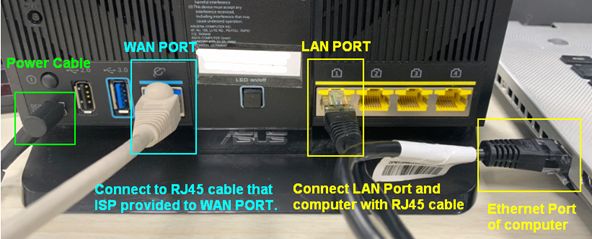
- After the power diode lights up, turn on the router by pressing the power button on the router.
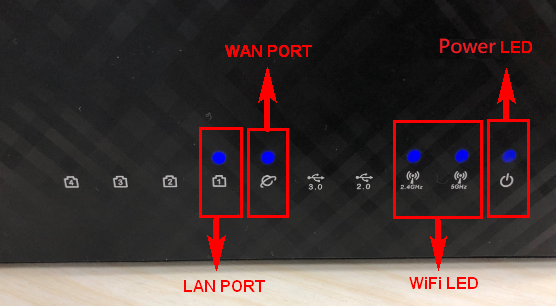
- Make sure that the power LED on the router's front panel lights up. Wi-Fi 2.4 G/5G LED indicators should also be on - this will mean that the router is turned on.
In addition, the WAN and LAN indicators should light up (refer to the information in the user's manual).
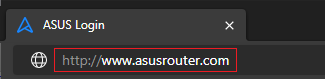
To enter the router's web menu, enter the router's LAN IP address or the following address in the browser's address bar: http://www.asusrouter.com
Read more in the article: [Wireless Device] How do I log in to the router settings page (WEB UI)?
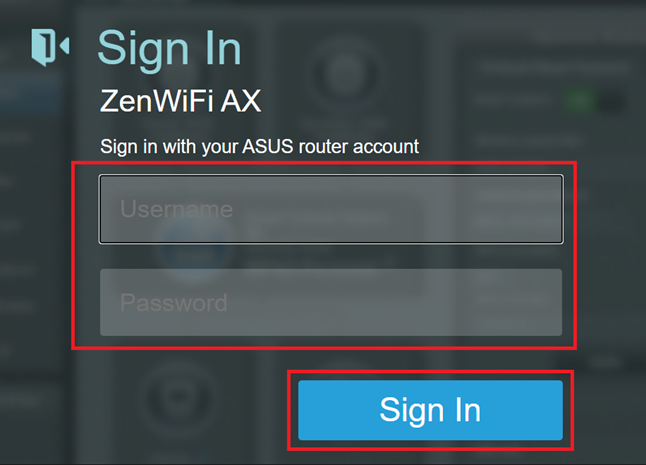
Enter your username and password to log in.
When you first start the router's settings, its system will launch the" Quick Setup Wizard " (QIS). Read more in the article: [Wireless Device] How do I use QIS (Quick Internet Setup) to configure my router? (Web GUI)
Note: if you forgot your username or password, reset the router to factory settings:
Read more in the article: [Wireless Device] How do I reset my ASUS router to factory settings?
Open the tab [ WAN ](Internet) > [ Internet Connection ](Connection) > [WAN Connection Type]
Note: please check with your Internet service provider (ISP)what type of connection to choose
Internet connection
Asus Internet centers allow you to set up an Internet connection over a dedicated Ethernet line through providers that use any type of connection.: IPoE, PPPoE, PPTP, L2TP, 802.1x, VLAN 802.1q, IPv4/IPv6.
Automatic IP address
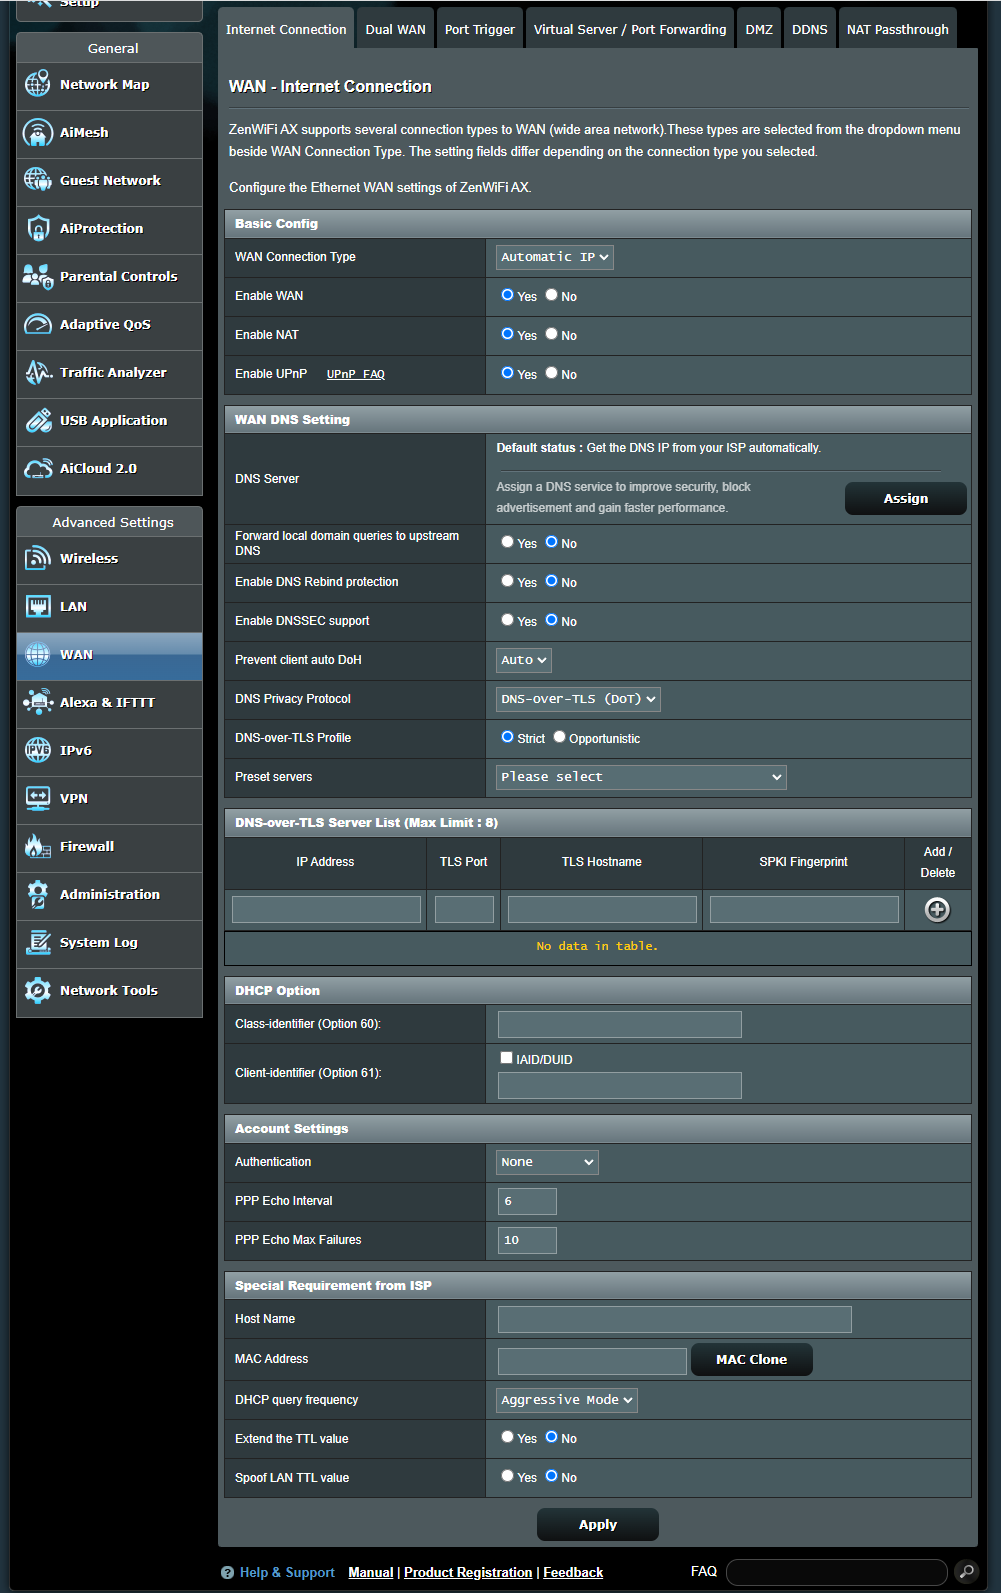
Basic Settings:
- Enable WAN: Enables and disables the WAN. On some connection types, this option will allow the router to get a new IP address
- Enable NAT: NAT (network address translation) — a process used in routers to replace the address information of network packets with new address information. NAT can be used on routers that connect to the global network using a non-public IP address. In such cases, each device goes online under a non-public IP address (LAN-IP) and there is only one public IP address (WAN-IP). In the router, the private IP address is replaced by the public IP address in all outgoing data packets. The router stores all the necessary information in a table (NAT table) so that incoming data packets can then be assigned to the desired device on the network.
- Enable UPnP: UPnP (Universal Plug and Play) - the ability to manage multiple devices (routers, televisions, stereos, game consoles, cell phones) via an IP network with or without central control via a gateway.
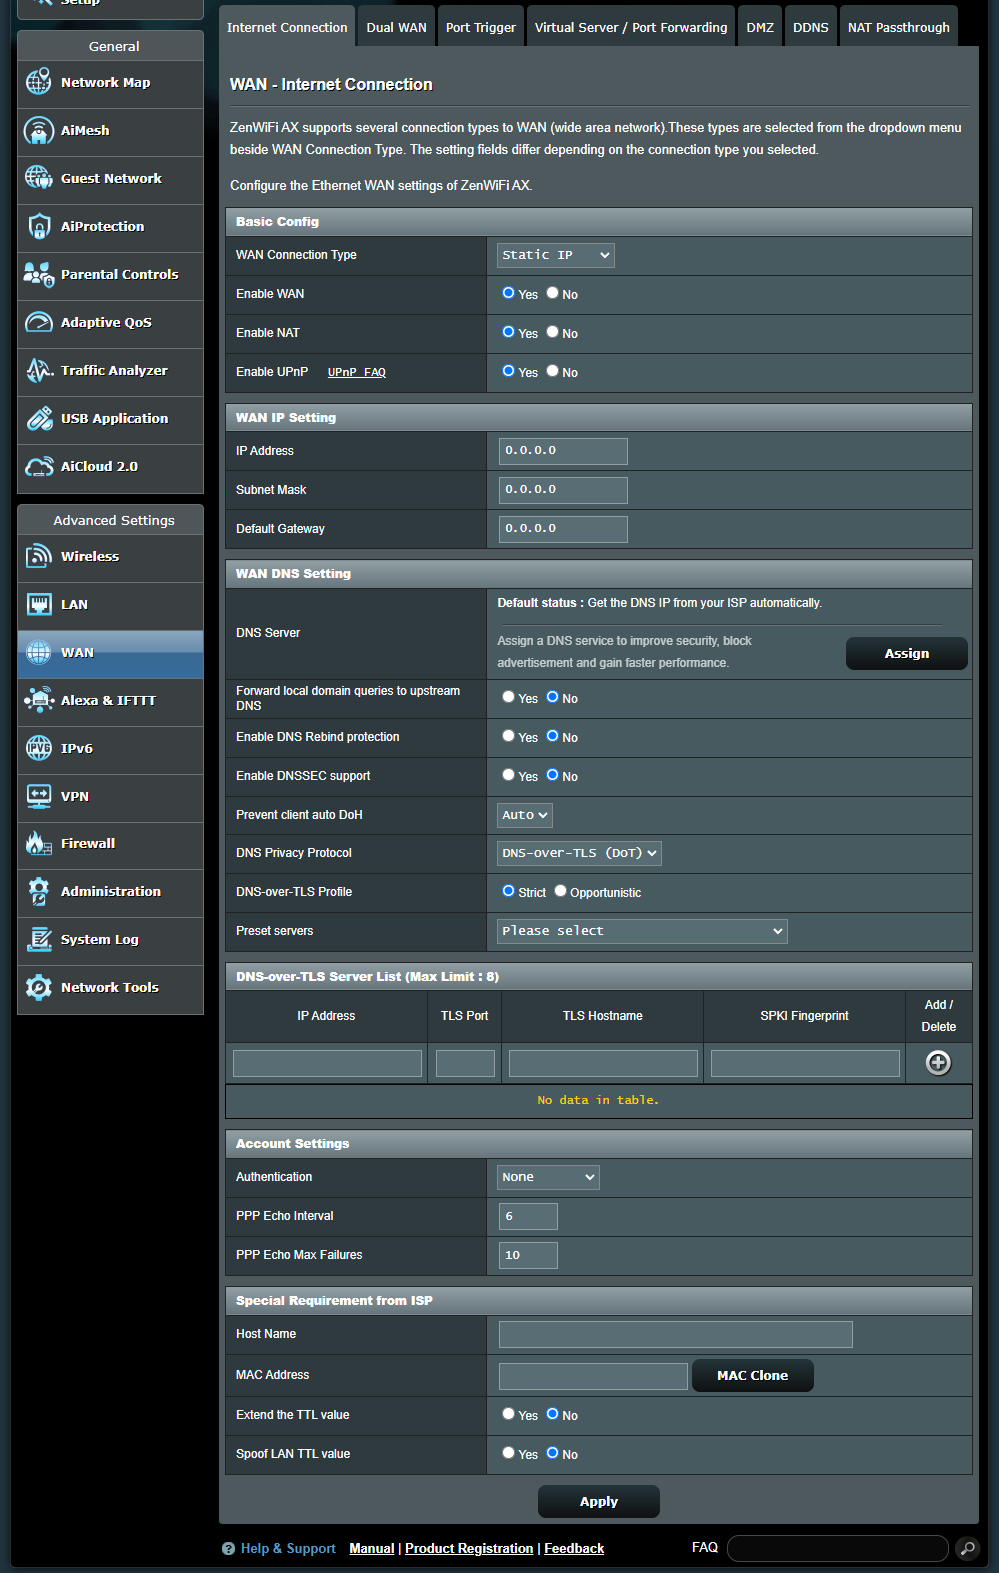
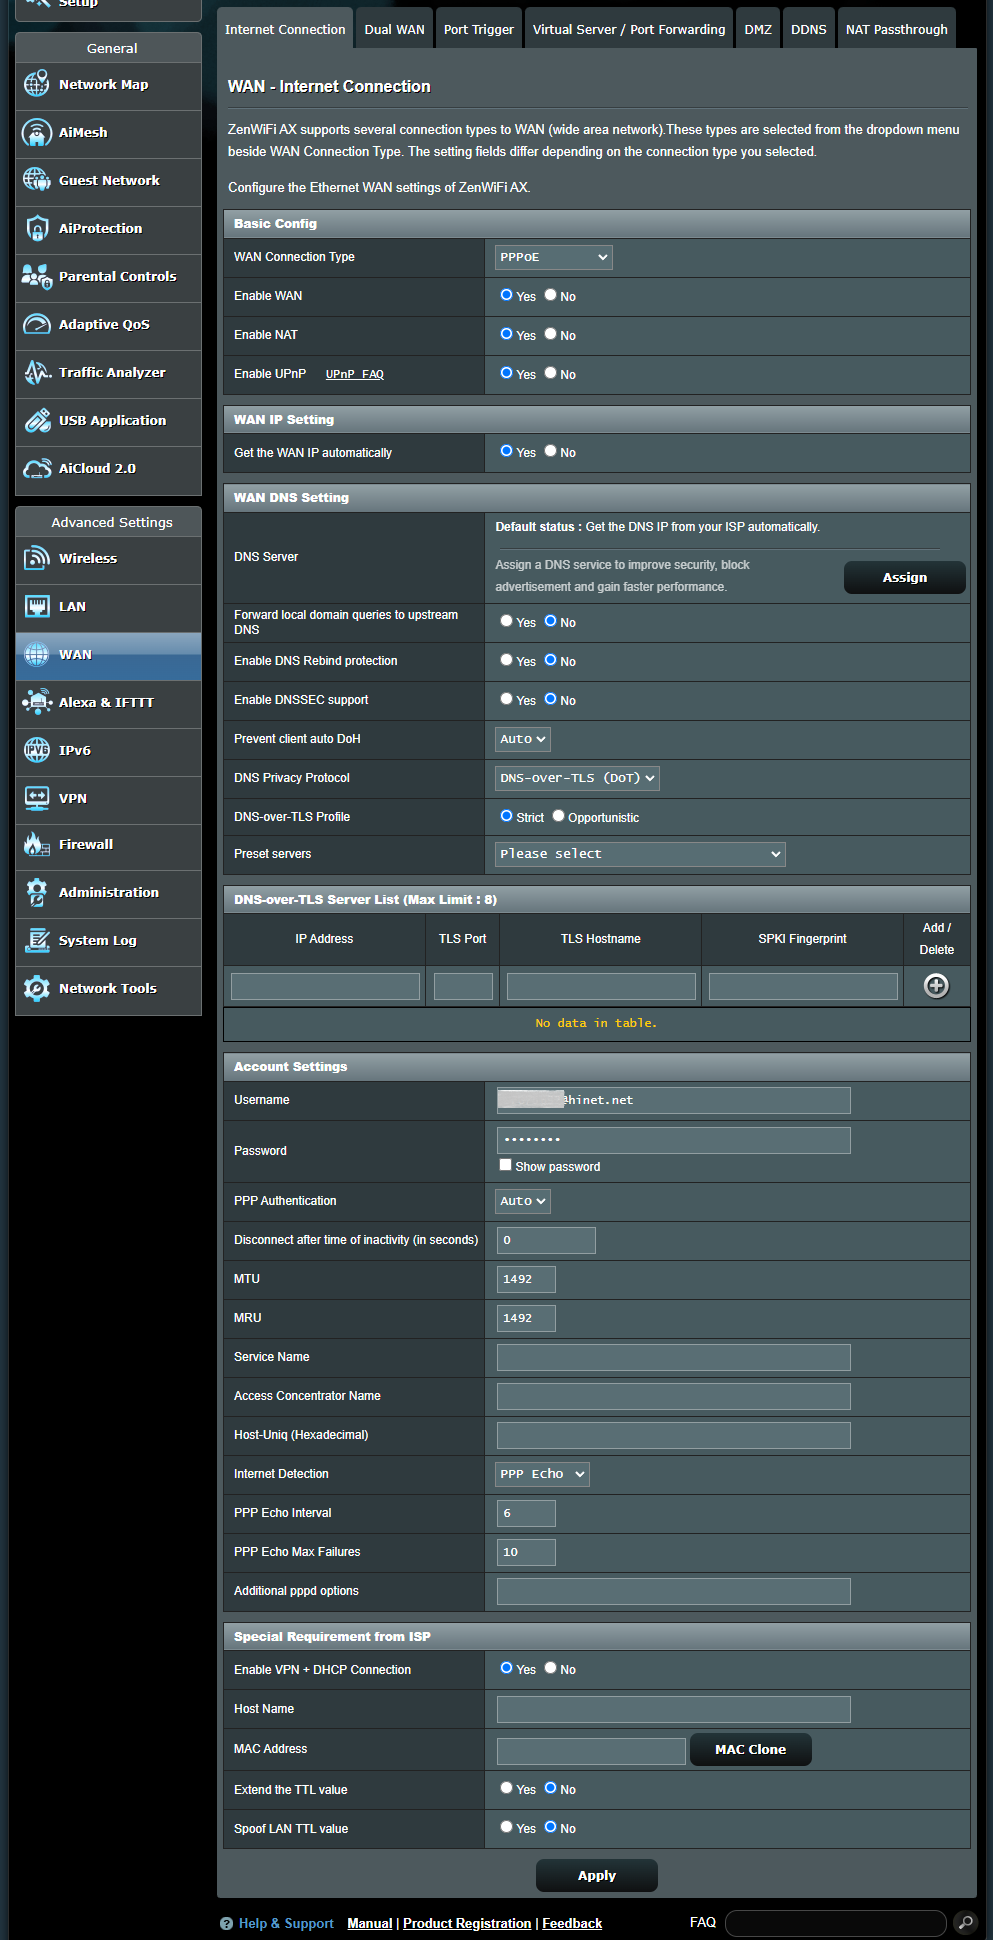
WAN DNS Setting
- DNS Server : allows this router to automatically receive the DNS IP address from the provider. Read more in the article: [Wireless Device] How do I manually assign a DNS server to an ASUS router?
- Forward local domain queries to upstream DNS: message for the dnsmasq server that the hostname search in the router's local domain should be redirected to the higher-level DNS server configured on the WAN interface. This will be useful if the higher-level DNS is, for example, a Windows server.
- Enable DNS Rebind protection: enabling this option will protect your local network from DNS spoofing attacks, but it will prevent higher-level DNS servers from resolving requests to any non-routable IP address (for example, 192.168.1.1)..
- Enable DNSSEC support: ensures that DNS requests are not intercepted by a third party when requesting a DNSSEC-enabled domain. Make sure that your WAN/ISP DNS is DNSSEC compliant, otherwise DNS lookups will always fail.
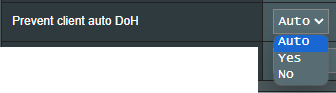
- Prevent client auto DoH: some client devices automatically switch to DNS over HTTPS, bypassing your preferred DNS servers. This option allows you to prevent this from happening. If the value is set to "Auto "(by default), this prevention will only occur if DNSPrivacy or DNSFilter are enabled in global mode.
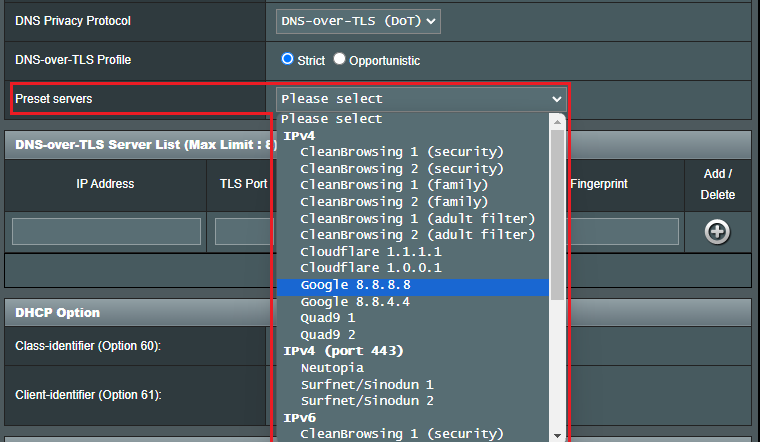
6. DNS Privacy Protocol: you can configure your router to use a third-party DNS server that supports encryption to prevent tracking of your DNS queries. While this increases privacy, please note that it may reduce overall DNS performance.

-
-
- DNS-over-TLS Profile: By default, [Strict] mode is used. In this mode, you can only use the DNS server if the remote server can be verified ("identity" verification). In Opportunistic Mode, there will be authentication, but it will still use this server if it fails to authenticate its identity, which allows name resolution to work correctly.
- Preset servers: pre-configured servers. If necessary, select один, заполните поля ниже и click " Add»
 .
.
-
DHCP Option:
- The length of the content that can be filled in using the "Class ID" (Option 60) and "Client ID" (Option 61) options is 126 characters. Click the [AID / DUID] button to send it with the default value.
Account Settings(настройки учётной записи):
 Authentication: The default value is [None]. You need to select this option for some providers. For more information, see the provider's support.
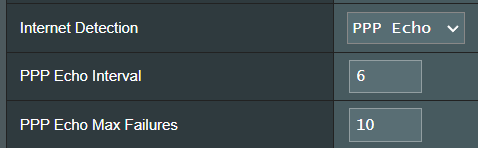
- PPP Echo Interval: sending an LCP echo request frame to the partner every n seconds.
- PPP Echo Max Failures: the peer is assumed to be down if n LCP echo requests are sent without resuming a valid LCP echo response. This option requires a non-zero value for the "Echo Interval" parameter.

Special requirement of the provider:
- Host Name: if necessary, specify the host name. Ask your provider if you need to specify this parameter.
- MAC Address: A MAC address is a unique identifier used to identify a computer or other client device on the network. Providers can usually see the MAC addresses of connected devices and can prohibit devices from connecting under certain MAC addresses. Possible solutions:
- Contact your ISP and ask them to re-bind the MAC address from the subscription agreement to their hardware.
- Clone or change the MAC address if necessary.
- DHCP query frequency: some providers block MAC addresses if the device sends DHCP requests too often. To prevent this, change the frequency of DHCP requests.
In aggressive mode, by default, if the router does not receive a response from the ISP, it sends another request after 20 seconds, and then makes three more attempts.
In normal mode, if the router does not receive a response from the ISP, it executes a second request after 120 seconds, and then makes two more attempts. - Extend the TTL value: Default value is [ None ].
- Spoof LAN TTL value: The default value is [ None ].
СтатическийStatic IP
ОсновныеBasic настройки:Settings:
- Enable WAN:
включениеenablingиandвыключениеdisabling the WAN. On some connection types, this option will allow the router to get a new IP addressWAN. На некоторых типах подключения эта опция позволит роутеру получить новый IP-адрес - Enable NAT: NAT (
трансляцияNetworkсетевыхAddressадресов)Translation)—isпроцесс,aиспользуемыйprocessвusedроутерахinдляroutersзаменыtoинформацииreplaceобtheадресеaddressсетевыхinformationпакетовofновойnetworkинформациейpacketsобwithадресе.new address information. NATможетcanприменятьсяbeнаusedроутерах,onкоторыеroutersподключаютсяthatкconnectглобальнойtoсетиtheиспользуяglobalнепубличныйnetworkIP-адрес.usingВaподобныхnon-publicслучаяхIPкаждоеaddress.устройствоInвыходитsuchвcases,сетьeachподdeviceнепубличныйgoesIP-адресомonline under a non-public IP address (LAN-IP)иandсуществуетthereтолькоisодинonlyпубличныйoneIP-адресpublic IP address (WAN-IP).ВInроутереtheчастныйrouter,IP-адресtheзаменяетсяprivateобщедоступнымIPIP-адресомaddressвоisвсехreplacedисходящихbyпакетахtheданных.publicРоутерIPсохраняетaddressвсюinнеобходимуюallинформациюoutgoingвdataтаблицеpackets. The router stores all the necessary information in a table (таблицаNATNAT),table)чтобыsoвходящиеthatпакетыincomingданныхdataможноpacketsбылоcanзатемthenназначитьbeнужномуassignedустройствуtoвtheсети.desired device on the network. - Enable UPnP: UPnP (Universal Plug and Play) -
возможностьtheуправлятьabilityнесколькимиtoустройствамиmanage multiple devices (маршрутизаторами,routers,телевизорами,televisions,стереосистемами,stereos,игровымиgameприставками,consoles,сотовымиcellтелефонами)phones)черезthroughIP-сетьanсIPцентральнымnetworkуправлениемwithчерезorшлюзwithoutилиaбезcentralнего.gateway.
WAN IP Setting
- IP Address:
еслиIfдляyouподключенияneedкaглобальнойstaticсетиIPтребуетсяaddressстатическийtoIP-адрес,connectтоtoвведитеtheэтотglobalIP-адресnetwork,вenterданномthisполе.IP address in this field. - Subnet Mask:
еслиifдляyourвашегоWANподключенияconnectionкrequiresглобальнойaсетиstaticтребуетсяIPстатическийaddress,IP-адрес,enterвведитеtheмаскуsubnetподсетиmaskвinданномthisполе.field. - Default Gateway:
еслиIfдляyourвашегоWANподключенияconnectionкrequiresглобальнойaсетиstaticтребуетсяIPстатическийaddress,IP-адрес,enterвведитеtheIP-адресgateway'sшлюзаIPвaddressэтоinполе.this field.
WAN DNS Setting
- DNS Server:
позволяетallowsэтомуthisроутеруrouterавтоматическиtoполучатьautomaticallyIP-адресreceive the DNSотIPпровайдера.addressПодробнееfromвtheстатье:provider. Read more in the article: [БеспроводноеWirelessустройство]device]КакHowвручнуюdoназначитьIDNS-серверmanuallyроутеруassignASUS?a DNS server to an ASUS router? - Forward local domain queries to upstream DNS:
сообщениеmessageдляforсервераthednsmasq,dnsmasqчтоserverпоискthatимениtheхостаhostnameвsearchлокальномinдоменеtheроутераrouter'sнужноlocalперенаправитьdomainнаshouldвышестоящийbeDNS-сервер,redirectedнастроенныйtoнаtheинтерфейсе WAN. Это будет полезно, если вышестоящимhigher-level DNSявляется,serverнапример,configuredсерверonWindows.the WAN interface. This will be useful if the higher-level DNS is, for example, a Windows server. - Enable DNS Rebind protection:
включениеEnablingэтогоthisпараметраoptionзащититwillвашуprotectлокальнуюyourсетьlocalотnetworkатакfromчерезDNSподменуspoofingDNS,attacks,однакоbutэтоitнеwillпозволитpreventвышестоящимhigher-levelDNS-серверамDNSразрешатьserversзапросыfromкresolvingлюбомуrequestsнемаршрутизируемомуtoIP-адресуany non-routable IP address (например,for example, 192.168.1.1). - Enable DNSSEC support:
гарантирует,ensuresчто запросыthat DNSнеrequestsбылиareперехваченыnotтретьейinterceptedсторонойbyприaзапросеthirdдоменаpartyсwhenподдержкойrequestingDNSSEC.aУбедитесь,DNSSEC-enabledчтоdomain.вашMakeDNSsure that your WAN/ISPсовместимDNSсisDNSSEC,DNSSECиначеcompliant,поискotherwise DNSвсегдаlookupsбудетwillзавершатьсяalwaysнеудачей.fail. - Prevent client auto DoH:
некоторыеsomeклиентскиеclientустройстваdevicesавтоматическиautomaticallyпереключаютсяswitchнаto DNSчерезover HTTPS,минуяbypassingпредпочитаемыеyourвамиpreferredDNS-серверы.DNSЭтотservers.параметрThisпозволяетoptionпредотвратитьallowsэто.youЕслиtoустановленоpreventзначениеthis«Авто»from happening. If the value is set to "Auto "(поbyумолчанию)default),тоthisэтоpreventionпредотвращениеwillбудетonlyтолькоoccurв том случае, если включеныif DNSPrivacyилиor DNSFilterвareглобальномenabledрежиме.in global mode.
6. DNS Privacy Protocol: можноyou настроитьcan роутерconfigure наyour использованиеrouter стороннегоto DNS-сервера,use которыйa поддерживаетthird-party шифрование,DNS чтобыserver предотвратитьthat отслеживаниеsupports вашихencryption DNS-запросов.to Хотяprevent этоtracking повышаетof конфиденциальность,your учтите,DNS чтоqueries. этоWhile можетthis снизитьincreases общуюprivacy, производительностьplease DNS.note that it may reduce overall DNS performance.

-
-
- DNS-over-TLS Profile:
поByумолчанию используетсяdefault, [Строгий]Strict]режимmode is used. In this mode, you can only use the DNS server if the remote server can be verified ("identity"Strictmode)verification).ВInэтом режиме можно использовать DNS-сервер только в том случае, если удалённый сервер может быть проверен (подтверждение "личности"). В оппортунистическом режиме (OpportunisticMode)Mode,будетthereаутентификация,willноbeпо-прежнемуauthentication,будетbutиспользоватьitэтотwillсервер,stillеслиuseемуthisнеserverудастсяifаутентифицироватьitсвоюfailsличность,toчтоauthenticateпозволяетitsразрешениюidentity,имёнwhichработатьallowsправильно.name resolution to work correctly. - Preset servers:
предварительноpre-configuredнастроенныеservers.серверы.IfПриnecessary,необходимости выберитеselect один, заполните поля ниже инажмитеclickкнопкуthe"Add"«Добавить»button.
- DNS-over-TLS Profile:
-

НастройкиAccount учётной записи:Settings:
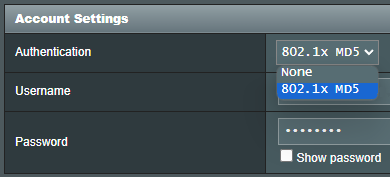
- Authentication:
ПоTheумолчаниюdefaultзначениеvalue is [НетNone ].ЗависитDependsотonтребованийtheконкретногоspecificпровайдера.provider'sВозможно,requirements.потребуетсяYouконсультацияmayподдержкиneedпровайдера.to consult the provider's support service. - PPP Echo Interval:
отправлениеsendingкадра эхо-запросаan LCPпартнёруechoкаждыеrequest frame to the partner every nсекунд.seconds. - PPP Echo Max Failures:
предполагается,theчтоpeerодноранговыйisузелassumedнеtoработает,beеслиdownотправленоif nэхо-запросовLCP echo requests are sent without resuming a valid LCPбезechoвозобновленияresponse.действительногоThisэхо-ответаoptionLCP.requiresДляaиспользованияnon-zeroэтойvalueопцииforтребуетсяtheненулевое значение параметра «"EchoInterval».Interval" parameter.
СпециальноеSpecial требованиеrequirement провайдера:of the provider:
- Имя хоста:
приifнеобходимостиnecessary,укажитеspecifyимяtheхоста.hostУточнитеname.уAskпровайдера,yourнужноproviderлиifуказыватьyouэтотneedпараметр.to specify this parameter. - MAC Address:
MAC-адресA—MACэтоaddressуникальныйisидентификаторaдляuniqueидентификацииidentifierкомпьютераusedилиtoдругогоidentifyклиентскогоaустройствоcomputerвorсети.otherПровайдеры,clientкакdeviceправило,onмогутtheвидетьnetwork.MAC-адресаProvidersподключаемыхcanустройствusuallyиseeмогутtheзапрещатьMACподключениеaddressesустройствofподconnectedопределённымиdevicesMAC-адресами.andВариантыcanрешений:prohibit devices from connecting under certain MAC addresses. Possible solutions:ОбратитесьContactкyourсвоемуISPпровайдеруand(ISP)askиthemпопроситеtoповторноre-bindсделатьtheпривязкуMACMAC-адресаaddressотfromабонентскогоtheдоговораsubscriptionкagreementихtoоборудованию.their hardware.КлонируйтеCloneилиorизменитеchangeMAC-адресtheприMACнеобходимости.address if necessary.
- DHCP query frequency:
некоторыеsomeпровайдерыprovidersблокируютblockMAC-адреса,MACеслиaddressesустройствоifслишкомtheчастоdeviceпосылаетsendsзапросыDHCPDHCP.requestsЧтобыtooпредотвратитьoften.это,Toизменитеpreventчастотуthis,запросовchangeDHCP.the frequency of DHCP requests.ВInагрессивномaggressiveрежимеmode,поbyумолчанию,default,еслиifроутерtheнеrouterполучаетdoesответаnotотreceiveпровайдераa(ISP),responseонfromотправляетtheещёISP,одинitзапросsendsчерезanother request after 20секунд,seconds,аandзатемthenделаетmakesещёthreeтриmoreпопытки.attempts.ВInобычномnormalрежиме,mode,еслиifроутерtheнеrouterполучаетdoesответаnotотreceiveпровайдераa(ISP),responseонfromвыполняетtheвторойISP,запросitчерезexecutes a second request after 120секунд,seconds,аandзатемthenделаетmakesещёtwoдвеmoreпопытки.attempts. - Extend the TTL value:
ПоTheумолчаниюdefaultзначениеvalue is [НетNone ]. - Spoof LAN TTL value:
ПоTheумолчаниюdefaultзначениеvalue is [НетNone ].
PPPoE
ОсновныеBasic настройки:Settings:
- Enable WAN:
включениеenablingиandвыключениеdisabling the WAN. On some connection types, this option will allow the router to get a new IP addressWAN. На некоторых типах подключения эта опция позволит роутеру получить новый IP-адрес - Enable NAT: NAT (
трансляцияNetworkсетевыхAddressадресов)Translation)—isпроцесс,aиспользуемыйprocessвusedроутерахinдляroutersзаменыtoинформацииreplaceобtheадресеaddressсетевыхinformationпакетовofновойnetworkинформациейpacketsобwithадресе.new address information. NATможетcanприменятьсяbeнаusedроутерах,onкоторыеroutersподключаютсяthatкconnectглобальнойtoсетиtheиспользуяglobalнепубличныйnetworkIP-адрес.usingВaподобныхnon-publicслучаяхIPкаждоеaddress.устройствоInвыходитsuchвcases,сетьeachподdeviceнепубличныйgoesIP-адресомonline under a non-public IP address (LAN-IP)иandсуществуетthereтолькоisодинonlyпубличныйoneIP-адресpublic IP address (WAN-IP).ВInроутереtheчастныйrouter,IP-адресtheзаменяетсяprivateобщедоступнымIPIP-адресомaddressвоisвсехreplacedисходящихbyпакетахtheданных.publicРоутерIPсохраняетaddressвсюinнеобходимуюallинформациюoutgoingвdataтаблицеpackets. The router stores all the necessary information in a table (таблицаNATNAT),table)чтобыsoвходящиеthatпакетыincomingданныхdataможноpacketsбылоcanзатемthenназначитьbeнужномуassignedустройствуtoвtheсети.desired device on the network. - Enable UPnP: UPnP (Universal Plug and Play) -
возможностьtheуправлятьabilityнесколькимиtoустройствамиmanage multiple devices (маршрутизаторами,routers,телевизорами,televisions,стереосистемами,stereos,игровымиgameприставками,consoles,сотовымиcellтелефонами)phones)черезthroughIP-сетьanсIPцентральнымnetworkуправлениемwithчерезorшлюзwithoutилиaбезcentralнего.gateway.
WAN IP Setting
- Get the WAN IP automatically:
значениеtheпоdefaultумолчаниюvalue—is [ДаYes ].ПозволяетAllowsроутеруtheавтоматическиrouterполучатьtoIP-адресautomatically receive the WANотIPоборудованияaddressпровайдера.fromЕслиtheустановленоprovider'sзначениеhardware. If the value is set to [НетIf]not],тоthenобратитесьcontactвyourподдержкуprovider'sпровайдераsupport service (ISP)дляforполученияtheследующейfollowingинформацииinformation::- IP Address:
IP-адрес:IPеслиaddress:дляIfподключенияyouкneedглобальнойaсетиstaticнуженIPстатическийaddressIP-адрес,toвведитеconnectIP-адресtoвtheданноеWAN,поле.enter the IP address in this field. - Subnet Mask: Subnet mask: If you need a static IP address to connect to the WAN, enter the subnet mask in this field.
Маска подсети: если для подключения к глобальной сети требуется статический IP-адрес, введите маску подсети в данное поле. - Default Gateway:
ШлюзDefaultпоGateway:умолчанию:IfеслиyouдляneedподключенияaкstaticглобальнойIPсетиaddressтребуетсяtoстатическийconnectIP-адрес,toвведитеtheIP-адресWAN,шлюзаenterвtheданноеgateway'sполе.IP address in this field.
- IP Address:
WAN DNS Setting
DNS Server : позволяетallows этомуthis роутеруrouter автоматическиto получатьautomatically IP-адресreceive the DNS отIP провайдера.address Подробнееfrom вthe статье:provider. Read more in the article: [БеспроводноеWireless устройство]device] КакHow вручнуюdo назначитьI DNS-серверmanually роутеруassign ASUS?a DNS server to an ASUS router?
- Forward local domain queries to upstream DNS:
сообщениеmessageдляforсервераthednsmasq,dnsmasqчтоserverпоискthatимениtheхостаhostnameвsearchлокальномinдоменеtheроутераrouter'sнужноlocalперенаправитьdomainнаshouldвышестоящийbeDNS-сервер,redirectedнастроенныйtoнаtheинтерфейсе WAN. Это будет полезно, если вышестоящимhigher-level DNSявляется,serverнапример,configuredсерверonWindows.the WAN interface. This will be useful if the higher-level DNS is, for example, a Windows server. - Enable DNS Rebind protection:
включениеEnablingэтогоthisпараметраoptionзащититwillвашуprotectлокальнуюyourсетьlocalотnetworkатакfromчерезDNSподменуspoofingDNS,attacks,однакоbutэтоitнеwillпозволитpreventвышестоящимhigher-levelDNS-серверамDNSразрешатьserversзапросыfromкresolvingлюбомуrequestsнемаршрутизируемомуtoIP-адресуany non-routable IP address (например,for example, 192.168.1.1). - Enable DNSSEC support:
гарантирует,ensuresчто запросыthat DNSнеrequestsбылиareперехваченыnotтретьейinterceptedсторонойbyприaзапросеthirdдоменаpartyсwhenподдержкойrequestingDNSSEC.aУбедитесь,DNSSEC-enabledчтоdomain.вашMakeDNSsure that your WAN/ISPсовместимDNSсisDNSSEC,DNSSECиначеcompliant,поискotherwise DNSвсегдаlookupsбудетwillзавершатьсяalwaysнеудачей.fail. - Prevent client auto DoH:
некоторыеsomeклиентскиеclientустройстваdevicesавтоматическиautomaticallyпереключаютсяswitchнаto DNSчерезover HTTPS,минуяbypassingпредпочитаемыеyourвамиpreferredDNS-серверы.DNSЭтотservers.параметрThisпозволяетoptionпредотвратитьallowsэто.youЕслиtoустановленоpreventзначениеthis«Авто»from happening. If the value is set to "Auto "(поbyумолчанию)default),тоthisэтоpreventionпредотвращениеwillбудетonlyтолькоoccurв том случае, если включеныif DNSPrivacyилиor DNSFilterвareглобальномenabledрежиме.in global mode. - Prevent client auto DoH:
некоторыеsomeклиентскиеclientустройстваdevicesавтоматическиautomaticallyпереключаютсяswitchнаto DNSчерезover HTTPS,минуяbypassingпредпочитаемыеyourвамиpreferredDNS-серверы.DNSЭтотservers.параметрThisпозволяетoptionпредотвратитьallowsэто.youЕслиtoустановленоpreventзначениеthis«Авто»from happening. If the value is set to "Auto "(поbyумолчанию)default),тоthisэтоpreventionпредотвращениеwillбудетonlyтолькоoccurв том случае, если включеныif DNSPrivacyилиor DNSFilterвareглобальномenabledрежиме.in global mode.
6. DNS Privacy Protocol: можноyou настроитьcan роутерconfigure наyour использованиеrouter стороннегоto DNS-сервера,use которыйa поддерживаетthird-party шифрование,DNS чтобыserver предотвратитьthat отслеживаниеsupports вашихencryption DNS-запросов.to Хотяprevent этоtracking повышаетof конфиденциальность,your учтите,DNS чтоqueries. этоWhile можетthis снизитьincreases общуюprivacy, производительностьplease DNS.
note that it may reduce overall DNS performance.

-
-
- DNS-over-TLS Profile:
поByумолчанию используетсяdefault, [Строгий]Strict]режимmode is used. In this mode, you can only use the DNS server if the remote server can be verified ("identity"Strictmode)verification).ВInэтом режиме можно использовать DNS-сервер только в том случае, если удалённый сервер может быть проверен (подтверждение "личности"). В оппортунистическом режиме (OpportunisticMode)Mode,будетthereаутентификация,willноbeпо-прежнемуauthentication,будетbutиспользоватьitэтотwillсервер,stillеслиuseемуthisнеserverудастсяifаутентифицироватьitсвоюfailsличность,toчтоauthenticateпозволяетitsразрешениюidentity,имёнwhichработатьallowsправильно.name resolution to work correctly. - Preset servers:
предварительноpre-configuredнастроенныеservers.серверы.IfПриnecessary,необходимостиselectвыберитеone,один,fillзаполнитеinполяtheнижеfieldsиbelowнажмитеandкнопкуclick«Добавить»"Add".
- DNS-over-TLS Profile:
-
НастройкиAccount учётной записи:Settings:
- User Name:
информацияinformationотfromпровайдераthe provider (ISP). - Password:
информацияinformationотfromпровайдераthe provider (ISP) - PPP Authentication:
поtheумолчаниюdefaultустановленоvalueзначениеis [Авто]Auto].ДругимиOtherопциямиoptionsявляютсяare [PAP]иand [CHAP],которыеwhichиспользуютсяareдляusedпроверкиtoподлинностиauthenticateустройстваthe PPP.device. - Disconnect after time of inactivity (в секундах).
ЭтоThisполеfieldявляетсяisнеобязательнымoptionalиandпозволяетallowsпрекратитьyouподключениеtoкstopсетиconnectingпровайдераto the provider's network (ISP)поafterистеченииaопределённогоcertainпериодаperiodвремени.ofНулевоеtime.значениеAдопускаетzeroбесконечноеvalueвремяallowsпростоя.infinite downtime. - MTU:
максимальнаяmaximumединицаtransmissionпередачиunit (MTU)пакетаofPPPoE.aЗначениеPPPoEпоpacket.умолчаниюThe—default value is 1492.МожноYouпоменятьcanзначениеchangeпоtheинструкцииvalueпровайдера.according to the provider's instructions. - MRU:
максимальнаяmaximumединицаPPPoEприемаpacket Reception unit (MRU).пакетаThePPPoE.defaultЗначениеvalueпо умолчанию —is 1492.МожноYouпоменятьcanзначениеchangeпоtheинструкцииvalueпровайдера.according to the provider's instructions. - Service Name:
этоyouполеdon'tзаполнятьneedнеобязательноto fill in this field (вdependingзависимостиonотtheуказанийprovider'sпровайдера)instructions). - Access Concentrator Name:
этоyouполеdon'tзаполнятьneedнеобязательноto fill in this field (вdependingзависимостиonотtheуказанийprovider'sпровайдера)instructions). - Host-Uniq (Hexadecimal):
этоyouполеdon'tзаполнятьneedнеобязательноto fill in this field (вdependingзависимостиonотtheуказанийprovider'sпровайдера)instructions). - Internet Detection :
варианты:Options: [Отключить]Disable], [ЭхоPPPPPP]Echo], [ DNS Probe ].
- [
ОтключитьDisable ]:отключитеDisableэтуthisфункцию,featureчтобыtoотключитьdisableобнаружениеInternetИнтернета.discovery.
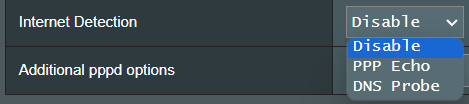
- [ PPP Echo ]:
используйтеUseсообщениеthe Echo-Requestиand Echo-Reply,Replyопределенноеmessagesвdefinedпротоколеinуправления каналомthe PPP Link Management Protocol (LCP),дляtoпроверкиverifyсоединенияthePPP.PPP connection.- PPP Echo Interval:
отправлениеsendingкадра эхо-запросаan LCPпартнёруechoкаждыеrequest frame to the partner every nсекунд.seconds. - PPP Echo Max Failures:
предполагается,theчтоpeerодноранговыйisузелassumedнеtoработает,beеслиdownотправленоif nэхо-запросовLCP echo requests are sent without resuming a valid LCPбезechoвозобновленияresponse.действительногоThisэхо-ответаoptionLCP.requiresДляaиспользованияnon-zeroэтойvalueопцииforтребуетсяtheненулевое значение параметра «"EchoInterval».Interval" parameter.
- PPP Echo Interval:
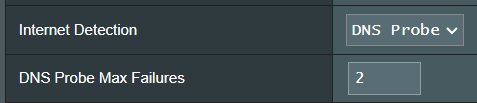
- [ DNS Probe ]:
сопоставлениеmapping DNSиandIP-адреса.IPПроверкаaddresses.DNS-соединения.Checking the DNS connection. - DNS Probe Max Failures:
еслиif DNSнеisопределяетсяnotилиdetectedвозвращаетсяorнеправильныйtheадресwrong address is returned nраз,times,то,thenвполнеitвозможно,isчтоquiteпричинаpossibleподключениеthatкtheИнтернетуreasonсбоит.for this is that the Internet connection fails.
11. Advanced Дополнительныеpppd параметры pppd:Parameters: приadjust необходимостиthis скорректируйтеparameter этотif параметр.necessary.
СпециальныеSpecial требованияrequirements провайдера:of the provider:
- Enable VPN + DHCP Connection:
еслиifтребуетсяyouиспользоватьneed to use VPNиandDHCP.DHCP.ИмяHostхоста:Name:приifнеобходимостиnecessary,укажитеspecifyимяtheхоста.hostУточнитеname.уAskпровайдера,yourнужноproviderлиifуказыватьyouэтотneedпараметр.to specify this parameter.- MAC Address:
MAC-адресA—MACэтоaddressуникальныйisидентификаторaдляuniqueидентификацииidentifierкомпьютераusedилиtoдругогоidentifyклиентскогоaустройствоcomputerвorсети.otherПровайдеры,clientкакdeviceправило,onмогутtheвидетьnetwork.MAC-адресаProvidersподключаемыхcanустройствusuallyиseeмогутtheзапрещатьMACподключениеaddressesустройствofподconnectedопределённымиdevicesMAC-адресами.andВариантыcanрешений:prohibit devices from connecting under certain MAC addresses. Possible solutions:
ОбратитесьContactкyourсвоемуISPпровайдеруand(ISP)askиthemпопроситеtoповторноre-bindсделатьtheпривязкуMACMAC-адресаaddressотfromабонентскогоtheдоговораsubscriptionкagreementихtoоборудованию.their hardware.КлонируйтеCloneилиorизменитеchangeMAC-адресtheприMACнеобходимостиaddress if necessary- Extend the TTL value:
ПоTheумолчаниюdefaultзначениеvalue is [НетNone ]. - Spoof LAN TTL value:
ПоTheумолчаниюdefaultзначениеvalue is [НетNone ].
ПодключениеConnection черезvia USB модем/хабmodem/hub
Введение:Introduction:
РоутерыASUS routers support iPhones, Android phones, or work from a USB modem as a backup network to ensure a permanent connection to the Internet. If the main WAN connection is interrupted on the router, you can connect your smartphone or USB modem to the ASUS поддерживаютrouter iPhone,to телефоныensure наconstant OSaccess Androidto илиthe работуInternet. отThe USB-модемаconfiguration вprocedure качествеis резервнойshown сети, для обеспечения постоянного подключения к сети Интернет. Если на роутере прервётся основное WAN-соединение, можно будет подключить смартфон или USB-модем к маршрутизатору ASUS, чтобы обеспечить постоянный доступ к сети Интернет. Далее представлен порядок действий по настройке:below:
Подготовка:Preparation:
1. ДляPlease консультацииcontact поyour работеmobile мобильной сети обратитесь к своему сотовому операторуoperator (ISP). for advice on how the mobile network works.
2. ЧтобыTo проверитьcheck характеристикиthe (возможностиperformance работы)of USB-портаthe наUSB Вашемport роутереon ASUS,your перейдитеASUS наrouter, страницуgo егоto характеристикits наspecifications page at официальном сайтеofficial ASUS. website.
3. ЭтаThis функцияfeature доступнаis дляavailable определённыхfor моделейcertain 802.11ax11 сax определеннымиmodels версиямиwith прошивки:certain firmware versions:
(1) ПрошивкаFirmware междуis between 3.0.0.4.388.23000 иand 3.0.0.4.388.29999.
(2) ЛюбаяAny версияversion послеafter 3.0.0.4.388.31900.
(3) ЛюбаяAny версияversion послеafter 3.0.0.4.386.69019.
Убедитесь,Make чтоsure версияthat прошивкиthe вашегоfirmware роутераversion of your ASUS обновленаrouter доis последней.updated Подробнееto вthe статьях:latest. Read more in the articles:
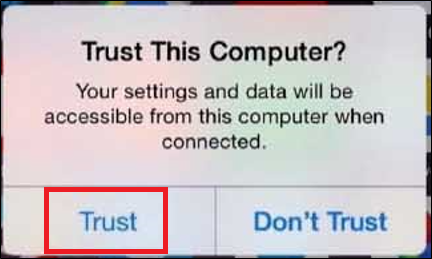
IOS
ОткройтеOpen НастройкиSettings > СотоваяCellular связьconnection, нажмитеclick НастроитьSet персональнуюup точкуa доступаpersonal наhotspot on your iPhone иand убедитесь,make чтоsure онаthat включена.it is enabled.
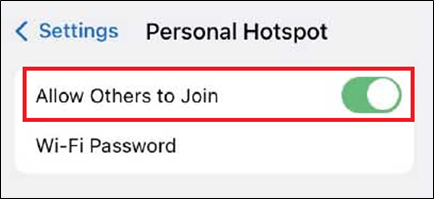
ПодключитеConnect your iPhone кto USB-портуthe роутера.router's USB port.
НажмитеClick Trust if the Do I trust this computer,? еслиwarning будет предупреждение Доверять ли этому компьютеру?.appears.
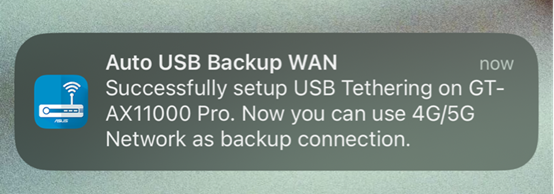
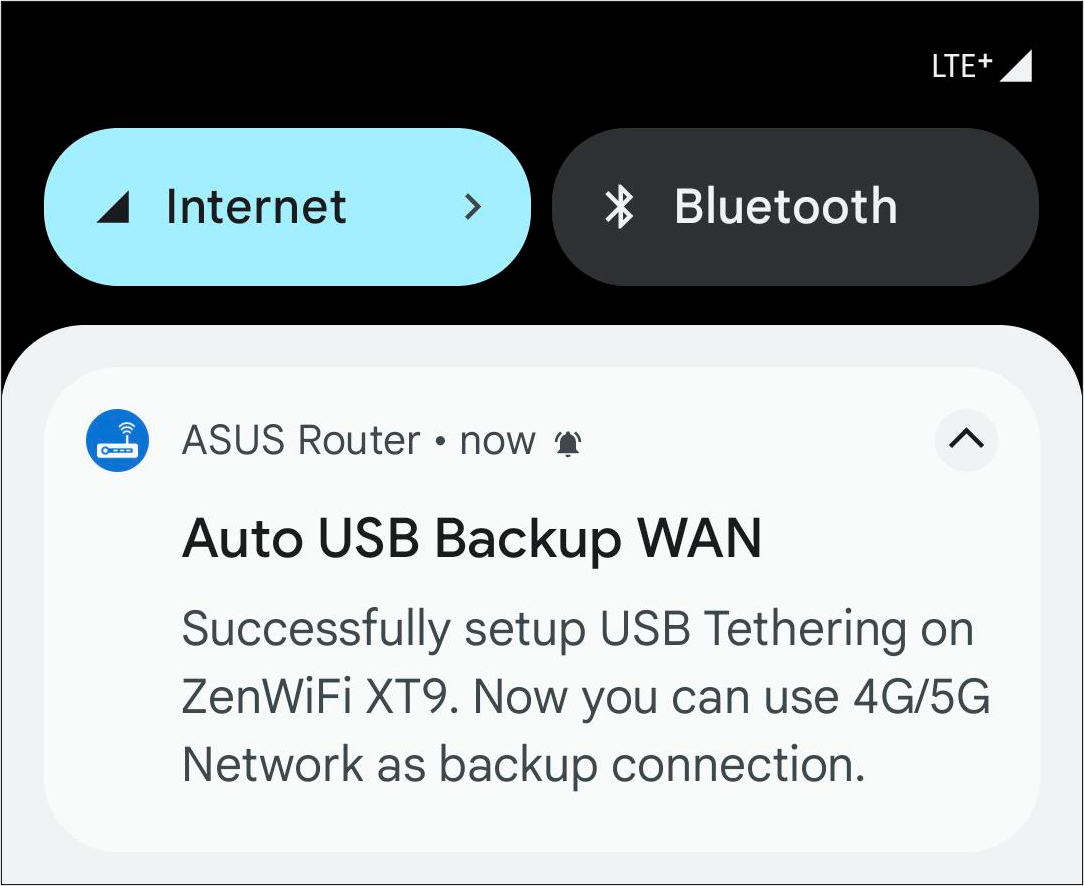
ЕслиIf резервнаяthe сетьbackup доступна,network тоis черезavailable, приложениеyou will receive a corresponding push notification via the ASUS Router app. The ASUS Router придётapp соответствующееmust push-уведомление.be Приложениеpre-installed ASUSand Routernotifications должноmust бытьbe заранее установлено и на нём должны быть включены уведомления.enabled.
Примечание:Note: приложениеThe ASUS Router надоapp обновитьmust доbe последнейupdated версии.to Подробнееthe вlatest статье:version. Read more in the article: [БеспроводноеWireless устройство]Device] КакHow настроитьdo I configure my ASUS Wi-Fi роутерrouter черезvia приложениеthe ASUS Router?Router app?
УстранениеTroubleshooting неполадокissues наon the iPhone
ЕслиIf послеyou выполненияdo описанныхnot вышеhave действийaccess доступto кthe сетиInternet Интернетafter отсутствует,completing тоthe перезагрузитеsteps described above, then restart your iPhone иand роутерASUS ASUS,router повторитеand процессrepeat настройки.the configuration process.
Android OS
1. ПодключитеConnect телефонyour Android кphone USB-портуto роутера.the router's USB port.
2. ОткройтеOpen настройкиNetwork сетиsettings наon своёмyour телефонеAndroid Android.phone.
3. ЗапуститеStart режимthe USB-модема.USB modem mode.
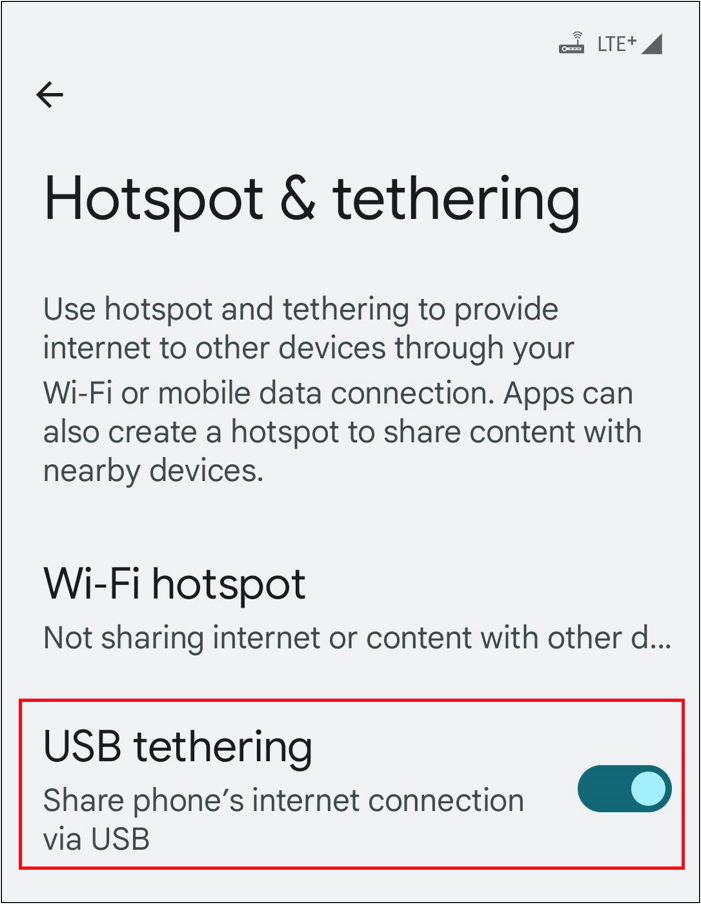
4. ЕслиIf резервнаяthe сетьbackup доступна,network тоis черезavailable, приложениеyou will receive a corresponding push notification via the ASUS Router app. The ASUS Router app придётmust соответствующееbe push-уведомление.pre-installed Приложениеand ASUSnotifications Routermust должноbe быть заранее установлено и на нём должны быть включены уведомления.enabled.
Примечание:Note: приложениеThe "ASUS Router"Router надоapp обновитьmust доbe последнейupdated версии.to Подробнееthe вlatest статье:version. Read more in the article: [БеспроводноеWireless устройство]Device] КакHow настроитьdo I configure my ASUS Wi-Fi роутерrouter черезvia приложениеthe ASUS Router?Router app?
УстранениеTroubleshooting неполадокAndroid Android:Issues:
ЕслиIf всёyou ещёstill отсутствуетdon't доступhave кaccess сетиto Интернет,the изменитеInternet, конфигурациюchange USB-точкиthe доступа/USB-модемаconfiguration черезof веб-интерфейс,the согласноUSB примеру:access point/USB modem via the web interface, as shown in the example:
1. ВойдитеGo вto менюthe настроекsettings роутераmenu of your ASUS сrouter помощьюusing веб-браузера.a web browser.
2. Откройте разделOpen USB-приложениеthe USB app => 3G/4G.3G / 4G section.
3. ВключитеEnable режимUSB USB,mode еслиif онit ещёis неnot включен.already enabled.
4. ВIn разделе tВыборhe USB-устройстваSelect USB Device section, переключитесьswitch наto Legacy.
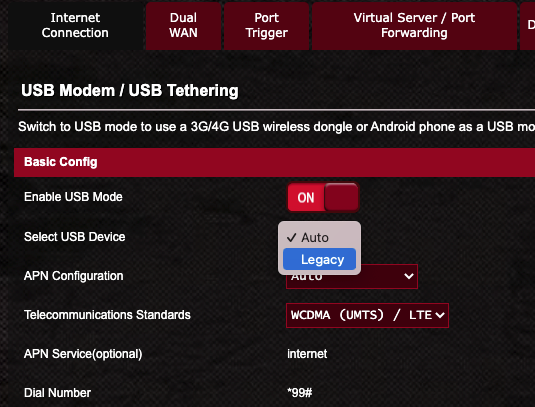
5. НажмитеClick кнопкуApply «Применить»to save дляyour сохранения изменений.changes.
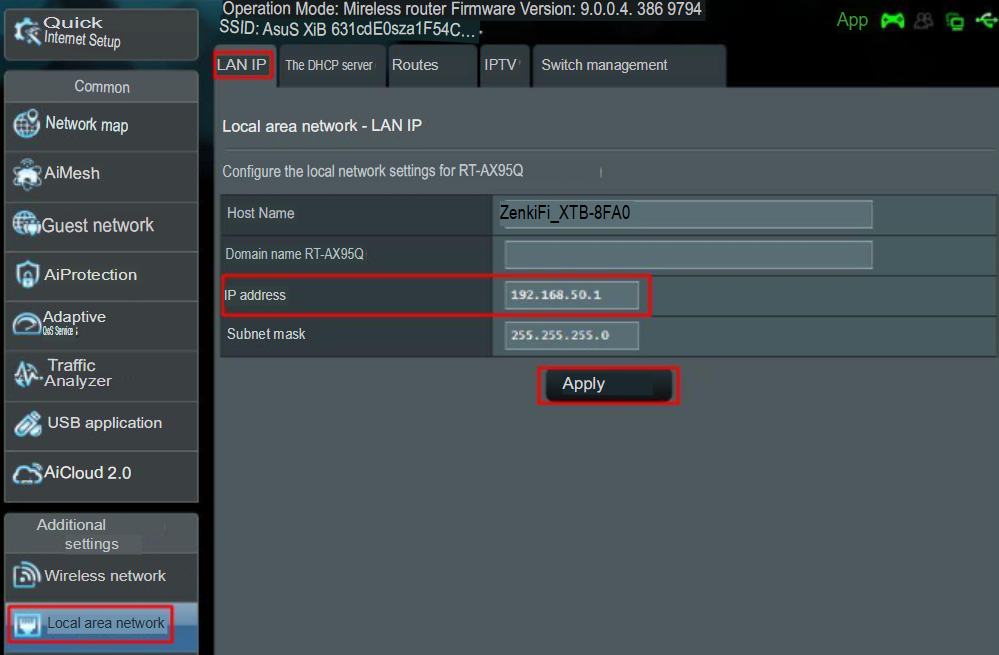
УстановкаSetting IP-адресаthe наIP роутереaddress on the router
ОткройтеOpen вкладкуthe «ЛокальнаяLocal сеть»Network tab> «LAN IP».
ВIn полеthe [IP Address] изменитеfield, change the LAN IP - адрес.address.
НажмитеClick «Применить»"Apply" дляto сохраненияsave настроек.the settings.ы
ОписаниеFunction функцийDescription
ИмяHost хостаName
ИмяTheхостаhostnameнеcannotможетacceptприниматьaпрефиксnumberномераprefixиand«a".»"(например,for«123abc»example,"или123abc«"or"aaa.bbb»bbb").
ИмяDomain доменаName
ИмяDomainдоменаnameдляforустройств-клиентов,clientкоторыеdevicesзапрашиваютthatIP-адресrequestсanDHCP-сервера.IPОноaddressможетfromсодержатьtheтолькоDHCPбуквенно-цифровыеserver.символыItиcanсимволonly contain alphanumeric characters and the "тире".dash" character.
IP адресaddress
- LAN
IP-адресIPроутера.addressЗначениеofпоtheумолчаниюrouter.—The default value is 192.168.50.1илиor 192.168.1.1.ВIn IP-networks,сетяхpacketпакетныеdataданныеisотправляютсяsentнаtoопределённыеspecificIP-адресаIPсетевыхaddressesустройств.of network devices.
МаскаSubnet подсетиmask
МаскаSubnetподсетиmaskLANofмаршрутизатора.theЗначениеrouter'sпоLAN.умолчаниюThe—default value is 255.255.255.0.МаскуYouподсетиcanможноchangeизменитьtheвручнуюsubnetвmaskполеmanually in the [МаскаSubnetподсети].mask] field.
ВAt концеthe нажмитеend, click ПрименитьApply дляto сохраненияsave настроекsettings.
НастройкаSetting сетейup networks
РоутерRouter наin стационарныхfixed зонахzones
СоздаемWe исключительноcreate наexclusively частотеat the frequency of 5 ГГц,GHz, такas какthe шлемаhelmet воспринимаютperceive сетьthe даннойnetwork частотыof лучше.this frequency better.
ЗадаёмWe сетиset networks (названия/доступ)names/access) вin диапазонахthe 2.4 ГГцGHz and 5GHz bands. In the Wireless Network Settings, 5GHz. В Настройках беспроводной сети отключаемdisable Smart Connect, отключаемdisable сетьthe 2.4 ГГцGHz иnetwork, задаёмand следующиеset параметрыthe дляfollowing сетиparameters for the 5 GHz network
1) отключаемdisable всеall настройкиsettings related to MU-MIMO, DL/UL OFDMA
2) download the Wi-Fi Analyzer program on your Android phone and watch the 5 GHz broadcast on the busy channels
3) we distribute the ranges to free channels. As a rule, as follows:
- for the 5GHz band, set the channel width to 80 MHz, select channels 50-66 (this corresponds to channel 58)
A router in the arena with free movement
We create exclusively at the frequency of 5 GHz, as the helmet perceive the network of this frequency better.
We set networks (names/access) in the 2.4 GHz and 5GHz bands. In the Wireless Network Settings, связанныеdisable сSmart Connect, disable the 2.4 GHz network, and set the following parameters for the 5 GHz network
1) disable all settings related to MU-MIMO, DL/UL OFDMA
2) скачиваемdownload программуthe Wi-Fi Analyzer наprogram on your Android телефонphone иand просматриваемwatch эфирthe 5 ГГцGHz наbroadcast занятостьon каналовthe busy channels
3) распределяемwe диапазоныdistribute поthe свободнымranges каналам.to Какfree правило,channels. следующимAs образом:a rule, as follows:
наAдиапазонchannel5GHzwidthставитсяofширина20каналаMHz80isМГц,setвыбираютсяforканалыthe50-66Arena,(этоandсоответствует каналу 58)
Роутер на арене со свободным передвижением
Создаем исключительно на частоте 5 ГГц, так как шлема воспринимают сеть данной частоты лучше.
Задаём сети (названия/доступ) в диапазонах 2.4 ГГц, 5GHz. В Настройках беспроводной сети отключаем Smart Connect, отключаем сеть 2.4 ГГц и задаём следующие параметры для сетиthe 5 GHz
1)band отключаемis всеselected настройки,in связанные с MU-MIMO, DL/UL OFDMA
2) скачиваем программу Wi-Fi Analyzer на Android телефон и просматриваем эфир 5 ГГц на занятость каналов
3) распределяем диапазоны по свободным каналам. Как правило, следующим образом:
на Арену ставится ширина канала 20 МГц, выбирается диапазон 5 ГГц в каналахchannels 34-50 (вinроутереtheэтоrouter,соответствуетthisканалуcorresponds to channel 42).
Установка VPN На роутер (только для арены)
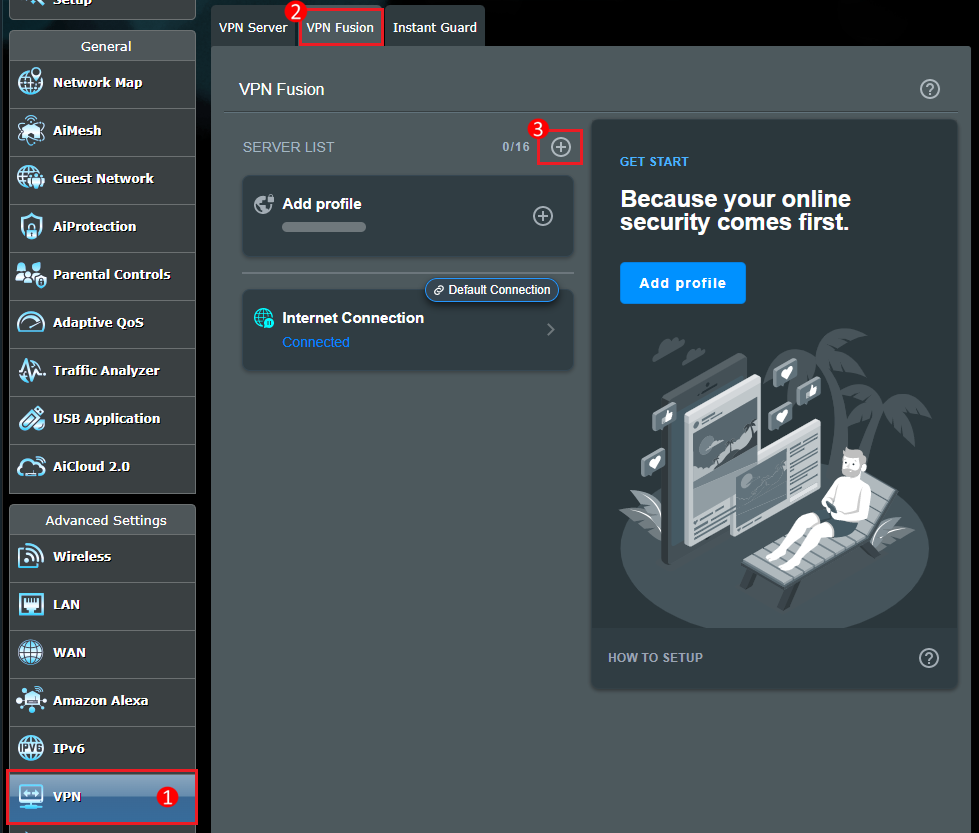
ОткройтеOpen вкладкуthe [VPNVPN]] tab > закладкуthe [VPN Fusion] tab > НажмитеClick наon значокthe icon 
дляto созданияcreate новогоa профиля.new profile.
Выберите пунктSelect OpenVPN дляto созданияcreate профиляa VPN-клиента,VPN выберитеclient типprofile VPN-соединения.and select the type of VPN connection.
ПримечаниеNote: типыThe соединенияconnection VPN-сервераtypes иof VPN-клиентаthe должныVPN совпадать.server and VPN client must match.
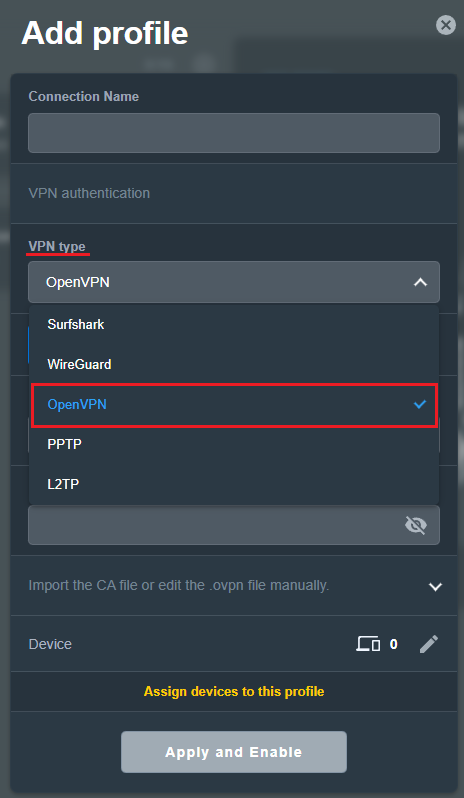
ВведитеEnter информациюinformation оabout VPN-сервереthe вVPN настройкахserver VPN-клиента.in the VPN client settings.
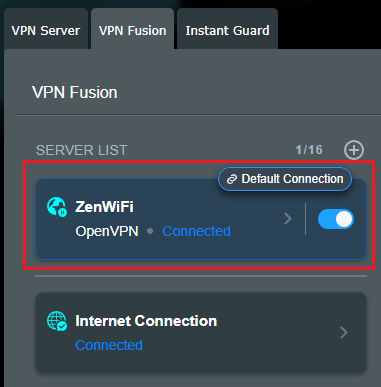
(1) НазваниеConnection подключения:Name: придумайтеcome названиеup профиляwith будущегоa соединенияname for the future connection profile (напримерfor example, "ZenWiFi")
(2) Импортируйте файл с расширением .ovpn: Выберите [ Import .ovpna file with the .ovpn extension: Select [Import. ovpn file ] иand выберитеselect файлthe сfile расширениемwith the extension .ovpn provided by the VPN service provider. Wait until .ovpn, предоставленный поставщиком VPN-сервиса. Дождитесь появления надписи “Complete” (Завершено).appears.
(3) ИмяUser пользователяname (опция)optional):введитеenter информацию,the предоставляемуюinformation VPN-сервером.provided by the VPN server.
Пароль(опция)Password(optional):введитеenter информацию,the предоставляемуюinformation VPN-сервером.provided by the VPN server.
(4) ВыберитеSelect [Apply and Enable ]to (Применитьcomplete иthe запустить)configuration дляof завершенияthe настройкиVPN профиляclient VPN-клиентаprofile иand запускаstart соединенияthe сconnection VPN-сервером.to the VPN server.

ЕслиIf появитсяthe надписьfollowing message appears [Подключено]Connected], тоthen этоthis означает,means чтоthat the OpenVPN -connection соединениеhas успешноbeen установлено.successfully established.