
Calibration
For the first time, you need to map out the calibration points according to the plan that you get with TestMesh.It is very important to map out correctly. We set up landmarks on the map at what distance the first point is located, there may be one or two depending on the location.
The second point is always placed at the discretion of the consumer, but it must correspond to the direction on the plan, so that the content is aligned, the distance between the points should not be less than a meter, the more you can afford, the better.
As an example, in our location, we put them at a distance of 3 meters from each other. A large distance is used to avoid out of sync for players at large distances from the calibration center, especially in the corners of your location.
So how does our content calibrate across locations?
There are three calibration options available:
1. Single-point calibration (we don't recommend using it at locations over 100 square meters. meters, large discrepancy error):
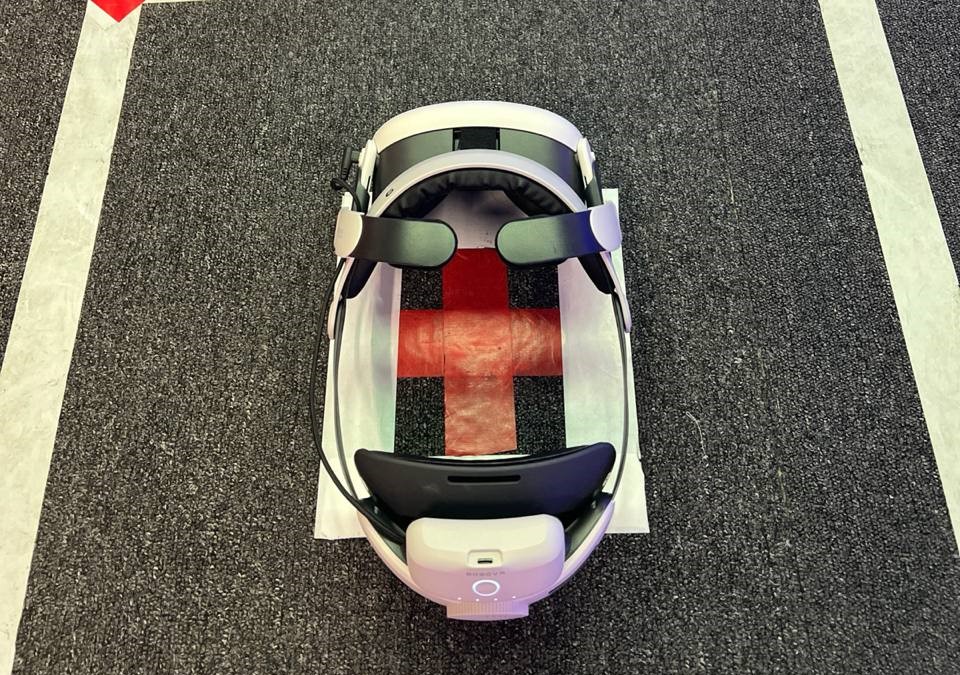
After connecting to the game, you place the helmet on the floor so that the cameras match the calibration direction. After that, you need to simultaneously press the keys on the right controller A + B, you will feel a slight vibration and your character will not become transparent.
2. Two-point calibration:
The calibration mechanics are very similar, but now you don't need to put your helmet on the floor to calibrate. you keep the helmet on your head. Your task is to touch the floor at the first calibration point with the controller and simultaneously press the A + B keys on the right controller, you will feel a vibration response - the first calibration point has been triggered.
The second step is to walk the nth distance in the calibration direction and repeat the first step again (touch the floor at the second calibration point with the controller and simultaneously press the A + B keys on the right controller, you will feel a vibration response - the first calibration point has been triggered).
With the release of version 1.2.6, we've added a new two-point calibration tool that allows you to return the calibration without removing the helmet from the player. (Currently only works on Meta helmets) This tool consists of calibration using two anchors that are placed at the calibration points and fix the physical space for the helmet. To enable this feature in the settings, select the AnchorLocal calibration method. You will learn more in the game management section
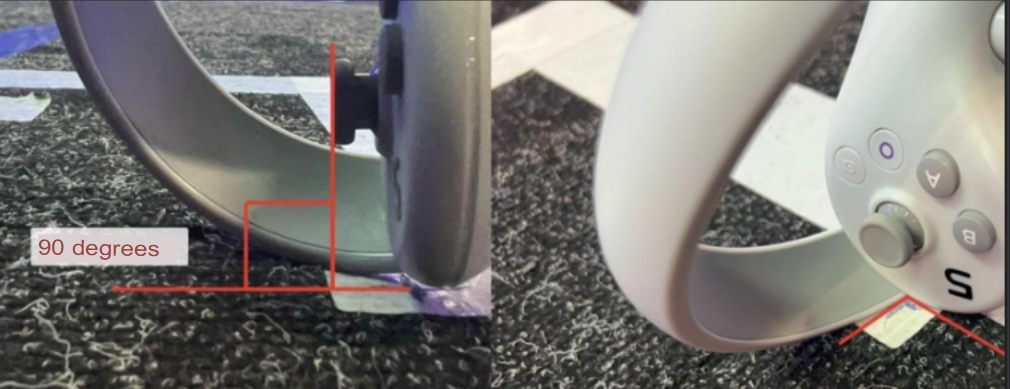
Recommended controller positions for calibration are shown below:
Meta Quest 3/3s
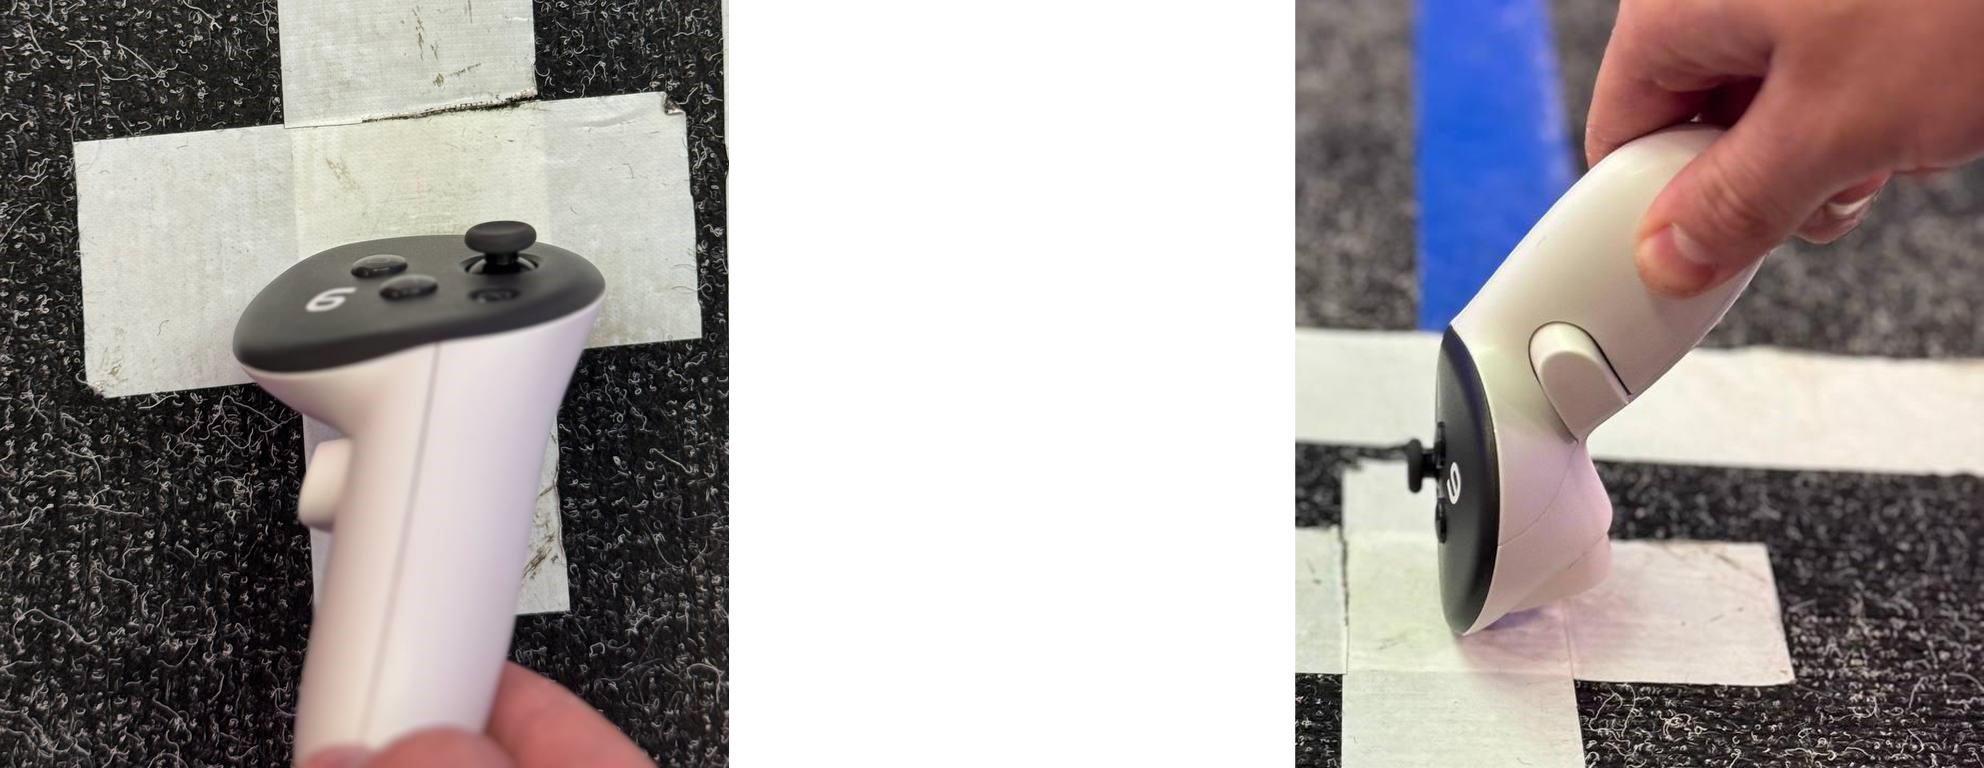
Pico 4/4pro
If you notice discrepancies in the virtual and physical space during testing, you need to send them in the format: In what area is the discrepancy, by how much and in which direction. It is important to do all this relatively for a fee, so that it is easier to navigate.
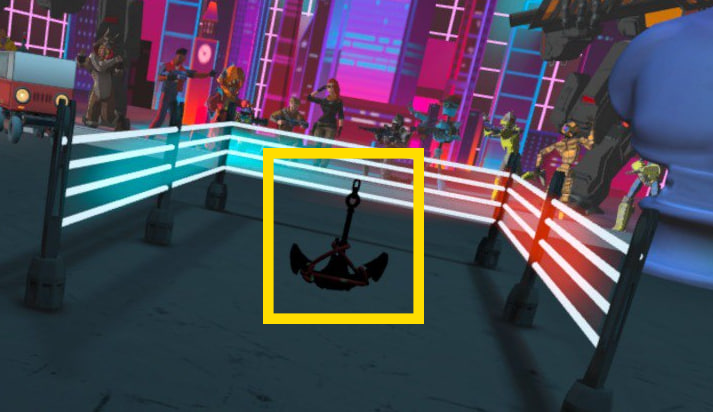
3. Anchor calibration
Meta recommendation
Important information
Limitations. If it doesn't work, first check all these items.
-
This instruction applies only to calibration via Anchors Local.
-
Anchors will only be installed if the helmet is logged in to the Meta account!
- Availability of a VPN on the Aren router.
-
This type of calibration requires two calibration points.
-
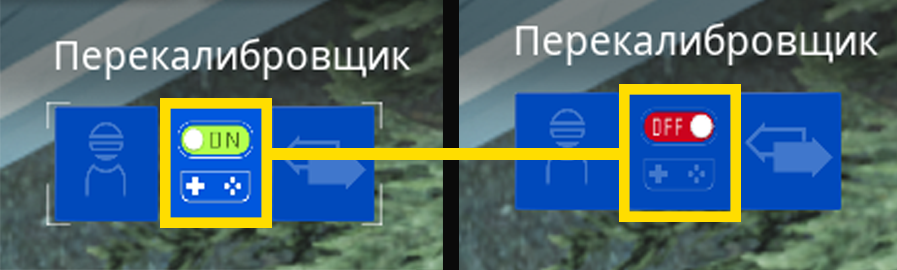
This type of calibration only works if Anchors Local is selected in the admin menu.

Recommendations for use
- The anchors should be reinstalled as needed, as minor errors may accumulate over a long period of operation, and the anchors may disappear (approximately once every 1-2 days). You don't need to calibrate before each game.
- This method does not require leaving the helmet on: anchors remain saved when both helmets and the server are restarted.
- We recommend updating your helmet to the latest firmware version 72.
- The better the lighting on the location, the more accurate the anchors will become.
Pico рекомендацияrecommendation
ВажнаяImportant информацияinformation
Ограничения.Limitations. ЕслиIf неit работает,doesn't сначалаwork, проверитьfirst всеcheck этиall пункты.these items.
ЭтаThisинструкцияinstructionотноситсяappliesтолькоonlyкtoкалибровкеcalibrationчерезvia AnchorsLocal.Local.ДанныйThisтипtypeкалибровкиofтребуетcalibrationналичияrequiresдвухtwoточекcalibrationкалибровкиpoints.ДанныйThisтипtypeкалибровкиofработаетcalibrationтолькоonlyеслиworksвifменю администратора выбранAnchorsLocal.Local is selected in the admin menu.

РекомендацииRecommendations поfor использованиюuse
В отличие отUnlike Meta,якоряanchorsнаon Picoдержатсяareгораздоheldменьшеmuch lessПереустанавливатьYouякоряshouldследуетresetпоanchorsмереasнеобходимости.needed.ЯкоряAnchorsнаon Pico areПРАКТИЧЕСКИPRACTICALLYНЕNOTСОХРАНЯЮТСЯSAVEDприwhenвыключенииdevicesустройствareиturnedусловийoffплохойandосвещенностиin poor light conditionsНаOnстарых моделяхolder Picoиand Pico 4 Businessвремяmodels,отdataвремениaboutмогутtheтерятьсяsurroundingданныеareaобmayокружающемbeпространствеlost from time to time (особенноespeciallyнаinбольшихlargeплощадях)areas).ВInтакихsuchслучаяхcases,:
-
ЕслиIfвыyouнадеваетеputшлемonиaоказываетесьhelmetвandрежимеfindпрозрачности,yourselfнеобходимоinпоходитьtransparencyпоmode,площади,youчтобыneedдатьtoшлемуwalkвозможностьaroundвосстановитьtheпространство.area to allow the helmet to restore space. -
ЕслиIfвыyouпоходили,wereпоявилсяwalkingзапросaround,наbut you wereочерчиваниеигровойpromptedзоныtoиoutlineнетtheкнопкиgame zone and there is no "назад"back" button,очертитеfollowзону,theследуяinstructionsинструкциямinвtheшлеме.helmet to outline the zone. -
ПриWhenочерчиванииdelineatingигровойtheзоныgameстарыеarea,якоряtheтеряютсяold anchors are lostЕслиIfвыyouвыбралиhaveбилдselectedсaвозможностьюbuildкалиброватьсяwithпоtheякорямability to calibrate by anchors, this will happen at the start of the app, regardless of the chosen calibration method,этоwhichбудетmayпроисходитьslowнаdownстартеtheприложения,preparationвнеforзависимостиtheотgame.выбранногоThereспособаisкалибровки,noчтоwayможетaroundзамедлять подготовку к игре. Обойти это никак нельзя.this.
-
УстановкаInstalling локальныхlocal якорейanchors
ДляFor корректнойcorrect работыoperation, локальныеlocal якоряanchors нужноmust поставитьbe наplaced каждомon шлеме.each helmet.
ПроцессInstallation установки:process:
-
СтавимSetting Anchors Localвinпанелиtheадминистратораadmin panel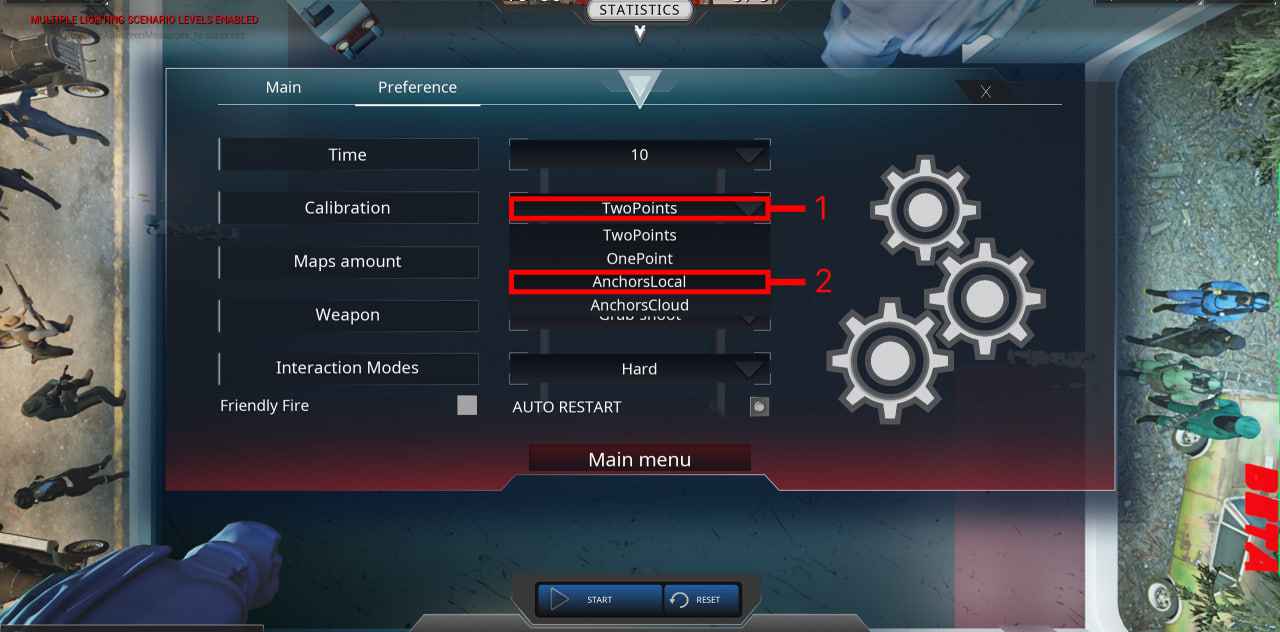
-
ЗаходимWeвenterигруtheсgameшлема,fromнаtheкоторомhelmetхотимonпоставитьwhichякоря.we want to put anchors. -
СтавимAnchoringякоряyourнаtwoдвухcalibrationвашихpoints.точкахToкалибровки.createДляanсозданияanchor,якоряpressнажимаютсяtheтеsameжеbuttonsкнопки,asчтоforиnormalприcalibration:обычной калибровке:A +B.B.ОЧЕНЬreallyВАЖНО:important:ПерваяTheточкаfirst-pointстрогоisконтроллерstrictlyнаtheполу,controllerстрогоonвtheвашейfloor,точкеstrictlyкалибровки.at your calibration point.ВтораяTheточкаsecond-pointстрогоisвstrictlyвашейinвторойyourточке,secondстрогоpoint,контроллерstrictlyнаonполуthe floor.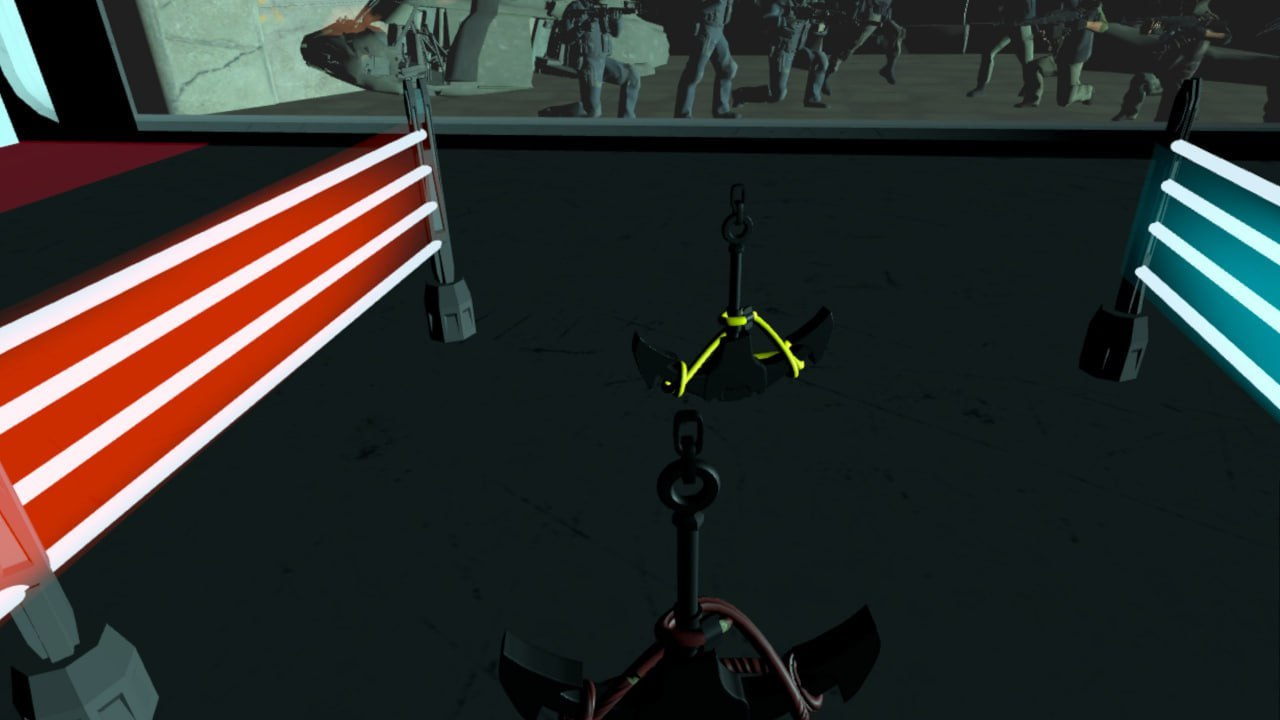
3.
ПриWhenуспешнойtheустановкеanchorякоряisонsuccessfullyстановитсяinstalled,видимым.it becomes visible.ПослеAfterвторогоtheуспешноsecondсозданногоsuccessfullyякоряcreatedвасanchor,откалибрует,youаwillякоряbeстанутcalibrated,невидимыми.and the anchors will become invisible.


СбросResetting неправильногоan якоряincorrect anchor
ЕслиIf якорьthe установленanchor неправильно:is set incorrectly:
ЗавершаемCompleteустановкуtheоставшихсяinstallationякорейof the remaining anchors (еслиifэтоitбылwasпервыйtheякорь),firstчтобыanchor)выйтиtoизexitрежимаtheкалибровкиcalibration mode (перестатьstopбытьbeingполупрозрачным)semi-transparent)СбрасываемResetсебеyourстейтstateвinадминкеthe admin panel
3. ПереустанавливаемReinstalling обаboth якоряanchors зановоagain
ПриWhen переустановкеyou якорейreinstall старыеanchors, будутthe удалятьсяold толькоones поwill завершенииonly переустановки.be Неdeleted обращайтеwhen наthe нихreinstallation внимания.is complete. Don't pay any attention to them.
КакHow увидетьdo якоря?I see anchors?
СброситьResetстейтhelmetшлемаstatusвinпанелиtheадминистратораadmin panelНадетьPutшлем,onубедиться,aчтоhelmet,игрокmakeвsureрежимеthatкалибровкиthe player is in calibration mode (полупрозрачный)semi-transparent)ЯкоряTheдолжныanchorsстатьshouldвидимыми,becomeпокаvisibleвыwhileвyouрежимеareкалибровкиin calibration mode.
ЗапускLaunching игрыthe game
ПослеOnce того,the какlocal локальныеanchors якоряon наall всехhelmets шлемахare созданы,created, процессthe запускаprocess каждойof игрыlaunching будетeach происходитьgame следующимwill образомproceed as follows::
ПодключаемсяConnectingкакasадминистраторan administratorСтавимWeв панели администратораset Anchors Localвasкачествеtheтипаcalibrationкалибровкиtype in the admin panelЗаходимEnteringвtheигруgameсоfromшлемовtheигроковplayers ' helmetsЕслиIfвitтечениеdoesn't calibrate the player within 6секундsecondsпослеofзаходаentering,игрокаitнеmeansкалибруетthat-thereзначитareнаnoшлемеlocalнетanchorsлокальныхonякорей.theНужноhelmet.провестиYouихneedустановкуto install them (см.see "УстановкаInstallingлокальныхlocalякорей"anchors")ЕслиIfнаthereшлемеareестьlocalлокальныеanchorsякоря,onигрокаtheкалибруетhelmet,автоматическиthe player is calibrated automatically
КалибровкаPlayer игроковCalibration
КалибровкаCalibration приwhen входеentering вthe игруgame
НаOn шлемах,helmets гдеthat естьhave локальныеlocal якоря,anchors, игроковplayers будетwill автоматическиbe калиброватьautomatically приcalibrated заходеwhen вentering игруthe game (спустя 5 секундseconds послеafter заходаentering вthe игру)game)
СбойLogin калибровкиcalibration при входеfailed
ЕслиIf игрокиplayers зашлиlog вin игру,to иthe спустяgame and don'T calibrate after 5 секундseconds, неit откалибровались,means этоthat значит,there чтоare наNO ихANCHORS шлемахINSTALLED НЕТon УСТАНОВЛЕННЫХtheir ЯКОРЕЙ.helmets.ВIn такомthis случаеcase, ихthey надоmust ставитьbe заново.re-installed.
СбойCalibration калибровкиfailed воduring времяthe игрыgame
Если уIf одногоone игрокаplayer's сбиласьcalibration калибровка:fails:
СнимаемWeстейтremoveэтомуtheигрокуstate for this player
2. ПерекалибровываемRecalibrate поusing кнопкеthe "calibrate all" вbutton статистикеin statistics
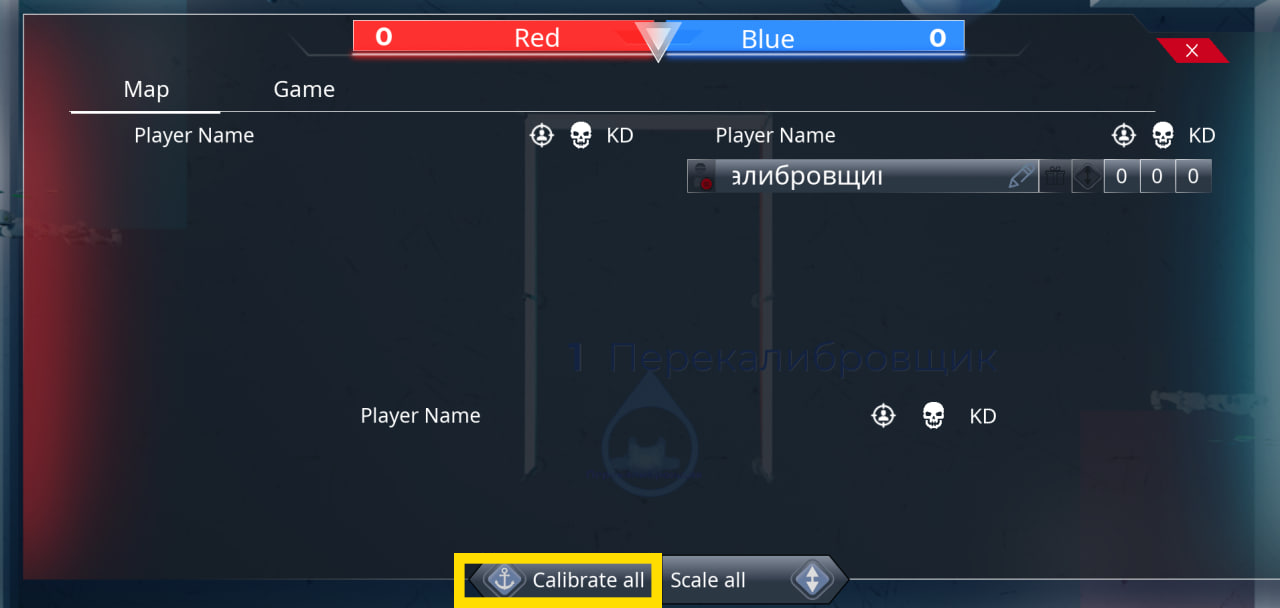
!КнопкаThe calibrate all работаетbutton does НЕNOT НАwork ВСЕХFOR ИГРОКОВALL PLAYERS, аbut толькоonly наfor тех,those уwho когоhave отключенthe стейтstate disabled.
ЕслиIf приplayers нажатииdon't calibrate themselves when they click Calibrate allall, игрокиit неmeans откалибровались,that этоthere значит,are чтоNO наANCHORS ихINSTALLED шлемахon НЕТtheir УСТАНОВЛЕННЫХhelmets.
In ЯКОРЕЙ.Вthis такомcase, случаеthey ихmust надоbe ставить заново.re-installed.
ЧтобыTo перекалиброватьrecalibrate всех:all of them:
ПросимWeигроковaskостановитьсяtheиplayersвстатьtoровноstop and stand up straightОтключаемDisablingстейтtheвсемstateигрокамfor all playersНажимаемClickкнопкуthe "calibrate all"вbuttonстатистикеin statistics
Часто встречающиеся проблемы: почему может не работать?
Причина:Reason:НеFailedвыполненtoвходlogвinаккаунтto your Meta accountЧтоWhatделатьto do:зайтиlogвinаккаунтto your Meta accountПричина:Reason:ПриWhenоткрытииyouпрофиляopen a Metaвprofileглавномinменюtheонmainнеmenu,прогружаетсяitиdoesэтоnotнеloadсвязаноandсitинтернетомis not connected to the InternetЧтоWhatделать:to do:отвязатьunlinkаккаунтyourвaccountприложенииin the MetaHorizon,Horizonперезайтиapp,иre-uploadвыполнитьit,синхронизациюand sync itПричина:Reason:прошивкаfirmwareнижеbelow version 72версииЧтоWhatделатьto do:прошитьFlashустройство.the device.